INSTALLING THE ARDUINO IDE
The Arduino IDE is easy to use, making it one major reason for the Arduino’s great popularity. It is available for Windows, Mac, and Linux computers, and it programs the Arduino over a USB connection without any need for special programming hardware.
NOTE
You will need an Internet connection to download the Arduino IDE, so do this before you start hearing about zombies on the news!
To install the Arduino IDE for your platform, download the software from the Arduino site at http://www.arduino.cc/ (click Download at the top and install the version that’s appropriate for your system). Then follow the instructions from the Getting Started link. Windows and Mac users will need to install USB drivers for the Arduino IDE to be able to communicate with the Arduino.
Once you have everything installed, run the Arduino IDE. Figure C-2 shows the Arduino IDE window with some code in it.
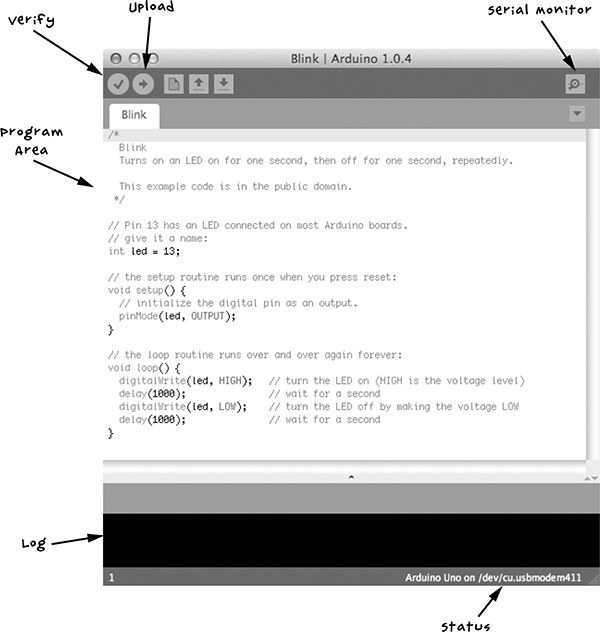
Figure C-2: The Arduino IDE window
The Upload button, as the name suggests, uploads the current sketch to the Arduino board. Before uploading, however, it converts the textual programming code into executable code for the Arduino and displays any errors in the Log area. The Verify button checks the code for errors without uploading the program to the board.
The serial monitor button opens the serial monitor window, which is used for two-way communication between the Arduino and another computer, as in “Project 13: A Raspberry Pi Control Center” on page 140. You can type in text messages to send to the Arduino, and you should see any responses that come back in the same window. The Status area at the bottom of the screen gives information on the type of Arduino you’re using and the corresponding serial port that will be programmed when the Upload button is pressed. The Status area in Figure C-2 also shows the type of port you would expect to see when using a Mac or Linux computer (something like /dev/cu.usbmodem411). If you’re using a Windows computer, this will display COM followed by a number.
The large, white area of the IDE is the Program Area, where you type the program code you want uploaded to the Arduino.
The File menu allows you to Open and Save sketches as you would in a word processor, and it has an Examples submenu from which you can load example sketches.
UPLOADING A SKETCH
To test out your Arduino board and make sure the Arduino IDE is properly installed, click File ▸ Examples ▸ 01. Basics to open the example sketch called Blink (shown in Figure C-2).
Use a USB cable to attach your Arduino to your computer. The power LED of the Arduino should light up as it’s plugged in, and a few other LEDs should flicker as well.
Now that the Arduino is connected, you need to tell the IDE the type of board being programmed and the serial port it’s connected to. Set the board using the menu Tools ▸ Board and then select Arduino Uno from the list of boards.
Set the serial port using the menu Tools ▸ Port. If you’re using a Windows computer, you probably won’t have many options there; you may find only the option COM4. On a Mac or Linux computer, there are generally more serial connections listed, many of which are internal devices, and it can be difficult to work out which one refers to your Arduino board.
Usually, the correct port is one that starts dev/ttyusbmodemNNNN, where NNNN is a number. In Figure C-3, the Arduino attached to my Mac has been selected.
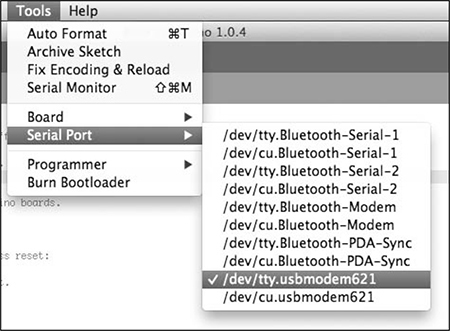
Figure C-3: Selecting the Arduino serial port
If your Arduino doesn’t show up in the list, this usually means you have a problem with the USB drivers, so try reinstalling them. If you’re a Windows user, try rebooting.
You should now be ready to upload the sketch to the Arduino, so press the Upload button. Messages should appear in Log area, and then the TX and RX LEDs on the Arduino should flicker as the program is uploaded onto the board.
When the upload is complete, you should see a message like the one shown in Figure C-4.

Figure C-4: A successful upload
The Done uploading message tells you that the sketch has uploaded, and the last line in the console tells you that you’ve used 1,084 bytes of the 32,256 bytes available on your Arduino.
Once the sketch is uploaded, the built-in L LED on the Arduino should blink slowly on and off, which is just what the Blink program is expected to do.
INSTALLING THE ANTIZOMBIE SKETCHES
All the sketches for the book are available via the book’s website (http://www.nostarch.com/zombies/). Click on the Download Code link to download a ZIP file called zombies-master.zip. Make sure to do this before the apocalypse begins, because your broadband is likely to be a low priority once the infection has begun to spread. This folder will contain all the Arduino and Raspberry Pi programs for the projects in this book.
Install the Arduino sketches so that you can use them directly from your Arduino IDE by copying the subfolders from the Arduino folder into Documents/Arduino folder for Mac and Linux users and My Documents\Arduino for Windows users. Exit and reopen the Arduino IDE. Now when you view File ▸ Sketchbook, you should find all the book’s sketches listed.
ARDUINO PROGRAMMING BASICS
This section contains an overview of the main Arduino programming commands to help you understand the sketches used to do with zombies. If you’re interested in learning the Arduino C programming language, consider getting a copy of my book Programming Arduino: Getting Started with Sketches (Tab Books, 2012). The technical reviewer for the book you’re reading now (Jeremy Blum) has also written a very good book on Arduino and has produced a superb series of video tutorials. You can find links to all this from his website (http://www.jeremyblum.com/).
STRUCTURE OF AN ARDUINO SKETCH
All Arduino sketches must have two basic functions (units of program code that perform a task): setup and loop. To see how they work, let’s dissect the Blink example that we looked at earlier.
int led = 13;
// the setup routine runs once when you press reset
void setup() {
// initialize the digital pin as an output
pinMode(led, OUTPUT);
}
// the loop routine runs over and over again forever
void loop() {
digitalWrite(led, HIGH); // turn the LED on (HIGH is the voltage level)
delay(1000); // wait for a second
digitalWrite(led, LOW); // turn the LED off by making the voltage LOW
delay(1000); // wait for a second
}
Your Blink sketch might be slightly different if you have a newer version of the Arduino IDE, so for the purposes of this discussion, refer to the sketch printed here rather than the one loaded in your IDE.