Just cut off one side of the bin so the zombies can see and hear the distractor, affix the project itself to the lid, and snap the bin on top, upside down. Attach this box to a lever and pulley system, and you could even lower it to the ground from the safety of your base, creating a new sport: zombie fishing. Who says you can’t have fun during an apocalypse?
Of course, the sound and movement distractor has many practical postapocalyptic uses, too:
• Place it opposite the most vulnerable point in your stronghold to draw away attacking zombie hordes and give you time to reinforce your bunker.
• Plant it by your zombie pit to draw them into the trap.
• Sneak it into your neighbor’s yard to thin out the competition for survivor salvage.
In case you want to find other survivors (whether to join forces or avoid them), in the next chapter, we’ll look at using wireless technology to communicate.
10
COMMUNICATING WITH OTHER SURVIVORS

In Chapter 1, we discussed the pros and cons of teaming up with other humans when zombies walk the Earth. Associating with other people can certainly be worthwhile: you can protect each other, share knowledge, pool resources, and so on. Of course, they can also take your stuff and put you between themselves and the oncoming zombies. If you decide to take the risk and reach out to your fellow life forms, then build the projects in this chapter.
First, we’ll build a beacon to broadcast a voice signal that can be heard on an FM radio, so any survivors scanning the airwaves can hear your message, whether that’s “Stay away!” or “Help, I’m trapped on the roof of a shopping mall!” After that, you’ll also build a Morse code flasher that will blink out any message you care to translate into dots and dashes.
Of course, if you want to be the one scanning frequency bands, this chapter also explains how to hack a radio receiver to search for a signal. Then, you can lurk silently while you decide whether what’s out there is worth broadcasting to (see Figure 10-1).

Figure 10-1: Zombies like the radio too.
PROJECT 17: A RASPBERRY PI RADIO TRANSMITTER BEACON
The Raspberry Pi is a versatile device that can, given the right software, act as an FM radio transmitter. The only extra hardware you’ll need is a length of wire to act as an antenna.
WHAT YOU WILL NEED
This is another Raspberry Pi project, so you will need to have a working Raspberry Pi system complete with keyboard, mouse, and screen as described in Chapter 5. Once the program that transmits the radio signal is up and running, you can turn off the screen to save power if you wish.
RADIO TRANSMITTER LEGALITY
If you’re reading this after the zombie apocalypse, there will be no legal problems with building a transmitter because there won’t be any government to enforce the regulations. If, however, you are building in preparation, then the legality of the transmitter in this project is covered by the same legislation as FM transmitters designed to be connected to an MP3 player for car audio.
These transmitters are legal in the United States if the effective range is 200 feet (60 m) or less. If you use a full-length antenna, this transmitter will have a longer range than that, so to stay within the law, use a small antenna of about 3 or 4 inches (7 to 10 cm).
Regulation of the airwaves is necessary so the frequencies used by emergency services stay clear, but this transmitter uses only the public broadcast FM wave band. The worst that can happen is one of your neighbors receives your broadcast instead of their favorite radio station.
To build this radio transmitter, you’ll need the following parts:
ITEMS
NOTES
SOURCE
Raspberry Pi 2, Model B or B+
Adafruit (2358), Fry’s (8258726)
Female-to-female jumper wire
Adafruit (826)
About 3 feet (1 m) of wire
Any wire will do for the transmitter; just check your box of scavenged hookup wire for something that will fit into the end of the female-to-female jumper wire.
You could add the radio transmitter to your existing Raspberry Pi setup. However, for maximum transmission range, you’ll want to put the transmitter somewhere high up, so I recommend getting a second Pi.
The length of the jumper wire doesn’t matter; it just allows an easy connection between the Raspberry Pi GPIO pin and the antenna wire. The wire to use for the rest of the antenna should be the right size to poke into one end of the female-to-female jumper wire and stay there. You might need to put a kink in the antenna wire so that it stays in place.
CONSTRUCTION
To build your transmitter, all you need to do is plug one end of the jumper wire onto GPIO pin 4 of the Raspberry Pi (Figure 10-2), then plug the antenna wire into the other end of the jumper wire and fix the other end of the antenna to a high spot so that the antenna is pulled up vertically.
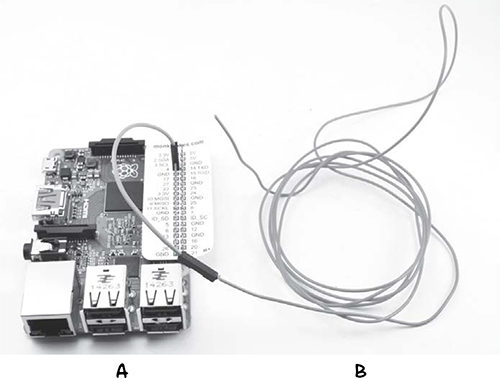
Figure 10-2: Attaching the antenna
You will get the longest transmission range if you place the whole Raspberry Pi up high. If you have a watchtower, this would be ideal.
It does not matter if the antenna wire is not very straight. You may find that some electrical tape wrapped around the junction of the antenna wire and the jumper wire will prevent the antenna from becoming detached. Once you’ve strengthened the antenna, you’ve built your radio transmitter beacon!
SOFTWARE
I wish I could claim credit for the wonderful piece of software you’ll use in this project, but as it was developed by those clever folk at the Imperial College Robotics Society, I can’t. You can find out all about their project at http://www.icrobotics.co.uk/wiki/index.php/Turning_the_Raspberry_Pi_Into_an_FM_Transmitter.
The software uses a sound file to oscillate GPIO pin 4 in just the right way to generate an FM carrier wave and signal (see the box on frequency modulation).
To install the software, start an LXTerminal session on your Raspberry Pi and type the following commands:
$ mkdir pifm
$ cd pifm
$ wget http://www.icrobotics.co.uk/wiki/images/c/c3/Pifm.tar.gz
$ tar -xzf Pifm.tar.gz
These commands create a directory ready to install the software, download the software using the wget utility, and then uncompress the downloaded file into the newly created directory.
USING THE FM TRANSMITTER
To test out the FM transmitter, you need an FM receiver (see “Project 18: Arduino FM Radio Frequency Hopper” on page 188). You also need to find an unused frequency, or at least a frequency with only a faint signal. Of course, this won’t be a problem following the apocalypse, but it’s more of a challenge with the crowded preapocalypse airwaves. Use your FM receiver to find a quiet part of the spectrum and make a note of the frequency.
The software you installed includes a sound sample of the Star Wars theme for testing the transmitter before you record your own, more appropriate message—although the music is not completely inappropriate to accompany humanity’s great battle to save itself.