To begin, we define a constant integer array, flashPins:
const int flashPins[] = {7, 6, 5};
The flashPins array defines the Arduino pins used to trigger each of the flash modules. Change these pin numbers if your relay shield uses different pins to control the relays.
Next, we define two more constants, which you can alter to adjust the zombie distractor:
const long overallDelay = 20; // seconds
const long delayBetweenFlashes = 1; // seconds
The overallDelay constant determines how many seconds elapse between each flashing cycle. This value is set to 20 seconds by default. Note, this delay needs to be long enough to enable the capacitor inside the camera to recharge.
The delayBetweenFlashes value sets the gap between each of the flashes being triggered in a cycle. This is set to one second by default. Note that both constants are long rather than int. That’s because int constants have a maximum value of +/–32,767, which would give a maximum delay of 32.767 seconds; that might not be long enough to keep a zombie distracted while you escape. Fortunately, the long data type has a maximum value of over +/–2,000,000. You can run a long way in 2,000 seconds!
Now we add a setup function:
void setup()
{
pinMode(flashPins[0], OUTPUT);
pinMode(flashPins[1], OUTPUT);
pinMode(flashPins[2], OUTPUT);
}
The setup function sets all the relay pins to be digital outputs.
With the pinMode functions in place, we add a short loop function:
void loop()
{
flashCircle();
delay(overallDelay * 1000);
}
This loop function calls the flashCircle function and waits for overallDelay seconds before starting the whole process again.
Let’s look at the flashCircle function definition now:
void flashCircle()
{
for (int i = 0; i < 3; i++)
{
digitalWrite(flashPins[i], HIGH);
delay(200);
digitalWrite(flashPins[i], LOW);
delay(delayBetweenFlashes * 1000);
}
This function loops over the flash pins and gives each a HIGH pulse for 200 milliseconds, setting off the flash. There is then a pause before the next flash, set by delayBetweenFlashes. The value of delayBetweenFlashes is multiplied by 1,000 because in Arduino, the delay function’s parameter is in milliseconds.
USING THE FLASH DISTRACTOR
Before you tape together all the parts of the flash distractor, test it with the parts laid out as shown in Figure 9-3. Turn on the flash switches of each camera and attach the 9V battery to the battery clip. The flash units should flash in turn, before pausing for 20 seconds and then repeating the cycle.
When you know your Arduino can activate the flashes, tape everything together, or if you prefer, stick the cameras together with a hot glue gun. Make sure to leave yourself access to the cameras’ battery compartments so you can change the batteries.
The small 9V battery that powers the Arduino will probably last about four or five hours. If you need to power the distractor for longer, then Figure 9-10 shows some other options.
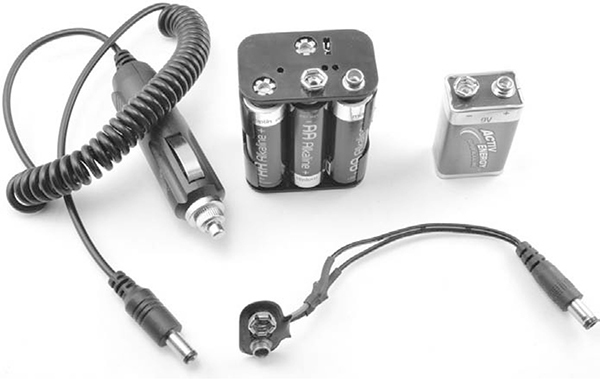
Figure 9-10: Options for powering the Arduino
A 6 × AA battery holder will last around 10 times as long as the PP3 9V battery, but for the ultimate battery duration, you can use one of your car batteries with the cigarette lighter–to–barrel jack adapter shown on the left of Figure 9-10. However, the AA batteries in the cameras won’t last more than a few hundred flashes before they need replacing, so if you plan to reuse your distractors—as you might if you’re in a zombie-rich neighborhood—keep an extra set of batteries on you.
I suggest you stockpile a few flash distractors and always keep one complete unit in your bag when you venture out for supplies or reconnaissance. Then, if there’s a mob of zombies between you and that grocery store you want to scavenge from, just set up the distractor, wait out of sight as it draws the zombies, and when the coast is clear, make a stealthy dash for the doors.
You might want to use the flash distractor in combination with the next project to maximize your ability to distract the undead.
NOTE
This project has no on/off switch, so when you are not using it, unplug the 9V battery and turn off the flash switches on the cameras. You could also use an in-line power switch like this: https://www.adafruit.com/products/1125/.
PROJECT 16: ARDUINO MOVEMENT AND SOUND DISTRACTOR
Remember the smoke alarm that we used to make “Project 11: Quiet Fire Alarm” on page 120? In this project, we’ll use the piezo buzzer we removed from that smoke alarm, along with a waving flag powered by a servo motor, to make a lot of distracting noise and movement.
Figure 9-11 shows the project in action. Next to the project, I’ve shown a coiled cigarette lighter adapter, which you can use as an alternative to the AA battery pack if you want to power the setup from a car battery for long-term usage.
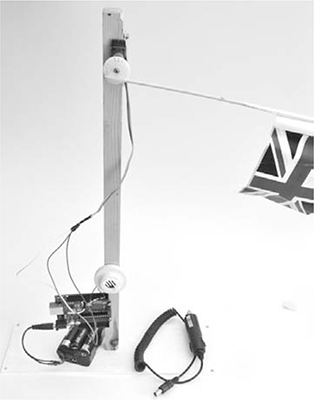
Figure 9-11: Sound and movement in disharmony
WHAT YOU WILL NEED
To make this project, you will need the following parts:
ITEMS
NOTES
SOURCE
Arduino Uno R3
Adafruit, Fry’s (7224833), Sparkfun
9V battery pack
Adafruit (248)
DC power jack-to-9V battery clip adapter
Adafruit (80), eBay
3 long male-to-male jumper wires
Adafruit (760)
2W or 1/4W
Mouser (594-5083NW100R0J or 293-100-RC)
2-way pin header
Adafruit (392), eBay
Small or standard
Adafruit (155 or 196), eBay, hobby store
Discarded from the smoke detector of Project 11 or another high-volume buzzer
Security store, smoke alarm