In the LXTerminal, issue the following command to play the tune over your transmitter:
$ sudo ./pifm sound.wav 103.0
In place of 103.0, substitute the frequency that your radio receiver is tuned to.
RECORDING A MESSAGE
To record a message, you’ll need a laptop and some sound-recording or editing software. I recommend Audacity, which is available free for Windows, OS X, and Linux from http://audacityteam.org/.
Fiction and history both tell us that when law and order disintegrate, bad behavior often follows. So think long and hard about what you want to say in your message. Who knows what gun-toting, supply-stealing outlaws are lurking around the corner? You’ll probably want to direct new arrivals somewhere you can observe them before lowering your defenses, so bear this in mind when recording your broadcast.
The pifm software requires you to record your message with the sample rate set at 16 bit 44.1kHz and then export the message as a WAV file. In the software, change sound.wav to the name of your new sound file, say my_message.wav.
FREQUENCY MODULATION
Frequency modulation, or FM as it is nearly always called, is a way of encoding a signal (in this case a low-frequency sound signal) on a much higher carrier frequency. The sound signal nudges the carrier frequency higher or lower than the carrier frequency, depending on the level of your message signal’s waveform.
Figure 10-3 shows two cycles of the message signal (solid line) superimposed on the much higher frequency carrier to create the broadcast signal (dotted line), whose frequency changes as your message signal changes.
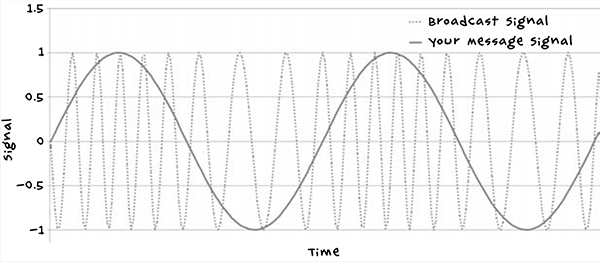
Figure 10-3: Frequency modulation
When the signal is at its maximum, the peaks of the dotted broadcast signal are closest together. That means the frequency is higher than average. At the bottom of the waveform, when the signal has its minimum value, the broadcast signal peaks are farthest apart (the frequency is lower than average).
In this way, the low-frequency sound wave is encoded onto the high-frequency carrier wave. When this signal gets to an FM radio receiver, the circuitry in the receiver extracts the original low-frequency audio from the carrier signal.
RUNNING THE TRANSMITTER AUTOMATICALLY
To maximize the chance of other survivors discovering your message, repeat this broadcast around the clock. You can configure the Raspberry Pi to do this for you automatically using a Linux tool called crontab. The crontab utility lets you schedule programs to run at certain times of day.
Enter the following command into the LXTerminal:
$ sudo crontab -e
This will open a configuration file with the nano editor, as shown in Figure 10-4.
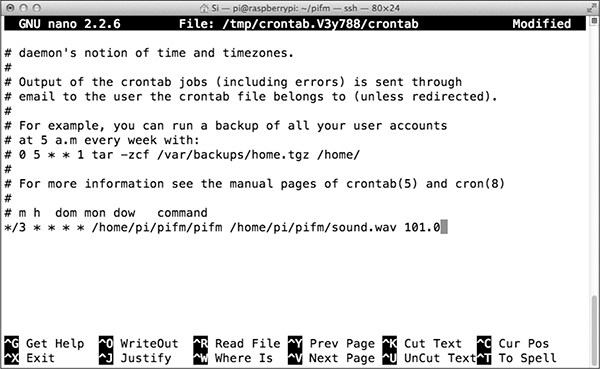
Figure 10-4: scheduling your broadcasts
Scroll down to the end of the file and add the following line:
*/3 * * * * /home/pi/pifm/pifm /home/pi/pifm/sound.wav 101.0
The first part of the line (*/3) schedules the transmission to run every 3 minutes, 24 hours a day, 7 days a week. If you use a different sound file or frequency, you need to replace sound.wav with your filename and enter your chosen frequency. If your message is longer than 3 minutes, change */3 to the number of minutes you need it to be.
You only need to do this configuration once; the settings will stick even if the Pi is rebooted.
PROJECT 18: ARDUINO FM RADIO FREQUENCY HOPPER
After the zombie apocalypse strikes, your chances of survival will be increased by group living—that is, assuming no bite victims come inside and turn into zombies. Always be sure that everyone gets checked for zombie-infected wounds before you grant entry!
You’ll inevitably need to sleep or go on supply runs, and without someone to watch your back you’ll be vulnerable. (Not to mention the slow descent into insanity you’ll suffer from lack of human contact—and you thought zombies were crazy.) Therefore, you’ll likely benefit from having a few companions around. Other groups of survivors may already be trying to make contact by broadcasting their own radio messages, as we now are. In fact, another group might have bought or salvaged this book and made the FM transmitter of Project 17. To find them, you just need to be able to pick up their transmission.
This project (Figure 10-5) takes a cheap FM receiver and hacks it so that it automatically scans the FM band for the next station. If someone has started transmitting on FM, creating a station instead of the hiss of empty airwaves, you will hear their broadcast. An Arduino simulates the pressing of the tune button on the radio receiver.
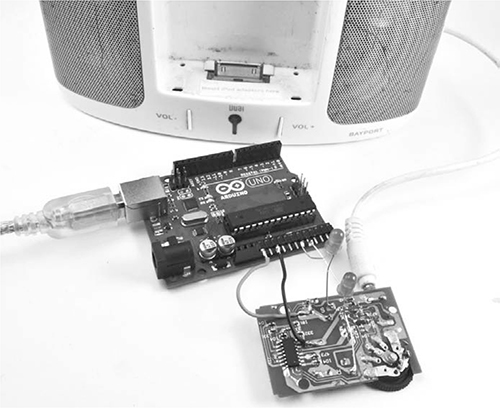
Figure 10-5: FM radio frequency hopper
WHAT YOU WILL NEED
To make this project, you will need the following parts:
ITEMS
NOTES
SOURCE
Arduino Uno R3
Adafruit, Fry’s (7224833), Sparkfun
Simple low-cost FM headphone radio
Dollar Store (or equivalently named establishment in your country’s currency)
Electronics store
To connect the radio to the powered speaker
2 red LEDs
Adafruit (297)
DC power jack with flying leads, 12V cigarette lighter adapter, or 5V USB adaptor and lead
Adafruit (80), eBay
12-way right-angle header pins
eBay
We are using right-angle pins rather than straight header pins as right-angle pins make it a little easier to solder wires and component leads to this project.
Look for an FM radio that has a Tune button that moves from one station to the next and a Reset button that starts from the beginning of the FM wave band. The radio I used cost less than $2, including in-ear headphones.
The Arduino and speakers both require power. Although I have suggested using the barrel jack, you could just as easily use the USB port to power the Arduino. By now, you should be used to figuring out the most convenient way to power low-voltage devices from a 12V battery.
CONSTRUCTION
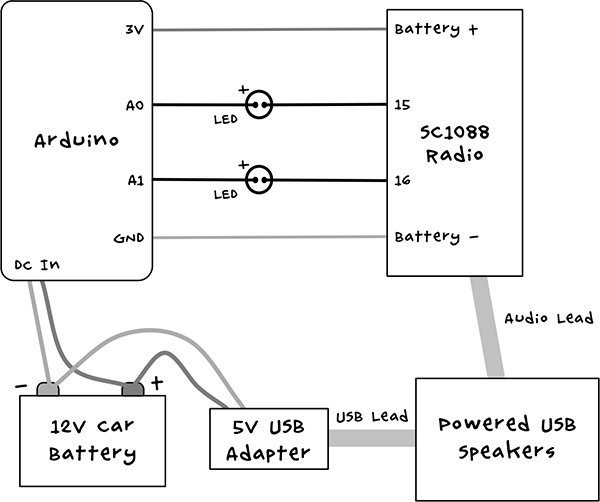
This project assumes the radio uses an SC1088 integrated circuit. This extremely low-cost chip is used in most very cheap radios, which seem to use the reference design specified in the datasheet for the chip. (Just search for “SC1088 datasheet” online; you should turn up a PDF in the first few results.) The wiring diagram is shown in Figure 10-6. It shows the Arduino being powered from the DC jack, but it could equally well be powered by the USB port.