ITEM
PREAPOCALYPSE SOURCE
POSTAPOCALYPSE SOURCE
Multimeter
Auto parts store, eBay, Fry’s
Auto parts store, Fry’s
Soldering iron
Auto parts store, Fry’s
Auto parts store, Fry’s
ELECTRONIC COMPONENTS
A lot of the components here can be found in electronics starter kits for hobbyists. Kits like Adafruit’s ARDX Experimenters Kit for Arduino (product ID 170) or the SparkFun Beginners Parts Kit (KIT-10003) will give you a good start with the basic resistors, diodes, and transistors.
ITEM
PREAPOCALYPSE SOURCE
POSTAPOCALYPSE SOURCE
Piezo buzzer
Adafruit (1740), eBay
270 Ω resistor
Mouser (293-270-RC)
470 Ω resistor
Mouser (293-470-RC)
Push button
Adafruit (1439)
1 kΩ resistor
Mouser (293-1k-RC)
1N4001 diode
Adafruit (755)
Blue or white LED
Adafruit (301)
100 µF ceramic capacitor
Adafruit (753)
TMP36
Adafruit (165)
Microswitch
Fry’s (2314449)
Microwave oven
Small sealed lead acid battery
Fry’s (6607854), security store
FQP33N10 or FQP30N06 MOSFET
Adafruit (355)
Resistor (100 Ω 2W)
Mouser (594-5083NW100R0J)
Resistor (100 Ω 1/4W)
Mouser (293-100-RC)
High-volume buzzer
Security store
Security store, smoke alarm
2N3904 NPN bipolar transistor
Adafruit (756)
5V or 3V vibration motor
eBay
Tactile push switch
Adafruit (504)
Red LED
Adafruit (297)
OTHER HARDWARE
Finally, you’ll need just a few other odds and ends to be able to power and construct the mechanics of your projects, as listed here.
ITEM
PREAPOCALYPSE SOURCE
POSTAPOCALYPSE SOURCE
A100 V drive belt
Auto parts store, eBay
Auto parts store, hardware store, scavenge
Project box
Fry’s
Closets, garages
4 × AA battery box
Adafruit (830)
6 × AA battery box
Adafruit (248)
RESISTOR COLOR CODES
Resistors have stripes on them that tell you their value, and an essential piece of geekiness is to know your resistor color codes.
COLOR
VALUE
Black
0
Brown
1
Red
2
Orange
3
Yellow
4
Green
5
Blue
6
Violet
7
Gray
8
White
9
Gold
1/10
Silver
1/100
There will generally be three of these bands together starting at one end of the resistor, a gap, and then a single band at the other end of the resistor. The single band indicates the accuracy of the resistor value. While gold and silver represent the fractions 1/10 and 1/100, they’re also used to indicate how accurate the resistor is; gold is ±5 percent and silver is ±10 percent.
Figure A-1 shows the arrangement of the colored bands. The resistor value uses just the three bands. The first band is the first digit, the second the second digit, and the third “multiplier” band is how many zeros to put after the first two digits.
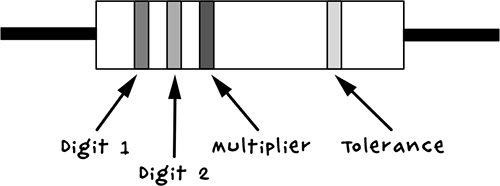
Figure A-1: Resistor color codes
Let’s say the digit-1 band is red, the digit-2 band is violet, and the multiplier band is brown. That makes this a 270 Ω resistor, or 27×101. Similarly, a 10 kΩ resistor will have bands of brown, black, orange (1, 0, 1,000).
B
BASIC SKILLS

If you’re going to be a postapocalyptic maker and survive the land of the walking dead, then you’ll need a few key electronics skills. This appendix is a quick guide to the basics, such as joining wires together, soldering, and using a multimeter. Flip here anytime you need a refresher. It may save your life!
STRIPPING WIRES
For an apocalypse survivor, stripping the insulation off wires is a skill that belongs near the top of the list. The devices in this book will help you stay alive, and to build them, you’ll often need to join insulated wires together or fit them into a screw terminal. The first step in that process is exposing the bare wire.
To strip a wire, use a blunt pair of pliers to grip the wire and pull off the insulation with a sharp pair of wire cutters (also called snips). Figure B-1 shows the process.
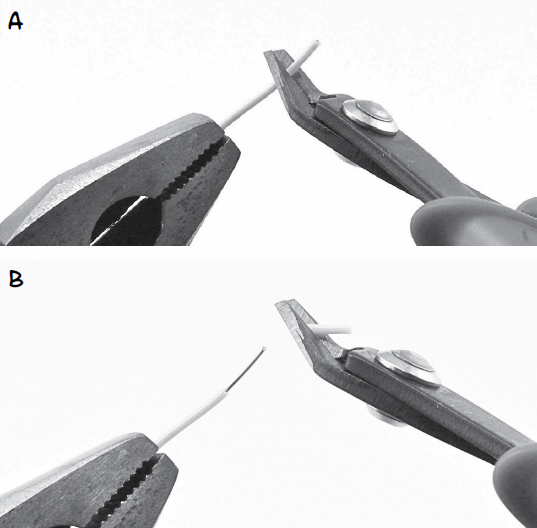
Figure B-1: Stripping wires
Grip the wire with pliers (Figure B-1a). If your wire is long, you could wrap it around your fingers instead. Either way, the idea is to stop the wire from moving. Next, gently pinch the wire with the cutters at the position where you want to remove the insulation. Apply just enough pressure to almost cut through the insulation without cutting into the wire inside, then pull the insulation away (Figure B-1b). If the snips start to slip as you pull, just squeeze them a bit tighter.
Mastering this skill can take a while, so practice on some old wire before you try it on something important. If you cut the last good wire in your cache too short, you could find yourself unable to complete your latest antizombie invention until the next supply run—when it might be too late.
JOINING WIRES BY TWISTING
Knowing how to twist wires together is a useful skill, too, especially if you haven’t come across any solder in your scavenging trips. If done properly (as illustrated in Figure B-2), just twisting the wires together can make pretty good electrical connections.
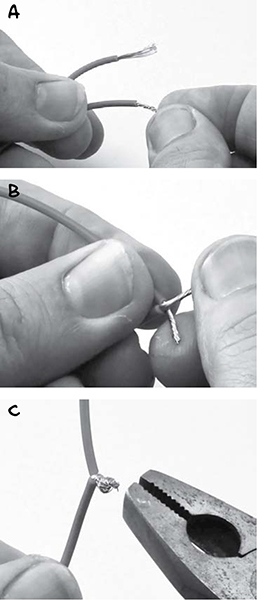
Figure B-2: Joining wires by twisting
First, strip about half an inch (15 mm) of insulation off each wire (see “Stripping Wires” on page 227). Then, if your wire is stranded rather than solid, use your thumb and forefinger to twist each wire on its own and keep all the strands together (Figure B-2a). Next, place the two wires side by side, lining up the ends of the insulation, and twist the wires around each other (Figure B-2b). Try to make sure that the wires actually go around each other, rather than leaving one wire straight while the other wraps around it. This can be difficult if the wires are of different thicknesses.