Figure 4-6: Connecting the horn and battery
Again, if the horn doesn’t have a terminal marked with a +, then it doesn’t matter which terminal of the horn you connect the battery to.
STEP 6: CONNECT THE SWITCH
Solder the two wires of one end of the long length of double-core cable to the COM and NO terminals of the switch (Figure 4-7). It doesn’t matter which wire goes to which switch terminal, as long as you use COM and NO. In fact, sometimes there won’t be an NC terminal on the microswitch at all.
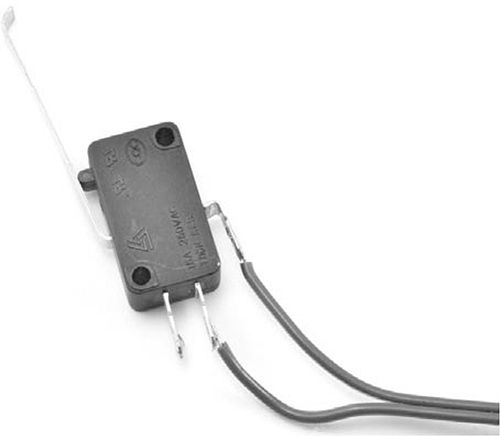
Figure 4-7: Soldering wires to the switch
Now connect the other ends of the double-core cable to the unused terminal of the horn and the negative terminal of the battery (Figure 4-8).

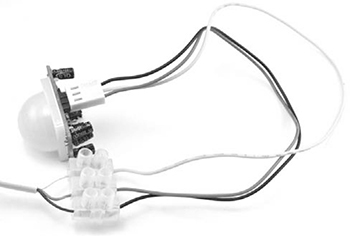
Figure 4-8: The finished wiring
With all the wiring complete, you’ll find that when you activate the switch by moving the lever, the horn will sound. Car horns are really loud, so it’s best not to test this out in an enclosed space—and warn your fellow survivors before you try it!
USING THE TRIP WIRE ALARM
Clearly, you need to choose your moment to deploy this project so that you don’t become a zombie yourself before you finish setting it up. When you’ve identified the opening that you want to protect, fix a screw or nail (or find some other way of securing one end of the string) about 6 inches (15 cm) off the ground. This will allow the switch to be triggered both by foot-dragging zombies and more athletic zombies that may simply tread on the string.
Fix the microswitch on the opposite side of the passageway you’re protecting and at the same height as the anchor for the string. Most microswitches have holes that make them easy to affix with small screws. If not, you can glue the switch in place with epoxy-based glue or a hot glue gun.
Position the switch so that the lever is on the other side from the space being protected. Tie the string around the top end of the lever (Figure 4-9).
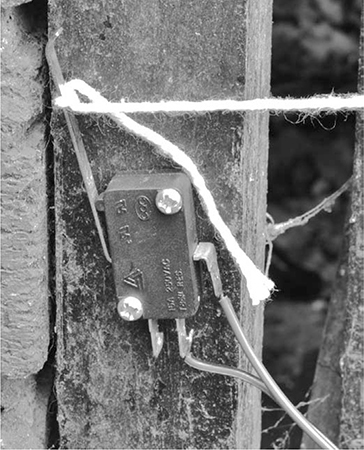
Figure 4-9: The switch fixed in place
Don’t make your string too taut. After all, you want it to detach without pulling the microswitch off the wall when a zombie walks through it. Tying a bow at one end or the other is a good idea.
Although I used a car horn, you could use anything that makes a noise and operates from 12V. Or, if you’d prefer a silent alarm, you could use a 12V car light bulb in place of the car horn.
Neither approach is very sophisticated, however, so in the next project, you’ll level up your zombie alarm with something a little more high-tech.
PROJECT 6: PIR ZOMBIE DETECTOR
The second zombie detector project in this book uses a passive infrared (PIR) detector. These detectors are the same type used in intruder alarms—they sense movement of heat—and I guess few things are more intrusive than a group of zombies intent on eating you.
You can of course just buy (or scavenge) an intruder alarm that uses PIR sensors, rather than make this project from scratch, but I thought it would be more fun to make something that uses an Arduino. In fact, if you just add the extra components needed for the PIR alarm to “Project 4: Battery Monitor” on page 53, the same Arduino can both monitor your battery and alert you to a zombie attack, using the same buzzer and display.
When a zombie triggers the PIR sensor, the LCD display will show the message ZOMBIES!! (Figure 4-10). Since the last thing you want to do while fending off a zombie is attract more zombies, this project also allows you to silence the alarm by pressing any button on the LCD shield.
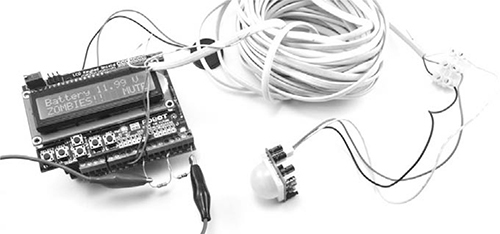
Figure 4-10: PIR zombie detector
WHAT YOU WILL NEED
To make this PIR alarm, you’ll need the following parts. If you’ve already made the battery monitor of “Project 4: Battery Monitor” on page 53, you’ll already have the Arduino, screwshield, and alligator clips.
ITEMS
NOTES
SOURCE
Arduino Uno R3
Adafruit, Fry’s (7224833), Sparkfun
Screwshield
Adafruit (196)
Adafruit (189), Fry’s (6726705), security store
Auto parts store
Long enough to reach the PIR sensor
Scavenge
3-way, 2A terminal strip
Auto parts store, electrical store
ZOMBIES AND PIR DETECTORS
One important thing that we haven’t discussed is whether zombies can even trigger a PIR detector, which relies on detecting heat.
While zombies are generally considered to be dead, and by implication cold, it isn’t possible to move muscles without also generating a small amount of heat. Also, if the cold zombie walks between a source of heat and the PIR sensor, the sensor will register the movement. So, while zombies are generally cooler than humans, you can expect attacking zombies to register on a PIR sensor.
CONSTRUCTION
This is another project that can be assembled without any soldering, and my instructions assume that you’re building on top of Project 4. If you haven’t already built Project 4, then you’ll need to build a slightly modified version of that project first, as the hardware for the PIR zombie detector is mostly the same.
STEP 1: BUILD THE SCREWSHIELD
Flip to Project 4, “Construction” on page 55 and follow Steps 1 to 3. In Step 1, download the sketch (Arduino’s word for program) Project_06_PIR_Alarm from http://www.nostarch.com/zombies/ and use that in place of the sketch for Project 4. Also, when it comes to Step 3, you don’t need to include the two resistors unless you also want to monitor the battery voltage.
STEP 2: MAKE A LEAD FOR THE PIR SENSOR
There’s little point in making a zombie detector that detects zombies only after they’re already in the same room as you. Chances are you’ll have already thoroughly detected them if they get that far. Therefore, you need to attach a long lead to the PIR detector so that it can monitor the corridor, porch, or other area outside your living space.
The PIR detector has three leads: two that supply power and one output that indicates that motion has been detected. This means you’ll need a three-wire lead. You could find some wire from an intruder alarm, or you could use three of the wires in a telephone extension lead. Pretty much any lead with three or more wires in it will be just fine.
You could either solder the ends of this lead to the lead that comes with the PIR sensor or use a terminal block, as I have (Figure 4-11).