Hardware store
To fix the trip wire and microswitch
Hardware store, Scavenge
Fry’s (2314449), microwave oven
To connect the microswitch to the battery and car horn
Hardware store, Scavenge
The louder the better. Even zombies can look surprised when a car horn blares a few feet from their head, and few things are funnier than a surprised-looking zombie.
Auto parts store, Scavenge
This can be a car battery, but a smaller battery will also be just fine.
Auto parts store, Scavenge
You could scavenge most of these parts easily, and you probably won’t have enough electricity to run a microwave, so you may as well strip it down for the microswitch. Of course, if you’re practicing before the zombies have completely taken over, it would clearly be a terrible waste to destroy a microwave oven just for a $2 switch; in that case, only use a microwave that is already dead. It’s dangerous to keep a zombie microwave around, anyway.
The 12V battery I used is a small, sealed lead-acid battery. These are effectively miniature car batteries. But if you have a car battery all set up from Chapter 2, then you will probably just want to use that one.
WARNING
The following procedure describes how to disassemble a microwave oven. You must only do this with the oven unplugged from the AC outlet. This procedure will render the oven at best nonfunctional and at worst very dangerous, so the microwave must be scrapped after this. Do not attempt to use the damaged microwave as a radiation weapon against the zombies (but using it as a blunt object is okay).
CONSTRUCTION
In a postapocalyptic world, low-tech traps, like this one, will usually be the most reliable. The hardest part of the build is probably extracting the microswitch from a microwave oven, and that’s where I’ll start. Of course, if you plan ahead, you can also just buy a switch; skip to “Step 2: Identify the Microswitch Terminals” on page 68 if you already have your switch prepared.
As with most of the projects in this book, it is a good idea to get them working safely on your workbench before deploying them in an active zombie area. It’s very difficult to concentrate on your soldering when a groaning heap of rotting flesh is bearing down on you.
STEP 1: OBTAIN A MICROSWITCH
All microwave ovens are slightly different, so you’ll need to adapt these instructions to your particular microwave. The basic principle is to keep taking out screws and removing parts of the microwave until you get to the door switch. Most microwave ovens have a U-shaped outer case that, once removed, gives you a clear view of the oven’s inner workings (Figure 4-3). The microswitch next to the door latch is then easily accessible.
In Figure 4-3, the microwave door is to the right, the back of the area with all the control buttons and knobs is at the top right, and the inside of the door latch is close to the circled area.
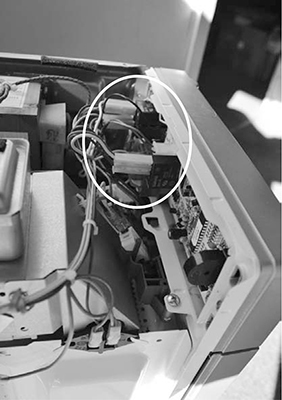
Figure 4-3: Inside the microwave oven
The microswitch you are trying to find will have clips attached to its terminals (Figure 4-4). You can pull those clips off, or you can simply cut the wires down to the clip to make the microswitch easier to remove.
NOTE
If you can’t see the microswitch at first, then just disassemble the oven a bit more until its location is obvious. Some ovens have more than one microswitch.
After you remove the microswitch, if the attached wires are long enough, you can just leave them in place and cut them. Otherwise, desolder the wires and attach new wires of the correct length. The microwave also contains a lot of other useful lengths of wire, particularly those with spade terminals attached.
Unfortunately, not much more of the oven is going to be of use in this project, though the remainder of the microwave oven makes an extremely effective zombie head crusher if dropped from a height into the groaning host of undead. Just attach a rope to it first so you can reel it back and use it multiple times. There’s an apocalypse on, so it’s even more important to recycle.
STEP 2: IDENTIFY THE MICROSWITCH TERMINALS
The microswitch will have three connections (Figure 4-4). If you look closely, you’ll see that they are marked COM (common), NC (normally closed), and NO (normally open). When pushed toward the left, the long lever pushes in the little button on the side of the switch.
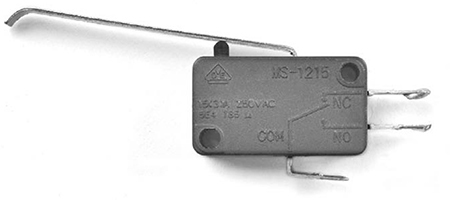
Figure 4-4: A microswitch
You’ll always use the common connection when you add one of these switches to a circuit. The other terminal you connect to will depend on whether you want the switch to cause something to happen when it’s activated or when it’s released. The normally open terminal of the switch is left open when the switch is not activated, meaning it has no connection to the common terminal until the button is pressed. The normally closed terminal works the other way around. You want your alarm to go off when a zombie hits the trip wire, thus activating the switch, so this project uses the NO connection.
STEP 3: PREVIEW THE ELECTRONIC CIRCUIT
Now let’s have a look at how that little switch will become a key part of your advance zombie-warning system.
The schematic of the trip wire alarm (Figure 4-5) shows an electronic circuit that is about as simple as one can get. If one of the car horn’s terminals is explicitly marked positive, you’ll connect it to the positive terminal of the battery; otherwise, it doesn’t matter which side of the horn you attach there. The battery’s negative terminal is connected to the microswitch’s COM terminal, and the microswitch’s NO connection completes the circuit back to the car horn.
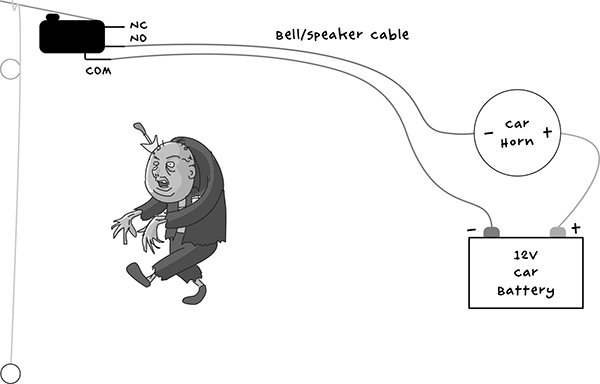
Figure 4-5: Schematic for the trip wire alarm
NOTE
Car horns normally require a full 12V before they’ll make much noise. Naturally, a car battery is well suited for this project. See Chapter 2 for more information on using batteries.
One big advantage of this alarm is that it doesn’t draw any current at all from the battery until the alarm is triggered. This means that your battery will provide effective zombie protection for a long while.
STEP 4: PREPARE THE WIRES
You’re going to need two lengths of cable: a longer length of double-core cable leading to the switch and a short single length (perhaps 6 inches, or 15 cm) of wire to connect the positive terminals of the battery and horn.
Strip and trim the ends of all the wires. If you need help doing this, see “Stripping Wires” on page 227.
STEP 5: CONNECT THE BATTERY AND HORN
If you’re using a small 12V battery with solder tabs, solder the short single length of wire between the positive terminal of the battery and the positive terminal of the horn (Figure 4-6). If, on the other hand, you’re using a car battery, then don’t try to solder directly to the terminal. Instead, use an alligator clip, as you did with many of the leads in Chapter 2 (see, for example, Figure 2-10 on page 32).