Figure 5-1: Zombie smiling and waving at a webcam
THE RASPBERRY PI
You could get these projects working with a regular laptop or desktop computer, but those devices take a fair bit of power. A laptop typically consumes 20W to 60W, and a desktop draws even more. Also, you’d need an AC inverter. Laptop power supplies provide low-voltage DC, but generally that voltage is still higher than 12V, so powering directly from a 12V battery wouldn’t be an option.
Besides, if you have to shift bases because the zombie population density has gotten too high, do you really want to risk being weighed down by a giant desktop tower?
The Raspberry Pi, on the other hand, is a tiny Linux computer on a single board about the size of a credit card, and it uses less than 3W of power. A Raspberry Pi Model B+ is used in this project and throughout this book (Figure 5-2). If you happen to have an older Raspberry Pi Model B or a newer Raspberry Pi 2, they should also work just fine. In fact, the extra power of the Pi 2 should make the webcam browser page perform noticeably quicker. Models A and A+ are not ideal, as they are less powerful and have less memory than the other models.
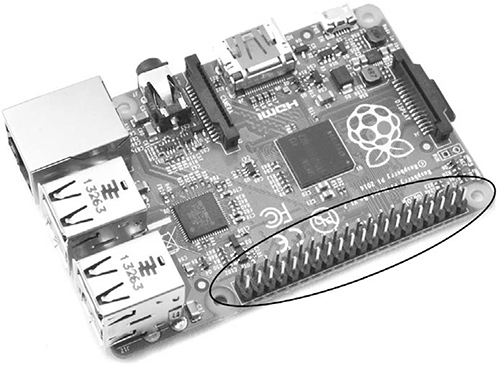
Figure 5-2: A Raspberry Pi Model B+
The Raspberry Pi can run simple Python scripts, and you can link it to external hardware, too. For example, in “Project 7: Monitor Zombies with a USB Webcam” on page 87, when the webcam detects movement, an LED will turn from green to red using the Raspberry Pi’s GPIO (general purpose input and output) connector. The GPIO connector is the double row of pins down one side of the board (Figure 5-2).
THE RASPBERRY PI SYSTEM
A complete Raspberry Pi system includes a USB keyboard, a mouse, and a small HDMI (High-Definition Multimedia Interface) monitor (Figure 5-3).
The keyboard and mouse are standard items that you can buy anywhere. For a constant visual on your zombie foes, you’ll need something to watch the video feed on, and you could just connect a normal TV or monitor to the Raspberry Pi. However, to save even more power, this project uses a 12V DC monitor with a 7-inch (180 mm) display. At worst, this might double the power consumption to a peak of 6W.
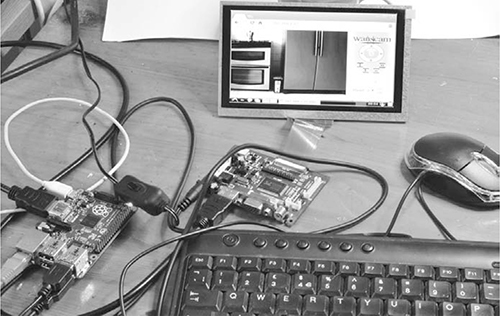
Figure 5-3: A Raspberry Pi system
WHAT YOU WILL NEED
To use this Raspberry Pi system with a 12V battery as this book describes, you’ll need the following items.
ITEM
NOTES
SOURCE
Model B+ or Pi 2 with NOOBS micro SD card
Adafruit (2358), Fry’s (8258726)
12V HDMI monitor. Suggested device has 800×480 pixel resolution.
Adafruit (1934), eBay
Standard USB keyboard and mouse
Computer store, online
As short as possible
Computer store, online
Minimum current of 1 A
Auto parts store, Computer store
Auto parts store
Needed only if you have a Raspberry Pi Model B
Computer store, online
If you’re using a Model B Raspberry Pi that has only two USB sockets, then you’ll need a powered USB hub or a wireless keyboard and mouse combo that uses a single USB adapter. Otherwise, the keyboard and mouse will occupy both of the Model B’s USB ports, and you won’t be able to plug in the webcam needed in the next project.
POWERING THE SYSTEM
The Raspberry Pi is powered from a micro USB socket, so you can use a 12V-to-USB power adapter when powering it from a 12V battery. The monitor I suggest has a separate driver board that powers the display and connects it to the Raspberry Pi; that’s the printed circuit board (PCB) in the middle of Figure 5-3. This driver board has a 2.1 mm DC power socket.
A combined cigarette lighter and USB socket adapter (such as in Figure 5-4) is a great way to power this whole system from batteries. If you haven’t already done so, you’ll need to replace the cigarette plug with a pair of alligator clips to attach the adapter to the battery. Refer to Chapter 3 for instructions on how to connect your 12V battery to low-voltage devices.
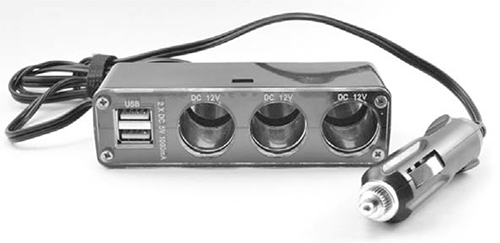
Figure 5-4: Combined USB and 12V DC power adapter
With the power adapter setup of Figure 5-4, you can power your Raspberry Pi from a normal micro USB lead and, in “Project 8: A Wireless Zombie Surveillance System” on page 96, power the Wi-Fi webcam and router with a DC jack-to-cigarette lighter adapter. Check the voltages used by your router and Wi-Fi webcam, but they’re quite likely 12V DC, which is very handy if you’ve stockpiled car batteries for the apocalypse already.
WARNING
Be careful when handling the display, especially if the display has a metal back. The exposed underside of the driver board can easily short against the metal, damaging the board.
To connect the driver board to a car battery from your stockpile, just make a lead with a 2.1 mm jack on one end and alligator clips on the other. However, if your battery is overloaded with alligator clips, you may want to attach a multiple cigarette lighter socket adapter to it instead. Then you can plug various appliances into the adapter with cigarette lighter plugs, as described in “Cigarette Lighter Sockets” on page 46.
INSTALLING RASPBIAN
The Raspberry Pi computer doesn’t have a hard disk. Instead, the Raspberry Pi 2 and Model B+ stores its operating system, programs, and data on a micro SD card. Older Raspberry Pi models store that information on a regular SD card. There won’t be an Internet after the zombie apocalypse, so get a micro SD card preloaded with an operating system (OS)—you won’t be able to download it. In fact, a Raspberry Pi with a preloaded SD card usually doesn’t cost much more than the Raspberry Pi on its own, so I recommend just buying the preloaded card with your Raspberry Pi. If you do want to add an OS to a blank SD card yourself, visit http://www.raspberrypi.org/help/noobs-setup/ and follow the directions there before the Internet ceases to exist.
Whether you buy a preloaded micro SD card or add the software yourself, this book assumes you’re using a micro SD card with the Raspberry Pi Foundation’s NOOBS (New Out Of the Box Software) installer. Once you have one, fit the micro SD card into the Raspberry Pi; plug in the keyboard, mouse, and monitor; and power everything up.
NOTE
The monitor I suggest for this project should detect the Raspberry Pi through the HDMI cable, and the Pi should automatically detect the screen resolution. If the Pi doesn’t detect the screen resolution, then visit the Raspberry Pi’s documentation page (http://www.raspberrypi.org/documentation/), go to the Configuration section, and read config.txt to learn how to configure your Raspberry Pi. Print the instructions and keep them with this book so you’re ready when the apocalypse ends the Internet as we know it.