When you boot the Raspberry Pi with NOOBS, you’ll be offered your choice of operating system. This book uses Raspbian, so select the checkbox next to Raspbian and then click Install. The installation will take a while, so watch your PIR zombie detector or double-check your battery stockpile while you wait. Once the installer finishes, you’re ready to move on.
The Raspbian distribution comes with a pretty comprehensive set of software, but at the time of writing, one thing it lacks is a decent browser that will work with a webcam. I favor Chromium, a derivative of Google Chrome that works well without hogging so many of the Raspberry Pi’s resources that the Pi becomes too zombie-like for comfort. As with most free software, you’ll need to download Chromium from the Internet.
I apologize if it’s too late, but if it’s not, then connect the Raspberry Pi to your preapocalyptic home modem or router with an Ethernet cable. Then, to install Chromium, click the LX Terminal icon on the Raspberry Pi desktop. A terminal window should open, and at first, you should just see a flashing cursor and a command prompt like this:
$
Anytime you need to enter commands for a project in this book, I’ll also show the dollar command prompt on the left, which you don’t need to type. Now, enter the following commands:
$ sudo apt-get update
$ sudo apt-get install chromium
The sudo (short for substitute user do) command allows you to execute administrative commands. Prepend it to commands that need administrative access, such as commands that install new software as we’re doing now.
The apt-get package management software on Debian-based Linux distributions such as Raspbian is used to manage and install software. The update command used with apt-get tells your system to update its cached list of available software from Internet software repositories. The apt-get install command tells apt-get to search for and install the latest version of the package supplied as the final argument, which in this case is Chromium.
With Chromium in place, you are ready to build your surveillance system. Now let’s monitor some zombies!
PROJECT 7: MONITOR ZOMBIES WITH A USB WEBCAM
This project uses a low-cost USB webcam with a long lead attached to the Raspberry Pi. The maximum usable length of a USB 2 lead is 96 feet (30 m), so that’s the farthest away from the Raspberry Pi that your camera can be.
You can see most of the setup in Figure 5-5, though the webcam is just out of view on the left; I’ve shown it in the inset photo. One of the benefits of building a surveillance system for yourself rather than simply using an off-the-shelf closed-circuit television (CCTV) system is that because the software is completely under your control, you can customize it however you want.
The webcam is controlled by a short Python program that monitors the images being captured for changes. When movement is detected on the screen, the program uses the Raspberry Pi’s GPIO pins to turn an RGB (red-green-blue) LED from green to red. You can cancel the alarm by pressing the spacebar on the keyboard, which will turn the LED green again.
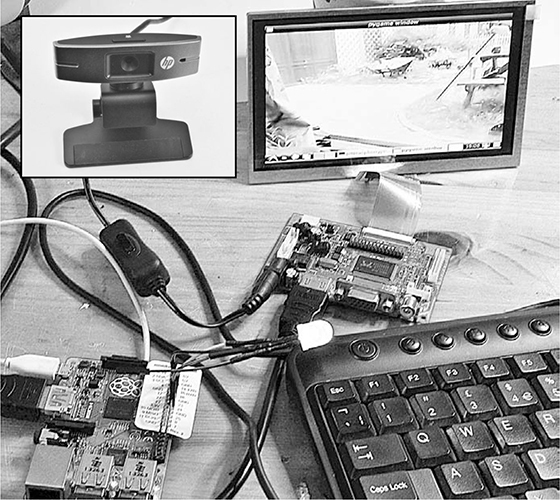
Figure 5-5: Zombie webcam and movement alarm
The advantage of this project over “Project 6: PIR Zombie Detector” on page 72, which uses a PIR sensor, is that now, if the alarm is triggered, you can take a good look at the zombies that are about to attack you.
WHAT YOU WILL NEED
To set up this USB webcam, you’ll need the Raspberry Pi setup described in “The Raspberry Pi” on page 82 and the additional items described here.
ITEM
NOTES
SOURCE
See http://elinux.org/RPi_USB_Webcams/ for compatible webcams.
Computer store
Length to suit your compound (less than 100 feet [30 m])
Computer store
Contains the RGB LED
Amazon, http://www.monkmakes.com/
Not every USB webcam is compatible with the Raspberry Pi, so check http://elinux.org/RPi_USB_Webcams for a list of cameras known to work with the Raspberry Pi. I used an HP 2300 Webcam.
NOTE
The Raspberry Pi camera module is a high-resolution camera that plugs directly into a special connector on the Raspberry Pi. The module is great if you’re making a Raspberry Pi camera, but it’s not much use in a situation like this, where you want the camera to be some distance from the Raspberry Pi.
The Raspberry Squid is a handy little accessory built just for the Raspberry Pi. It has an RGB LED with built-in current-limiting resistors that allow you to connect it directly to the Raspberry Pi’s GPIO pins. Its design is open source, and you can find details of how to build your own here: https://github.com/simonmonk/squid/. You can also buy a ready-made Squid; see http://www.monkmakes.com/ for details.
CONSTRUCTION
After completing the setup in “The Raspberry Pi System” on page 83, to build this project you just need to attach the Raspberry Squid to the GPIO connector of the Raspberry Pi, plug in the USB webcam, supply 12V to the monitor, and supply 5V to the Raspberry Pi (see Figure 5-6).
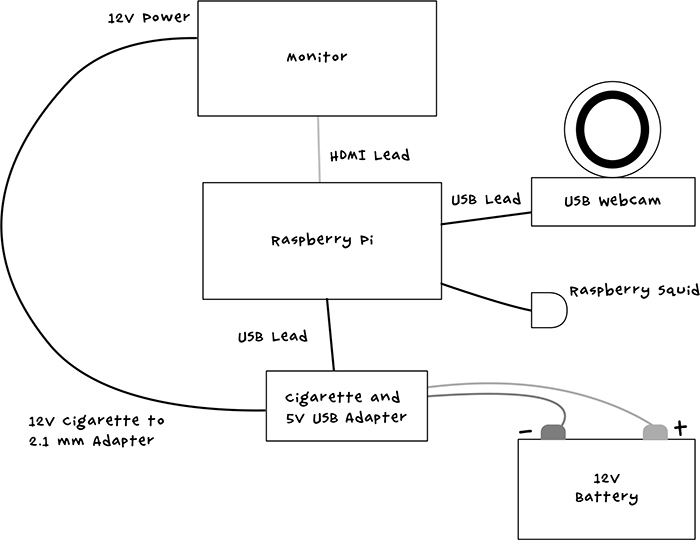
Figure 5-6: Schematic for the surveillance system
STEP 1: ATTACH THE RASPBERRY SQUID
By controlling the three outputs of the Raspberry Squid, you can make the LED display any color. However, this project won’t use the accessory’s full potential since this surveillance setup needs to display only red and green.
To help identify the GPIO pins, you can use a GPIO pin identification template. There are many of these available from suppliers like Adafruit, including the Raspberry Leaf, which is included if you buy a ready-made Raspberry Squid. Place this template over the GPIO connectors so that you can tell which pin is which. Then connect the Raspberry Squid to the GPIO connector (Figure 5-7).
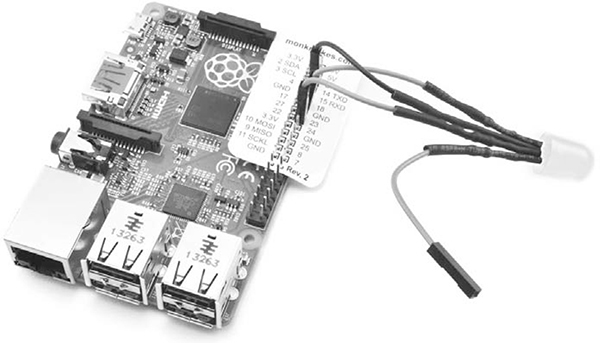
Figure 5-7: Connecting the Raspberry Squid to the GPIO connector
The black lead of the Raspberry Squid goes to one of the GND pins on the Raspberry Pi. In the orientation shown (Figure 5-7), this is the third pin down on the right. The red lead of the Raspberry Squid goes to pin 18 on the Raspberry Pi, and the green lead of the Squid goes to pin 23 of the Pi. Since you won’t need the blue color, you can leave the blue lead of the Raspberry Squid unattached, but if you prefer to keep the leads tidy, just attach the blue lead to any one of the other GND pins of the GPIO header.
STEP 2: INSTALL THE USB WEBCAM
If you already have a USB webcam, then see if it works with the Raspberry Pi before you get another one. First, check whether the Raspberry Pi can detect your webcam as a USB device by entering the command lsusb in LXTerminal both before and after plugging the webcam into the Pi, without the USB extension lead.
$ lsusb
Bus 001 Device 002: ID 0424:9514 Standard Microsystems Corp.