Connecting a tablet or smartphone to the Wi-Fi network (Figure 5-11) is by no means essential, but it would allow you to monitor the webcam from a mobile device as well as the screen of your Raspberry Pi.
STEP 1: SET UP A LOCAL AREA NETWORK (LAN)
Since this network will not connect to the Internet, you only need a router. That means even if you have a modem-router combination, you don’t need to connect it to a phone line or cable connection.
The router allows devices to connect to it in two ways: using an Ethernet cable or using Wi-Fi. We’ll connect the Raspberry Pi using an Ethernet cable because a wired connection is more reliable and uses less power than Wi-Fi.
Once you plug the Raspberry Pi into the router, the Pi should automatically join the network using DHCP (Dynamic Host Configuration Protocol), so you shouldn’t need to set it up. At this point, though, you may want to set up the Wi-Fi details of the router. This will involve connecting to the configuration page for your router. The IP address for this page is usually 192.168.1.1, but in my case, it was 192.168.1.254. In other words, check your router documentation. When you know the address of your router’s admin page, open the Chromium browser and type that URL into the browser’s address bar.
The router admin page should have a wireless, WLAN, or Wi-Fi settings page somewhere. Find this page and set the wireless network name (also called the ESSID) and password (Figure 5-12).
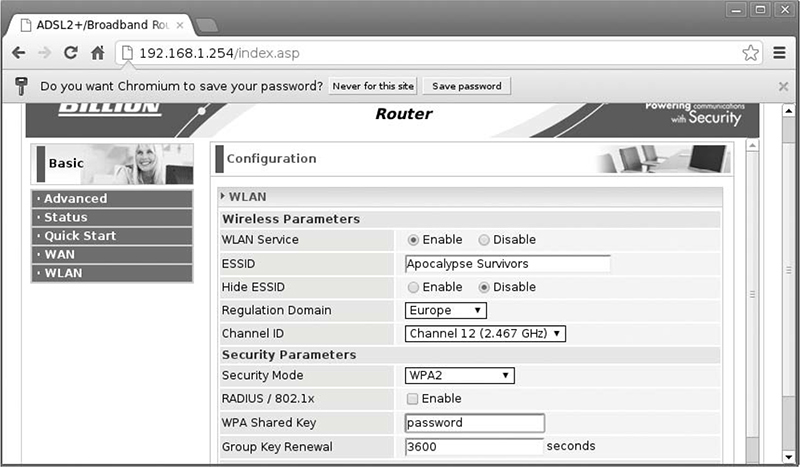
Figure 5-12: Setting up a wireless network
Set the network name to something like Apocalypse Survivors so techsavvy survivors can find you easily. Your group of survivors can always benefit from more geeks—especially if it looks like you can run faster than them.
STEP 2: SET UP THE WI-FI CAMERA
The Wi-Fi camera can’t connect itself to your wireless network without knowing your password and network name. To give it this information, you’ll need to connect to it from a browser, but first it must be connected to the network. This is a bit of a problem. Fortunately, it’s a problem that can be resolved by connecting the Wi-Fi camera to the router using an Ethernet cable. Making a wired connection doesn’t require a password, and the camera should connect to the network using DHCP just like the Raspberry Pi. After you finish the setup, you can disconnect the Ethernet cable, and the Wi-Fi camera will be free!
Connect the Wi-Fi camera to the router and go back to the same router admin page you used to set up the wireless network. You can use it again to find the IP address of the camera so you can configure it. This time, you’re looking for a page called either DHCP table or ARP (Address Resolution Protocol) table. Figure 5-13 shows the ARP table for my router.
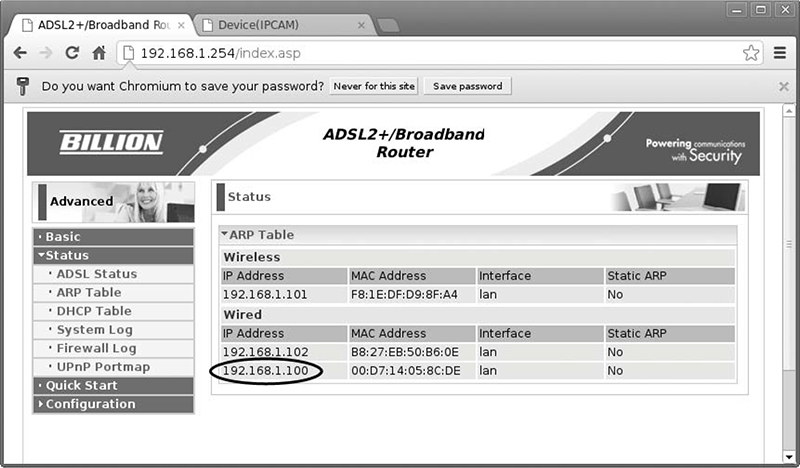
Figure 5-13: Finding the IP address of the camera
The connection to the camera is wired, so the IP address of the camera is either 192.168.1.102 or 192.168.1.100. One of those IP addresses belongs to the Raspberry Pi. Find out which is which by entering the ifconfig command in LXTerminal. You should see one of the two addresses above in the response to the command, and that’s the Raspberry Pi’s address.
My Raspberry Pi had an IP address of 192.168.1.102, so by process of elimination, my camera’s IP address was 192.168.1.100. Start a new tab on the browser and connect to that IP address, adding :99 after the last number in the address. (I pointed my browser to 192.168.1.100:99.) This extra number specifies the network port to use for the webcam. In most cases, this is 99, but if you’re using a different camera, then check your documentation because its port may be different.
NOTE
Any IP address can have a port number after it like this. Different types of network traffic use different ports. For example, most web traffic uses port 80, which is the default. The webcam happens to use port 99, so this has to be specified in the URL.
The browser should immediately start displaying video from the camera as well as the controls to pan and tilt the camera. Somewhere on the page, you should see a settings link. Click on this and look for Wireless LAN Settings. Click Wireless LAN Settings, and you should see an option to scan for Wireless Networks (Figure 5-14).
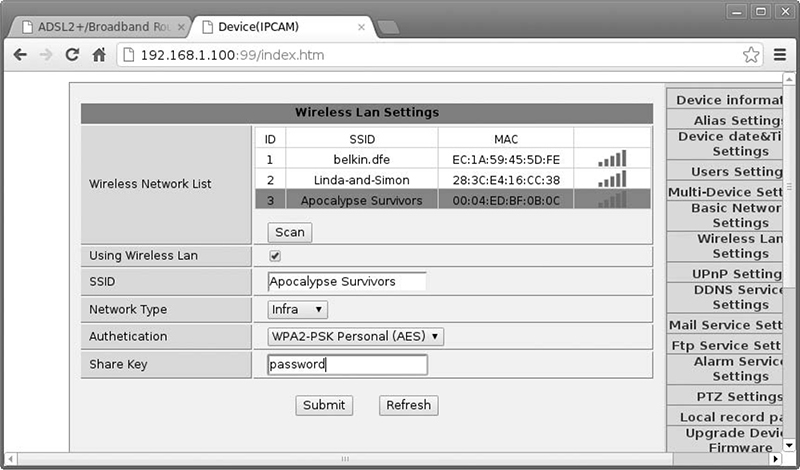
Figure 5-14: Connecting the camera to the wireless network
Select the Apocalypse Survivors network, enter the password (also called the share key), and click Submit. The camera should reboot, and then you can unplug the Ethernet because from now on, the camera will use its Wi-Fi connection.
Once the camera has switched over to using Wi-Fi, it will also have a different IP address, so return to the router admin page (Figure 5-13). This time, there should be an entry in the wireless section of the list representing the camera. Try browsing to the camera using that IP address with :99 on the end. Once again, the video should appear in the browser window along with the camera controls (Figure 5-15).
One problem with using DHCP to allocate an address to the webcam is that the router may allocate a different IP address if it is restarted. To avoid this problem, look for the option in your router’s DHCP settings that sets the lease time and set this to its maximum. That way, once the IP address is allocated, it shouldn’t change until sometime after civilization has been reestablished.
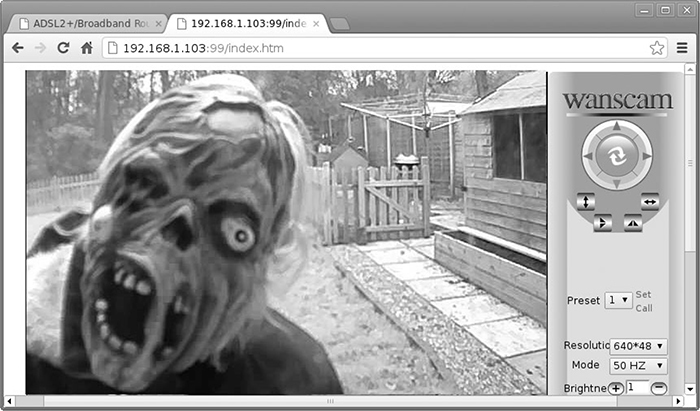
Figure 5-15: A view from the Wi-Fi camera
USING THE WI-FI WEBCAM
Once everything is set up, you can view the image from the webcam by going to the URL for your camera in the browser. The software for most webcams will also allow you to set up multiple cameras and split the screen two or four ways so that you can monitor all the images at once. Then, you can keep tabs on your entrance, supply cache, any zombie traps you’ve built, and the survivors across the street simultaneously!
You could also access the camera from a mobile browser on a smartphone or tablet computer. There may also be an app for the camera that works better than a browser. This would allow you to work in one area of your compound while keeping an eye on another area using your mobile device. The app provided with the camera I used includes a function to send alerts when movement is detected.
In the next chapter, you’ll learn how to control an electric door latch. After completing that project, you’ll be able to unlock doors remotely and get inside faster. You’ll also be able to detect when the door opens, just in case the undead begin to overrun your base.
6
ADD REMOTE ACCESS AND DETECT OPEN DOORS

Controlling access to your base is key in the postapocalyptic world. Let’s say you’re being pursued by a herd of brain-hungry zombies. You finally reach your base, and all you have to do to survive another day is get inside to safety. Don’t fumble with keys and get eaten before you can unlock the door. Unlock it before you get there! To help you out, this chapter includes projects that allow you to unlock (or lock) doors without touching them. Just don’t press any door-opening buttons with without checking your surveillance system first; no matter how politely someone knocks (Figure 6-1), you never know if they’re alive or undead.
The first project in this chapter will allow you to open a door by simply pushing a button or even by remote control with a wireless extension. The other project uses a reed switch to detect when a door has been opened and then alerts you using the same Arduino that you used in “Project 4: Battery Monitor” on page 53 and “Project 6: PIR Zombie Detector” on page 72 to monitor the battery voltage and detect zombies with a PIR sensor, respectively.