Figure 6-1: Postapocalyptic Access control
PROJECT 9: REMOTE DOOR LOCK
First, let’s make reaching the safety of your base a little easier. With an electromechanical door latch, you can press a button to open the door and avoid making jingling key sounds that would attract nearby zombies. This project uses a 12V latch. This door latch will work with the existing door lock, and you can fit one to an existing door by replacing the socket that the lock normally engages with, as shown in Figure 6-2. Note the latch part in the middle that is released by the electromagnet.
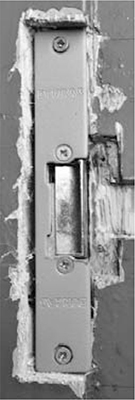
Figure 6-2: The electro mechanical door latch
The first part of this project builds a simple electrically controlled lock. Press a button to unlock the door (Figure 6-3), and the door will stay unlocked as long as you hold down the button. If you have fellow survivors living with you, this would probably be inside your base, ready for you to let others in. However, if you are on your own, you may want to position it on the outside of your base, right by the door, but high up where it can’t be accidentally activated by zombies.
An optional second part of this project lets you use a radio frequency (RF) remote module to unlock the door (see Figure 6-4). A remote-controlled door could save your life, allowing you to run toward your locked door, unlock it just before you get to it, and slam it in the face of that pursuing horde of zombies.
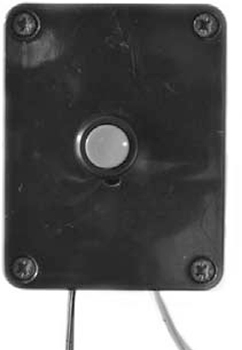
Figure 6-3: The door control button
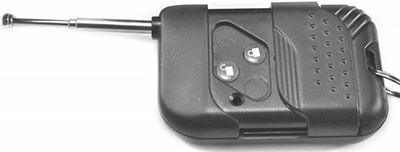
Figure 6-4: The wireless remote control
WHAT YOU WILL NEED
To make this project, you are going to need the following parts and tools:
ITEM
NOTES
SOURCE
You will need larger bit sizes, perhaps up to half inch depending on the width of the door latch.
Hardware store
Doubles as a handy weapon
Hardware store
Hardware store
12V DC
Farnell, Fry’s, security store
10A fuse and holder
Auto parts store
Adafruit (1439)
Closets, Fry’s, garages
One three-way block and one two-way block, both 2A
Home Depot, Lowe’s, Menards
Bell wire or speaker cable
Hardware store, scavenge
Single-channel RF-controlled 12V relay and remote control
eBay
This is one project that requires some woodworking tools. You’ll use the drill and set of wood bits, the hammer, and the chisel to make a recess to fit the new door latch, which is generally bigger than normal door latches.
To find a door latch after the apocalypse, you will need to find a specialist security store to scavenge from. Maybe the paper version of the Yellow Pages still has a use! Find your closest security retailer, make your way there carefully, find the latch, and get back to your base. After all, you won’t remember what to do with the latch if you become a zombie before you get home.
Almost any double-core wire will work fine, so bell wire or speaker cable is ideal.
CONSTRUCTION
Figure 6-5 shows the schematic for the project. The door latch used in this project remains locked until power is applied to its terminals, and then an electromagnet (electrically powered magnet) releases the latch so the door can open.
This system is great for excluding zombies, but in the event of a fire or other damage to the circuit, this could be very bad: your door would be permanently locked!
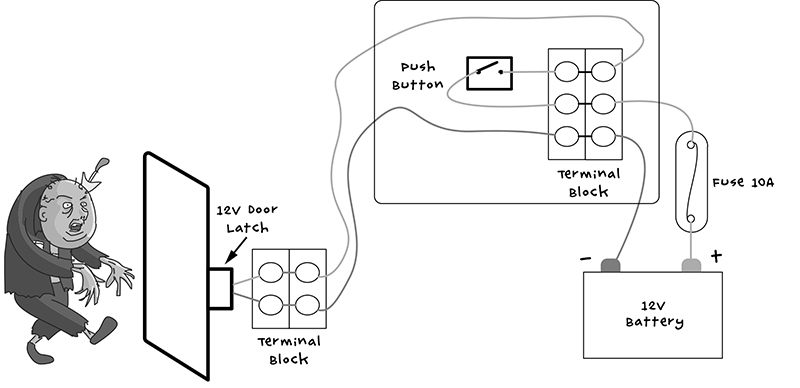
Figure 6-5: Schematic for the electrical door latch
For this reason, any door that you fit this kind of latch to should also retain its original latch; that way you can open it from the inside by twisting the latch. While there won’t be anyone around to enforce the fire code, it’s not a bad thing to make sure you can get out easily. After all, whatever postapocalypse heating and cooking appliances you cobble together may not be exactly up to code either, making unexpected fires a real possibility.
STEP 1: MAKING A SWITCH BOX
Whether the button is on the inside or outside of your base, you might need to press the door unlock button in a hurry, and letting the button hang about somewhere in a tangle of wires is no good. You need it to be easy to use, so just put it in a box on the wall.
NOTE
If you plan to add the wireless control to the door latch, then pick a box that is big enough to contain the remote relay receiver; try placing all of your hardware inside the box to test its size.
Unless you’re lucky and manage to scavenge a switch already enclosed in a box, you’ll also need to fit the push button into the box. Make sure it has a hole in the lid big enough to mount the switch, as well as holes for the latch and battery lead wires to enter and exit the box. Either find a box with holes large enough or drill the holes out yourself. While you’re at it, drill a couple of holes in the bottom of the box to make it easier to fix it to the wall with screws, too. Figure 6-6 shows the switch in a box.
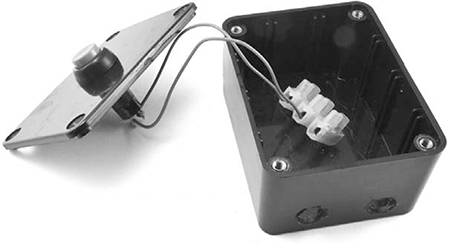
Figure 6-6: Making a switch box. Note the two holes on the small side facing the camera, which are for the battery and latch wires.
Run the switch leads through the hole in your box lid and wire the two terminals of the switch to the terminal block, which will make the overall wiring up of the system easier. The two leads from the switch go to the middle and top positions of the terminal to match the schematic of Figure 6-5.
STEP 2: MAKING THE BATTERY LEAD
To provide power to the project, you need a lead to connect it to your car battery. The lead and fuse shown in Figure 6-7 are just the same as used in “Project 3: LED Lighting” on page 49, so if you need more details on how to make this, have a look at that project.
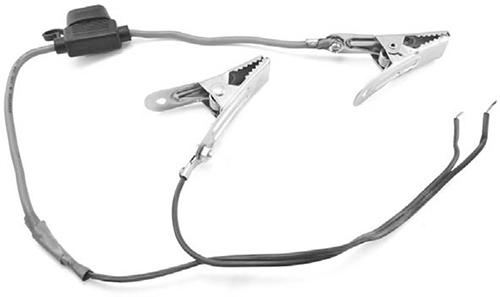
Figure 6-7: Making a battery lead