You can buy a cigarette lighter socket adapter, like the one on the left in Figure 3-2, at your local auto parts store. Having acquired it, you can strip the leads and attach alligator clips so you can hook the adapter up to the battery. For info about how to join the wires/attach the alligator clip, see Project 1, “Step 3: Wire Up the Battery and Charge Controller” on page 30.
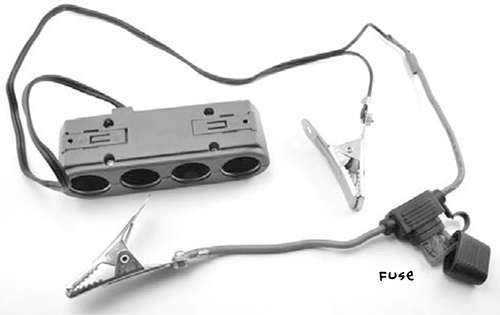
Figure 3-2: Making a cigarette lighter socket adapter
WARNING
Never assume that a car battery is harmless just because it’s only 12V! While you can’t get an electric shock from 12V, you can most certainly receive nasty burns from it. If a wrench or screwdriver accidentally shorts across the terminals of a car battery, hundreds of amps will flow through it, turning the tool into flying molten metal that can easily burn or even blind you. Just remember: Car batteries store a lot of energy, which can easily be released by such an accident.
Now that you’re starting to connect things to your battery, you need to make sure the battery is protected from accidental damage. Some adapters may already incorporate a fuse, but if yours doesn’t have a fuse, you should include a fuse holder in the circuit. A 10A fuse, like the one used in “Project 2: Bicycle Generator” on page 34, will work just fine. Always remember to keep spare fuses around. It’s not so easy to nip out to the shops if the neighborhood is overrun with zombies. Notice that I’ve included a fuse in the design in Figure 3-2; the fuse will prevent any problems of a fiery nature, should an accidental short circuit occur.
An alternative (or supplementary) way to protect your battery is to position the solar charge controller from “Project 1: Solar Recharging” on page 26 between the battery and the load, or anything you want to power from that battery (Figure 3-3).
When set up this way, the charge controller monitors the battery voltage and will automatically disconnect the load when the battery voltage drops below a certain threshold. This is advantageous because if the battery is discharged too much beyond this point, then it can be so damaged that it will no longer accept charge, and then good luck recharging it.
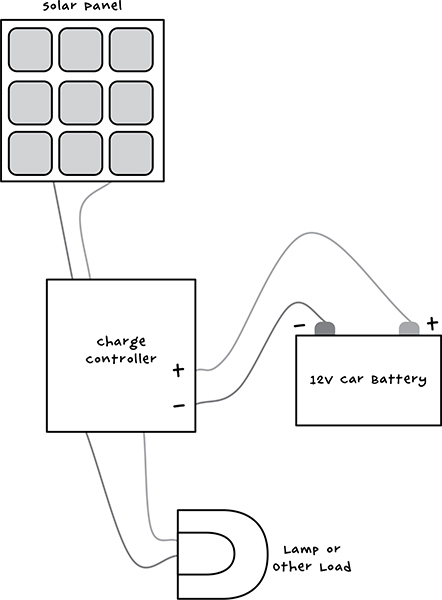
Figure 3-3: Use a charge controller to protect your battery. The solar panel is optional.
In “Project 4: Battery Monitor” on page 53, you will learn how to build a battery monitor that will alert you when your battery runs low.
USB POWER
Largely due to the influence of the USB charger lead, 5V has become the most common operating voltage for small DC devices. Jumping from 12V to 5V is much easier than from 120V AC to 5V DC. At the auto parts store, you will find 12V cigarette lighter to 5V USB power adapters.
The adapter in Figure 3-4 has the benefit of combining both 12V sockets and 5V USB sockets. Another type of adapter just has a 12V cigarette lighter–shaped plug with one or two USB sockets built into the end of the plug. You could either plug the type of adapter shown in Figure 3-4 into the adapter of Figure 3-2. Alternatively, you could chop off the plug from the adapter of Figure 3-4 and add alligator clips to it, just as you did to the adapter in Figure 3-2.
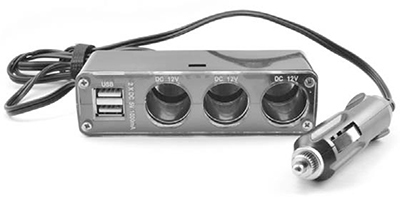
Figure 3-4: 12V to USB adapter
You could, of course, use this adapter to charge your cell phone. But the cellular network will probably be one of the first services to collapse during the zombie apocalypse, first suffering overload from callers flooding the network, trying to get in touch with loved ones, and then succumbing to system failures due to power outages and lack of maintenance.
AC INVERTERS
It’s possible to convert the 12V DC of a battery into 120V (or 220V) AC using an inverter. This device has terminals that connect to a 12V battery and an AC outlet, which you can plug regular AC appliances into.
You cannot, however, plug in very high-powered AC devices. A wattage rating printed on the inverter will specify the maximum power load it can handle. Small models intended for powering laptops may only be 50W, but 200W or 400W inverters are neither hard to find nor particularly expensive.
Where possible, using DC devices is much better, as inverters aren’t very efficient. They generate high-voltage AC and waste quite a lot of energy as heat; just look at the large heat sinks on the sides of most inverters. They also often use significant amounts of current even when nothing is plugged into them, so you have to remember to turn them off when not in use.
In the next section, you’ll learn how to make a low-voltage lighting setup that can provide lighting intensity similar to that of AC lighting but by using 12V DC lamps powered directly by a car battery.
PROJECT 3: LED LIGHTING
LEDs offer the most light per watt of any type of illumination and are a natural choice for postapocalyptic lighting. This project uses three 12V, MR16 LED light bulbs. These bulbs are available in powers from 2W to 10W or more, and any of these wattages are suitable for this project.
You can string together more than three of these bulbs if you like. Just use a longer lead and more bulbs. You may, for example, have a long corridor that you wish to defend, and good illumination is essential for effective zombie fighting.
In fact, almost any 12V light source could be used, including high-power halogen light bulbs of 50W or more. However, the higher the wattage, the faster the battery will drain.
WHAT YOU WILL NEED
To make this project, you’ll need the following items.
ITEM
NOTES
SOURCE
12V
Auto parts store, scavenge
7A or more
Auto parts store
12V 2W-10W
Hardware store
Sockets with trailing leads
Hardware store
Inline switch (5A)
Hardware store
7A
Scavenge
10A fuse and holder
Auto parts store
CONSTRUCTION
The LED lights for this project are wired in parallel (Figure 3-5). In this arrangement, each of the lights gets the full 12V from the battery, and if one of the lights fails for any reason, the other lights will keep working.
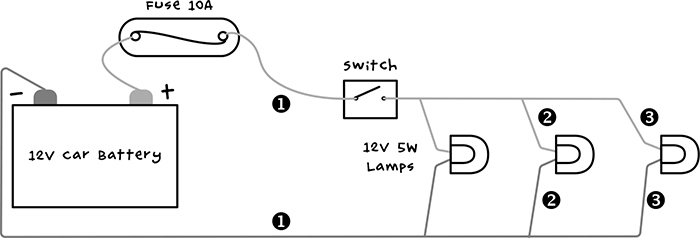
Figure 3-5: 12V lighting system
STEP 1: PREPARE THE ELECTRICAL CABLE
If you’re using a fairly small number of low-power LED light bulbs (up to five, at up to 5W each), then double-core bell wire will be just fine. Cable designed for speakers is also a good choice. In my design (Figure 3-5), I used three bulbs, so I cut three lengths of cable, stripping half an inch (15 mm) of the insulation off the ends.