The flashMessage function starts by echoing the message it is about to send to reassure you that it is sending what you want it to. It then loops over every character in the message. Before each character, it uses Serial.available to check for a new message. If a new message has come in, the function stops sending its message in order to receive the new message from your computer or Raspberry Pi; then it begins sending the new message instead.
The flashMessage function determines whether the character is an uppercase letter, a lowercase letter, a number, or the space character and then takes the appropriate action.
If the character is a lowercase letter, the index position of the sequence of dots and dashes held in the letters array is provided as a parameter to the flashSequence function, which then flashes those dots and dashes. The other options are handled in the same way.
Finally, when the whole message has been sent, the lastFlashTime variable is set to the current time so the loop function can work out when it is time to start flashing the message again.
The work of flashing the sequence of dots and dashes for a particular character is handled by the flashSequence function:
void flashSequence(char* sequence)
{
int i = 0;
while (sequence[i] != NULL)
{
flashDotOrDash(sequence[i]);
i++;
}
delay(dotDelay * 3); // gap between letters
}
This loops over each dot or dash, calling flashDotOrDash:
void flashDotOrDash(char dotOrDash)
{
digitalWrite(ledPin, HIGH);
if (dotOrDash == '.')
{
delay(dotDelay);
}
else // must be a -
{
delay(dotDelay * 3);
}
digitalWrite(ledPin, LOW);
delay(dotDelay); // gap between flashes
}
The flashDotOrDash function uses the appropriate delay period to flash a dot or dash.
USING THE MORSE BEACON
Upload the sketch to your Arduino and power up the project. The default message should start to flash. If it doesn’t, go back and check over all your wiring. To change the message, attach your Arduino to your computer, open the serial monitor on the Arduino IDE, and type in a new message (Figure 10-16).
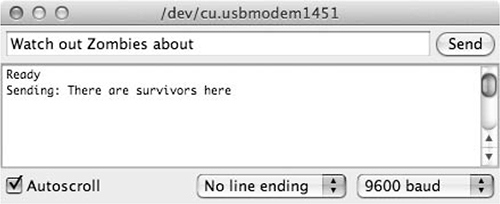
Figure 10-16: Changing the message using the serial monitor
Here, the current message, “There are survivors here,” should change to “Watch out zombies about” when the Send button is pressed.
If you prefer to use your Raspberry Pi to change the message, install the terminal program screen (your Raspberry Pi will need an Internet connection):
$ sudo apt-get install screen
Once screen is installed, connect the USB lead between your Raspberry Pi and the Arduino and then enter the following command on your Raspberry Pi:
$ screen /dev/ttyACM0 9600
At this point, anything you type should be sent to the Arduino, and any messages coming from the Arduino should be displayed. Figure 10-17 shows the message being changed using screen. Note that the message will not appear on the screen as you type it but only after you press ENTER.
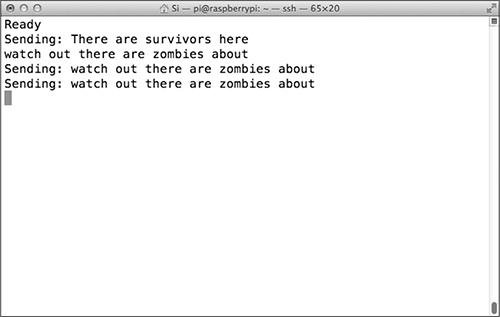
Figure 10-17: Changing the message using the screen command
Once the message has been changed, the Arduino will remember it, so you can unplug the Arduino to get ready for installation. Unplugging the Arduino will quit the screen command by closing the serial connection to the Raspberry Pi.
Now just attach your project to your desired location, preferably one with 360-degree visibility, and start blinking your message. Figure 10-18 shows the project fixed to my zombie-proof shed.
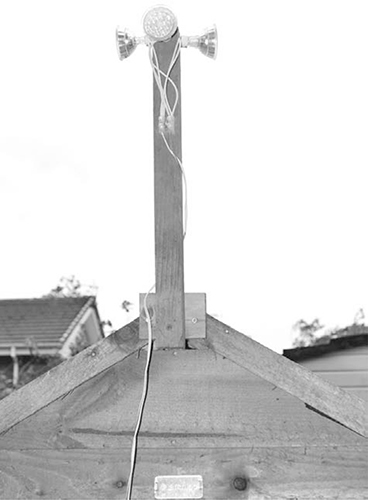
Figure 10-18: Installing the Morse beacon
If you want to conserve power, only use your beacon at night, when it is most likely to be spotted. But beware: popular culture gives us mixed messages on whether zombies are attracted to flashing lights. You may want to reinforce your stronghold before sending out messages, just in case.
In Chapter 11, we will continue with the theme of communication. For the final project of this book, we’ll build a pair of haptic communication devices that will allow you and a fellow survivor to communicate silently, without alerting zombies to your presence.
11
HAPTIC COMMUNICATION

If you’re out on a supply run, then you’ll definitely want this silent communication device, which uses trembling buzzer motors and radio modules to send two-way messages. With this final project, you can communicate without attracting unwanted attention.
PROJECT 20: SILENT HAPTIC COMMUNICATION WITH ARDUINO
The problem with walkie-talkies is that, as the name suggests, they require talking. Zombies have very acute hearing for human speech and will easily home in on any desperate request for backup that you shriek into a walkie-talkie. This is where a silent two-way haptic communication device comes into its own (see Figure 11-1).

Figure 11-1: “When the sign said ‘press for attention,’ this wasn’t what I thought it meant!”
Haptic is just a fancy way of saying “relating to touch,” and instead of making noise, the devices you’ll build in this project will vibrate like a cell phone. You will make a pair of these haptic devices, one of which is shown in Figure 11-2.
Each device has a push-button switch and a small buzzer motor of the sort you find in cell phones. When you press the button on one handset, it causes the buzzer on the other handset to vibrate, and vice versa. The whole thing is powered by a 9V battery.
Then when you are out and about, you can get in touch with your partner using a set of prearranged signals: one short buzz means, “I’m OK”; one long buzz means. “Come quickly, I’m about to be eaten!” In your free time (which has probably increased now that your old school or office is full of zombies), you could even memorize the Morse code you used in “Project 19: Arduino Morse Code Beacon” on page 196 and send more detailed messages.
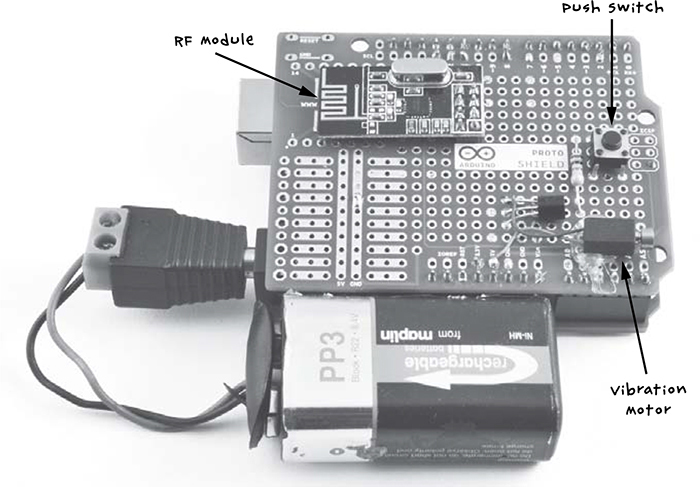
Figure 11-2: A haptic communicator
WHAT YOU WILL NEED
To make this pair of haptic communicators, you’ll need the following parts:
ITEMS
NOTES
SOURCE
2 x Arduino Uno R3
Adafruit, Fry’s (7224833), SparkFun