BUSH WINDLASS
A bush windlass, capable of taking a very heavy strain on a rope can be made by selecting a site where a tree forks low to the ground, with the fork facing the direction in which the pull is required. Alternatively, a stout fork can be driven in and anchored with the “1-2-3” method.
The windlass portion is a forked log. The forks are notched to take the lever (up to seven feet long). The rope is passed round the roller a few times so that it locks upon itself. (If the fork of the roller is long, the rope may pass through the fork.)
This type of bush windlass has many uses.
CHAPTER 2
HUTS AND THATCHING
Little skill is needed to make a comfortable, thatched, weatherproof hut using only material locally available.
Such huts can be expected to have a useful service life of 4 to 6 years without maintenance. With maintenance, such as renewing lashings, and repairs to ridge thatch, the life is anything up to 20 years.
Where rammed earth is used for walls, the life of the structure is indeterminate. Many earth wall buildings have stood undamaged for hundreds of years.
The building of a thatched hut from local materials is a creative exercise. Design must provide for the anticipated weather conditions. Finding suitable materials almost anywhere presents no problem, but considerable organisation may be required to collect the material. For the actual structure and thatching, good teamwork is required.
The final hut, with its promise of long periods of protection and shelter, is the result of combination of head work and hands. With this comes the inward reward of having created a weather-proof hut out of nothing except the natural materials garnered from the surrounding area.
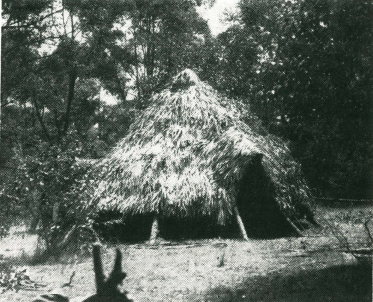
Circular hut 20 feet diameter at ground; no nails or man-made materials used in its construction. Time of erection, 12 to 18 man hours. Left half is thatched with palm leaves—right half thatched with eucalypt branches. Shortly after erection there was 4½ inches of rain in 75 minutes. The inside of the hut was completely dry after this terrific drenching.
THATCHED HUTS
The making of huts and shelters for occasional or continuous use from exclusively local materials and without the aid of any man-made equipment is not difficult. In place of nails, lashings, either of vine, bark strips or other fibrous material are used. Framework is of round poles. Weatherproof roofing is provided by thatching with long grass, ferns, reeds, palm leaves, sea weeds, bark sheets, split shingles or even sods of clayey turf.
The material you will use depends on what there is in your vicinity. The shape, size and details of your hut are governed by the length of your occupation; the number of people that have to be sheltered; the local climatic conditions against which you want shelter; and, of course, the time available for construction.
If there are one or two to be sheltered for a few nights only in a temperate climate, a simple lean-to thatched shelter will suffice and this can be built in one to three hours, but if there are eight or ten in your party and they require shelter for a few months against cold and bad weather, then a semipermanent hut complete with doors, windows, and a fireplace for heating, and built-in bunks will be required, and to do this properly might take two or three days.
It is assumed that a good knife, hatchet or axe is available and that the workers are willing. The structures shown here are merely examples of what can be done. When it comes to planning your hut, you are your own architect and your own builder. If there are several people in the party, organise the labour so that no hands are idle–have one or two fellows cutting poles, another carrying them to the site, a fourth stripping bark for lashings (see Chapter 1 “Ropemaking”), and set the others gathering material for thatching.
Collect all the material for your structure before you start to build, stack it in orderly piles where it will be most convenient. Your main structure poles in one pile; your battens for thatching in another pile; your bark strips or vines shredded down for immediate use; and your thatching material neatly stacked in several piles close to the work.
When you are ready to start building, have every man on the site. Organise the labour of erection of the main framework, and then break your team up into small gangs for lashing on battens and completing details of framework. By this means you will save hours of labour and you will succeed in building a better hut.
There is nothing to it really, except intelligence. Plan and organise to keep everybody’s fingers busily engaged.
DESIGN
There are three main designs of huts: a simple lean-to hut, suitable for fine warm weather; an enclosed pyramidal hut, suitable for cold, inclement conditions; and a long hut, which if open is suitable for mild climates, or if completely walled is suitable for cold conditions.
Refinements such as doors (yes, doors that swing on hinges) and windows may be added to suit your pleasure. And when your hut is completed, then there is the all important matter of furnishing it–but first let us look at what the backwoods man can build for his new season camp.
This would be suitable for a short summer shelter for two fellows. It can be put up in one to three hours.
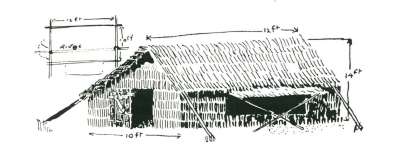
This long hut, about twelve feet by ten feet wide, will house five to twelve men, depending on the bunking arrangements, and can be built in about 40 man hours.
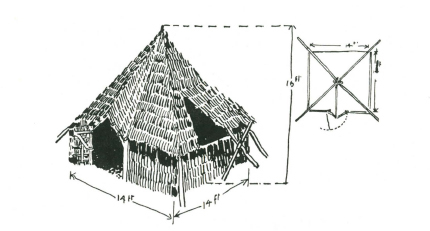
This pyramidal hut, 14 feet square inside the 5 ft. high walls, is comfortable, and an excellent cold weather camp for from eight to sixteen men, according to the bunking arrangements. It can be put up in about 20 man hours.
SECTIONAL LEAN-TO HUTS
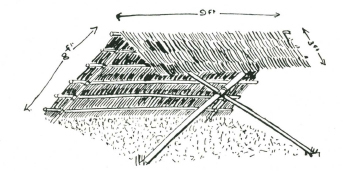
Small one and two man lean-to huts can be easily constructed in an hour or two by making and thatching two or three frames which are from seven to nine feet in length and three feet six to four feet deep.
Framework for Sectional Lean-to Shelter
Three Thatced Sections attach to Crossbar and Ridge.
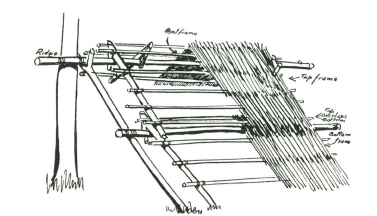
These frames, built of battens, are lashed on to two fork sticks. The forks are in the form of hooks at the upper end. The framework for these one or two man shelters is simple to construct.
Assembly on framework of sections.
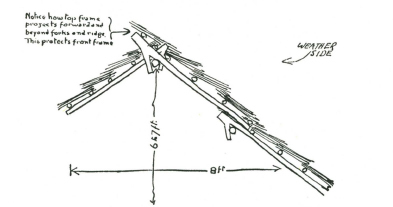
Note how top of top frame projects forward beyond fork and ridge. This protects front frame, and saves the work of ridge thatching. If raised bunks (see Chapter 3) are being put in, it is advisable to have bottom of thatch about 1’6” to 2’ above ground. This raises ridge height to 1’ to 1’6” and side poles become 10 to 11 ft. instead of 8 to 9 ft.

Section of assembly.
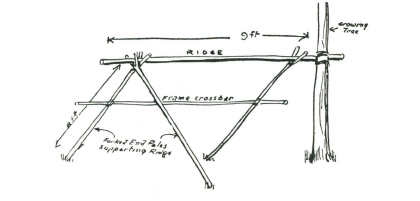
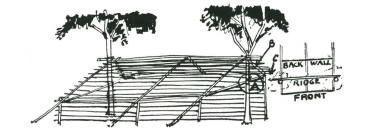
PERMANENT LEAN-TO HUTS
The permanent lean-to hut using a tree for bracing is simple and quick to erect.
Cutaway section of frame for hut sited between two saplings
The ridge pole is raised against the tree by means of the two end forked poles to the required height, between eight to ten feet, depending on the width. The end forked poles should be at an angle of not less than 45 deg. If the length of ridge is more than 10 to 12 feet, it is advisable to put in another one or two forked poles about halfway along.