In descending, the free hand pulls the rope over the shoulder. This leaves a loop below the thigh, and the feet are walking’ down the rock face until the thigh is again impossible to fall.
In ascending a rock face which has an extreme slope but is not vertical, the feet are ‘walked’ up the rock face, the body is pulled up the rope, and the slack, hanging below the legs, is pulled up with one hand and fed over the shoulder. By this means the climber can ‘sit’ on the rope and rest. When using the ‘Absyle’ it will be found that bare feet, sandshoes or spiked shoes give a better grip on the rock face than plain leather soles.
TYING SPLIT CANES AND VINES TOGETHER
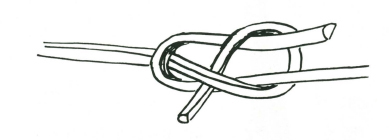
These materials will only tie with special knots and it is a safe rule to tie with the outside of the skin on the outside bend of the knot, as in A. If you try to tie with the inside of the material on the outer surface of the bend (as in B), it is probable that the material will either crack or snap off, and you may reject it as useless. The knots which are most suitable for tying these canes and vines are:
Joining knots: Sheet bend, Reef knot, and fisherman
Securing knots: Timber hitch.

When pulling the knot taut, do so gently. If you snap the joining knot the material may either cut itself or break. If the canes or vines are brittle through greenness try heat treatment.
USES FOR BUSH-MADE ROPES
There are many occasions when bush-made ropes can be extremely useful ... for climbing or descending a short cliff face; for climbing a tree; for a rope bridge; for a safety-line across a fast or flooded river.
SINGLE ROPE LADDER WITH STICKS

A single rope ladder is made by opening the lays of the rope and inserting cross sticks each about 8 inches long as shown with an equal amount protruding on either side of the rope. These cross sticks must be secured to the rope, and it is necessary to lash the rope above and below the sticks. The distance between the sticks should be from 15” to 18”.
To climb a rope ladder, hold the rope with both hands, bend the knees, and draw both feet up together and lay them with even pressure on the next cross sticks. When the footing is secure, raise the hands and continue the action, which is somewhat like that of a toy monkey on a string.
Bush single-rope ladders have the advantage that they can be used easily by people who may not be able to climb by ordinary means. They provide an easy means of ascending and descending a cliff or a lookout.
SINGLE ROPE LADDER WITH CHOCKS
This type of ladder has the advantage of being portable and quickly made. The chocks of hardwood are about 6” diameter and 2” deep, and are suitably bored to take the diameter of the rope. Splice an eye at the top end and seize in a thimble to lash the rope head securely. To secure the chocks, put two strands of seizing between the strands of the rope and then work a wall knot.
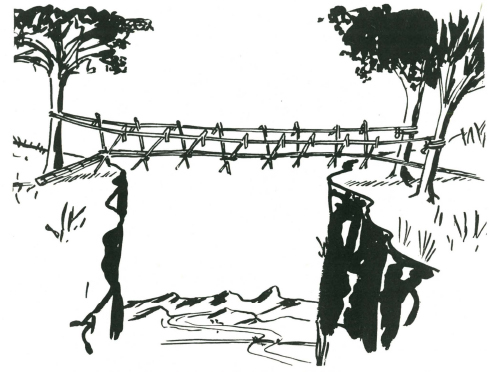
ROPE BRIDGE
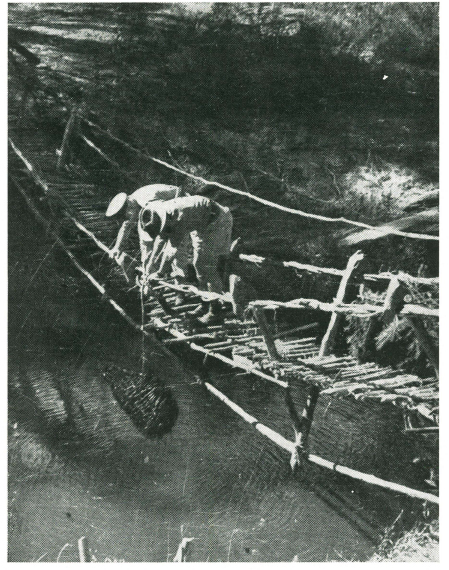
Two ropes are spun. They must be very strong and thoroughly tested. They are anchored to either side of the river, either to convenient trees or to anchors as shown.
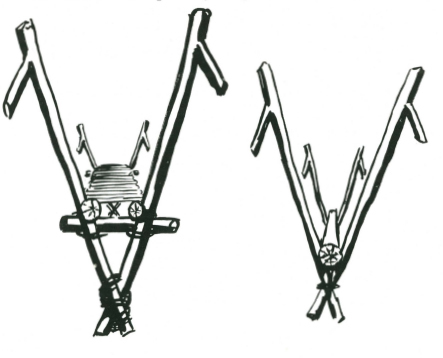
When these ropes have been stretched taut, light ‘A’ frames are made. The number required depends upon the length of the decking.

The first ‘A’ frame is hooked onto the ropes and pushed forward with a stick. The footing, a straight sapling, is dropped down onto the crotch of the frame, and the bridge builder walks out along this and hooks on the next ‘A’ frame, pushing it out the required distance, and repeats the process till the far bank is reached. Rope bridges must not be overloaded–one at a time is a safe rule. If Monkey vines, Lianas, or Lawyer vines (Calamus) are available instead of bush-made rope, use any of these. They are much stronger and will make a bridge strong enough for 4 to 6 men at a time.
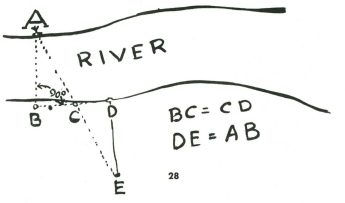
TO MEASURE THE DISTANCE ACROSS A RIVER OR GORGE
Select a mark on the opposite bank ‘A,’ and then drive a stake on the near bank ‘B.’ Walk at right angles for a known number of paces and put in another marker stake ‘C,’ and continue an equal number of paces and put in a third marker ‘D.’
Turn at right angles away from the river, and keep moving back until the centre marker stake and the mark on the other side of the river are in line ‘E.’
Measure the distance from the third or last marker peg ‘D’ to this point ‘E,’ and this distance will equal the distance across the river.
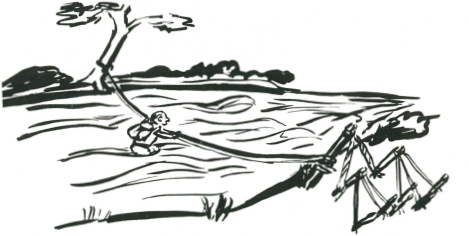
TO GET A ROPE ACROSS A NARROW DEEP RIVER
Fasten a stout stick to the end of the rope. The rope must be in the middle of the stick. Select a forked tree on the opposite bank. Throw the free end of the coiled line with the stick across the river to the tree. After many casts when it has caught, test with two or three people to make sure the line is secure. Fasten the near end of the rope to a convenient anchor, and then the person crossing the line (usually the lightest member of the party) hangs onto the line, lifts his legs and hooks them over the rope, with his feet towards the opposite bank. By this means he can work himself across the river, fasten the rope, and do all the work which has to be done on that side of the river.
SAFETY LINE FOR RIVER CROSSING
A bush rope can be spun to serve as a safety line for crossing flooded or fast rivers. The rope is taken across by one member of the party, and fastened to an anchor on the opposite bank. As a safety line it should be above water level. The person crossing should stand on the downstream side of the rope, and face upstream. He crosses by moving his feet sideways, one step at a time, and holding all the time to the rope which helps him keep his balance. If by chance the current is so strong that it sweeps him off his feet, his grip on the line will save him from being washed downstream, and he can work his way shoreward hand over hand, until he is a less strong portion of the current where he can regain his footing.
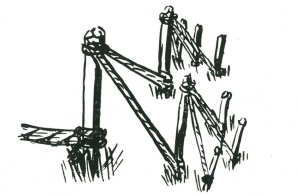
1-2-3 ANCHOR

A very stout stake is driven into the ground, at an angle of about 45°, and to the foot of this the main rope to be anchored is fastened. To the head of this stake two ropes are secured and these are fastened to the foot of two stakes to the rear. The heads of these stakes are in turn tied back to the foot of three other stakes. This anchor will hold secure under almost all conditions.
ANCHORING A PEG IN SAND
The only way to anchor a rope into soft sand is to attach it to a peg, and bury the peg in the sand.
Scrape a trench in the sand to a depth of between a foot and eighteen inches, deeper if high winds or very stormy weather are expected. Pass the rope round the centre of the peg; scratch a channel for it at right angles to the pegtrench.
Fill in the trench and rope channel, and fasten the free end of the rope to the standing end with a stopper hitch, and pull taut. The buried peg should hold a tent rope in sand under all normal weather conditions.