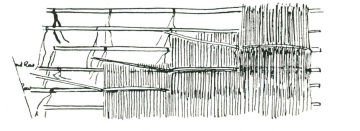
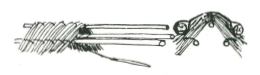
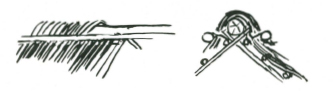
About two inches from the end cut an eye carefully through the flat side. This eye should be about one quarter inch wide and at least half an inch long.
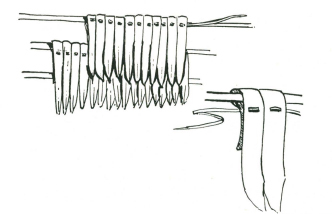
Lay the thatching material with the butts towards the roof and the lower end on the lowest batten. Secure one end of the sewing material with a timber hitch to the thatching batten, thread the other end through the eye of the thatching needle and sew in the ordinary manner to the thatching batten. To avoid holes where the sewing may tend to bunch the thatching together, pass the needle through the thatch at the angle indicated in the sketch and push thatch over the crossing of the stitches.
STICK THATCH
With this stick thatch, ties about two feet apart are fastened on to the thatching batten. The thatching stick is tied at one end, the thatching material placed under it, and when the tie, fixed on the thatching batten is reached, the stick is tied down, thus binding the thatching to the batten. This method of securing thatching is useful when long lengths of material for sewing are not readily available.
The overlapping and general principles of sewn thatching are followed.
TUFT THATCHING
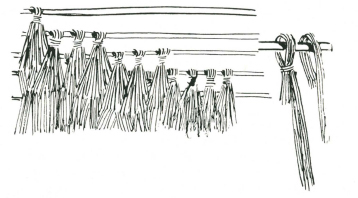
This method is excellent if the material is fairly long, say, two or three feet, and pliable. It is very suitable for reeds and sedges. The thatching material is gathered into small sheaves about an inch or so thick. The butt end is bent over the thatching batten, and a few strands are then twisted round the sheaf a few times and pushed through the bunched up material to hold the end secure. The tuft is then slipped along the thatching batten to lie alongside the preceding tuft. This thatch makes a very neat job from inside. It is secure in all weather, and requires no tying material. If sedge or sword grasses are being used it is advisable to put a pair of socks or gloves on your hands to avoid cuts.
It is important that the long free ends overlap the two or three preceding rows. Do not push the tufts up too tight. There can be about half an inch or more between the bent-over ends on the thatching battens. This open space will be covered by the free ends on the next row.
STALK THATCH
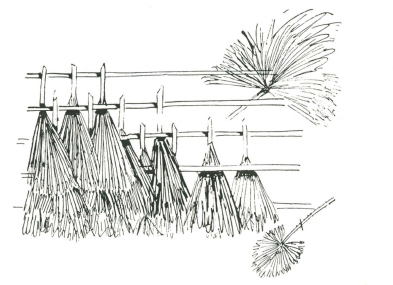
This method is very quick to apply and quite efficient. It is suitable for either the plicate type of palm leaf (as shown above) or the pinnate type (shown overleaf). The stalks are simply woven between the thatch battens. The natural bend forced on the stalks will exert sufficient pressure to hold the leaves securely in position. This is the quickest and easiest of all thatching methods, and quite efficient if the palm leaves are well bunched and have a good overlap to give watershed.
SPLIT STALK THATCH
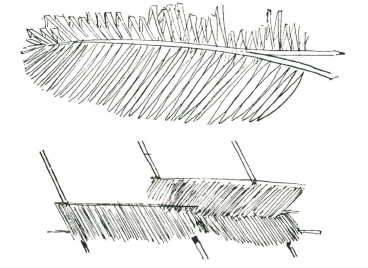
This thatch is particularly suitable for very long pinnate leaves. The centre rib of the palm frond is split. These split ribs are tied together and secured to the thatching battens with a good overlap. This method eliminates the need for thatching battens and is very efficient if suitable material is easily available.
WOVEN THATCH

If time permits and the materials are readily available, an alternative method to the split stalk thatch is the woven thatch. The pinnate fronds are laid flat on the ground and the leaves from one side are laid over and woven between the leaves on the other side. The entire stalk is then tied on to the framework, observing the same principle of overlap which applies to the other methods.
SEWN BATTEN THATCH
With other long, broad-leaved materials the leaves may be bent over sticks on the ground and a thin sliver of split cane or other suitable material used to sew the two sections of the leaves together. The sticks are then tied to the framework as for split stalk thatching. This method is very neat and efficient for certain materials. If green material is to be used make certain that it will not curl as it dries out. Many grass materials will curl into thin strips, and the thatch will be almost ineffective. Dead material is generally best.
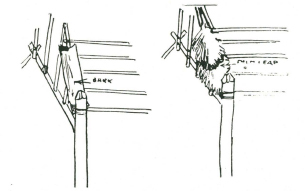
RIDGE THATCHING
In thatching the ridge it is essential to cover the stitching of the topmost row of thatching. If this stitching is covered there will be complete protection. If it is inadequately covered there will be a leak along the ridge.
The ridge thatch therefore must curl completely over the ridge pole or, better still, over a false ridge pole or, alternatively, it may stand up from the ridge and, if bound tightly, will make an efficient watershed. For pyramidal and circular huts this last is the most efficient method.
SEWN RIDGE THATCHING
With very long material two heavy poles may be slung on slings, so that they lie on either side and hold the outside edges of the ridge thatch material down.
Another method of thatching a ridge is to tie on two battens to the top of the topmost layer of thatching. The ends of the ridge thatching material sewn to these two battens must overhang the sewing of the topmost layer.
An alternative method is to sew the ridge material on to three poles, one of which acts as a false ridge, and the other two, which are sewn tightly, hang over the ridge some twelve or eighteen inches on either side of the centre pole. This ridge thatch material can be sewn on the ground in lengths of from six to twelve feet, and when the roof is ready for ridging these are laid over the actual ridge proper and the two side poles allowed to hang on either side, covering the top layer of stitching.
CROWN RIDGE THATCH

GUTTERING
Under some conditions it may be necessary to put a “valley” in the roof, and this will require guttering. Efficient guttering can be made from wide sheets of bark inverted so that they lie with the hollow side in the valley. An alternative is the use of hollowed-out palm trunks or the extra-wide leaves of the plicate palms can be laid to overlap each other. Considerable care must be taken with this guttering if you are to have a watertight roof.
FLASHING
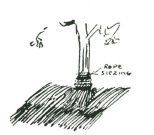
There are occasions when flashing may be required. For instance, there may be a tree growing through the roof where the ridge pole is held up, or for some reason some of the structural poles or tree trunks may project through the roof thatch. When flashing is required, simply spin up a length of thin rope from grass or other soft fibrous material (see Chapter 1 “Ropemaking”) and bind thatching round the tree or pole. Continue the binding an inch or two above top of the thatching material. Make sure that it is tight and secure. The rain will run down the tree trunk, come to the flashing binding and, seeping over it, come on to the thatch, from where it is led by natural flow to the thatch of the roofing.
RAMMED EARTH
This method of building makes a permanent structure which is well insulated and low in cost. The only materials required for the walls are earth containing certain wide proportions of clay and sand or other gritty particles. The earth must also be free from organic materials such as grass, roots and the like.