Doors, if required, are similar to the gate fame shown, but with two uprights lashed across the fork. To these two uprights the horizontal thatching battens are secured.
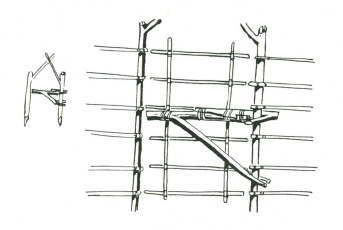
The hinging of the door frame is obtained by a combination of hook and fork.
There are several means whereby the door hinge can be assembled.
TREE SWINGING SHELTER
In swampy country, or in areas which are badly snake infested, a very simple swinging bunk can be made by one man in a day.
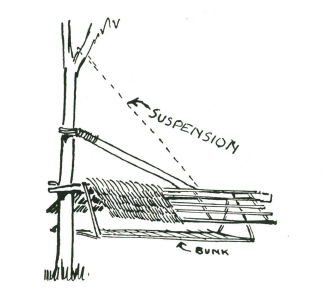
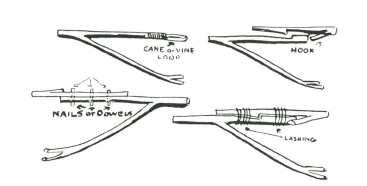
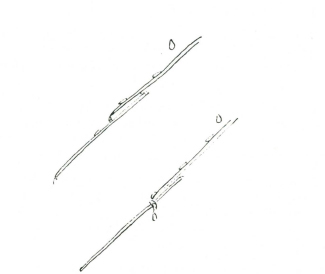
The forked frame stick must be very strong, both at the fork on the tree and at the main juncture. Either a cane or vine loop or a hook may be used at the top section. It is also advisable to have a vine or cane rope from the extreme end of the main frame to as high up in the tree as it is practical to reach for additional suspension.
The frame poles for thatch battens are lashed separately with a square lashing to the bottom of the forked frame stick, and, in order to give rigidity, a short cross stick is lashed horizontally to each of the opposite sides of the frame poles.
When thatching, thatch one row on one side, and then the row on the opposite side. This will help to strengthen the framework and keep it correctly balanced.
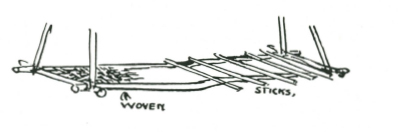
The bunk is made separately.
The main frame of the bunk is simply four poles lashed together to form a rectangle about three feet by seven. The space between the poles to form the bunk proper can be either woven or made with crossed sticks as for the camp bed (see Chapter 3).
THATCHING MATERIALS
Materials suitable for thatching range from long grass, reeds, rushes; most of the long stalked ferns, such as bracken, etc.; palm leaves of all types, and, as a last resource, many pliant leafy branches.
Long grass and reeds are most satisfactory when used dry or partly dry. It is advisable if you are going to use these materials to cut and stook them first so that they may get a chance to season before being used on the roof.
There are two good reasons for this: first is that in drying out most of these materials, if green and exposed to hot sun, tend to shrink on one side and turn and curl in shrinking, so reducing the coverage value for thatching. The other is the general tendency of all green materials to shrink, and therefore the thatching stitches become loose, and the thatch may slip from the stitches and be blown away in the first breeze.
When the materials are well seasoned the stitches will not slacken because there is very little shrinkage, and the thatch will stay down securely.
With most of the bracken ferns it is advisable to thatch with the material green, and sew it down very tightly. This also applies if you are forced by circumstances to use green branches. These do not make a very efficient thatch and their use is not recommended except in emergency.
In a general way, the use of bracken and reeds for thatching is doing a very good service to the land generally. Bracken is injurious to cattle, and reeds choke watercourses, so that removing these two pests and putting them to practical use is quite a good thing to do.
If branches of trees or shrubs are to be used, seek out a dead branch with some of the leaves still on it. Shake the branch. If the leaves immediately fall from it, the material is almost useless and will only serve you for a day or so. If the leaves withstand this shaking, the plant will probably serve your purpose fairly effectively. Some trees and shrubs drop their leaves within a few hours of being cut. Such are useless.
The palm leaves are best used for thatching when they are dead. You will find great quantities lying under the palms and these are excellent material. They may be brittle and inclined to break if you start collecting them in the middle of a hot summer day.
The best time to collect dead palm for your thatching is either early in the morning when the leaves are softened’ by the overnight dew, or after rain. It is always advisable to wet the leaves down before you start sewing them on the thatching battens. This damping down softens the brittle leaves, makes them lie flat, and ensures that you get a better coverage.
THATCHING METHODS
There are almost as many different methods of thatching as there are different materials. Each different method has its own peculiar advantage and applications for certain types of material.
The methods you are most likely to find of use are either to sew the thatch on to the thatch battens, which is called “Sewn Thatching,” or to tuft the material on in bundles, which, appropriately, is called “Tuft Thatching.”
Instead of sewing on to the battens you may find it more convenient to tie a pliant stick on to the thatching batten at convenient intervals, using the pressure of this stick tightly tied to the thatch batten to hold the thatch material secure. This is called “Stick Thatching.”
There are also several methods by which the thatching materials may be secured to the thatching battens on the ground, and these thatching battens are then laid on to the framework, overlapping like long tiles.
Or with some of the palms the palm stalk itself may be used either as the thatch batten, or to hold the palm leaf itself in the desired position. All these methods are self explanatory, and briefly dealt with on the following pages.
PRINCIPLES OF WATERSHED IN THATCHING
Thatching may be either for shade or to give protection against rain. Thatching for shade presents no problems. If the thatch is thick enough to break up the sun’s rays, that is all that is required.
Thatching for protection against rain or, under certain conditions, wind, will be effective only if certain principles are observed. It is interesting to watch the behaviour of drops of water on thatch. The drops run down the topmost strands, until they come to the very end of the blade of grass or other material. There the drop gathers size and, when it is big enough, and heavy enough, it falls off and on to the blade immediately beneath.
If the stitching interrupts the smooth continued course of the water droplets, then the water will follow the stitching because it is at a steeper angle. It will creep along the stitch and when it reaches the lowest point, on the underside of the thatching batten, the drop will gradually build up until it becomes too heavy to ream in on the sewing material. Then you will complain that the “thatching leaks”. Thatch will never leak if the stitching is properly covered.
It is this quality of “coverage” rather than thickness which makes a thatch waterproof. Windproofing lies largely in the “tightness” and thickness of the thatching.
SEWN THATCHING
Stitch at bottom of first thatch on lowest thatching batten. The second layer must overlay the stitching of the first row and include the top section of the underneath layer in the actual stitch. It is better to have each layer held by three rows of stitching. The stitching of every row MUST be completely covered by the free ends of the next layer above it.
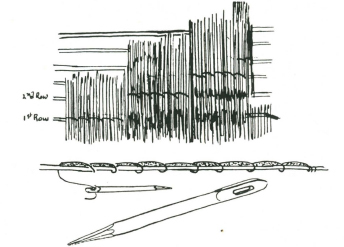
To sew thatching make a thatching needle by cutting a dead, straight grained stick one inch thick and about 18 inches long. Sharpen one end and rub it fairly smooth on a stone. Narrow the other end till it is about one quarter of an inch thick, but the full width of the stick. This end should be flattened for about three inches.