

Inspect All Positions
Leaders must ensure their soldiers build fighting positions that are both effective and safe. An improperly sited position cannot be used and an improperly constructed position is a danger to its occupants. Leaders should inspect the progress of the fighting position at each stage in its preparation.
TYPES OF FIGHTING POSITIONS
There are many different types of fighting positions. The number of personnel, types of weapons, time available, and terrain are the main factors that dictate the position that will be used.
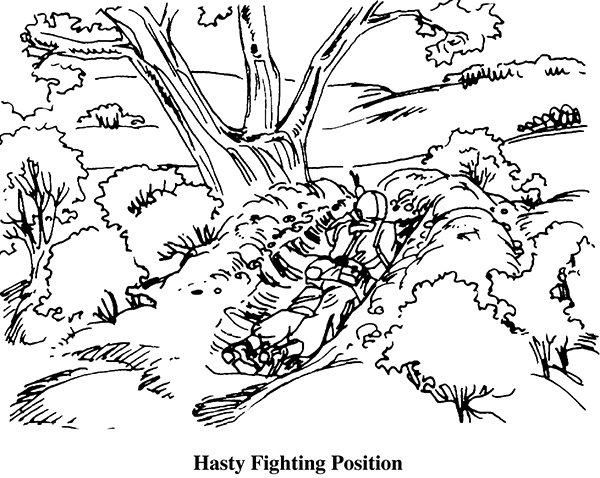
Hasty Fighting Position
Soldiers use a hasty fighting position when there is little or no time to prepare. They locate it behind whatever cover is available. It should give frontal protection from direct fire while allowing fire to the front and obliquely. A hasty position may consist simply of a rucksack placed beside a tree or large rock. For protection from indirect fire, a hasty fighting position should be in a small depression or hole at least 18 inches deep. The term “hasty position” does not mean that there is no digging. In only a few minutes, a prone shelter can be scraped out or dug to provide some protection. This type of position is well suited for ambushes or for protection of overwatching elements during raids and attacks. Hasty positions can also be the first step in the construction of more elaborate positions.
One-Soldier Fighting Position
Positions that contain a single soldier are the least desirable, but they are useful in some situations. One-soldier positions may be required to cover exceptionally wide frontages. They should never be positioned out of sight of adjacent positions. The one-soldier fighting position should allow the soldier to fire to the front or to the oblique from behind frontal cover.

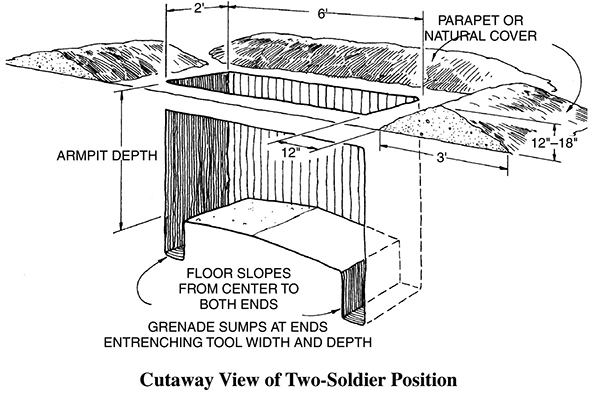
Two-Soldier Fighting Position
A two-soldier fighting position can be prepared in close terrain and used where grazing fire and mutual support extend no farther than to an adjacent position. It can be used to cover dead space just in front of the position. One or both ends of the hole are extended around the sides of the frontal cover. Changing a hole this way allows both soldiers to see better and have greater sectors of fire to the front. Also, during rest or eating periods, one soldier can watch the entire sector while the other sleeps or eats. If they receive fire from the front, they can move back to gain the protection of the frontal cover. By moving 1 meter, the soldiers can continue to find and hit targets to the front during lulls in enemy fire. This type of position requires more digging and is harder to camouflage. It is also a better target for enemy hand grenades.
Positions On Steep Terrain
On a steep slope, a soldier in a hole behind frontal cover cannot shoot attackers without standing up and exposing himself. To overcome this, the hole is dug and firing ports are dug out at each end of the hole. The ground between the firing ports then serves as frontal cover for the position.
Three-Soldier Fighting Position
A three-soldier position has several advantages over the other positions. There is a leader in each position, which makes command and control easier. It also supports continuous, secure operations better than other positions. One soldier can provide security; one can do priority work; and one can rest, eat, or perform maintenance. It allows the platoon to maintain combat power and security without shifting personnel or leaving positions unmanned. Lastly, it provides 360-degree observation and fire.
The leader must consider the following with three-person positions:
•Either the distance between positions must be increased or the size of the squad’s sector reduced. The choice depends mainly on visibility and fields of fire.
•Because the squad leader is in a fighting position that will most likely be engaged during the battle, he cannot exert personal control over the other two positions. The squad leader keeps control over the battle by:
Clearly communicating plans and intent to his squad, including control measures and fire plans
Using prearranged signals such as flares, whistles, or tracers
Positioning key weapons in his fighting position
Placing his fighting position so that it covers key or decisive terrain
Placing his fighting position where his team might be able to act as a reserve
The three-soldier emplacement is the T-position. This basic design can be changed by adding or deleting berms, changing the orientation of the T, or shifting the position of the third soldier to form an L instead of a T. Berms, camouflage, and overhead cover are similar to other fighting positions.
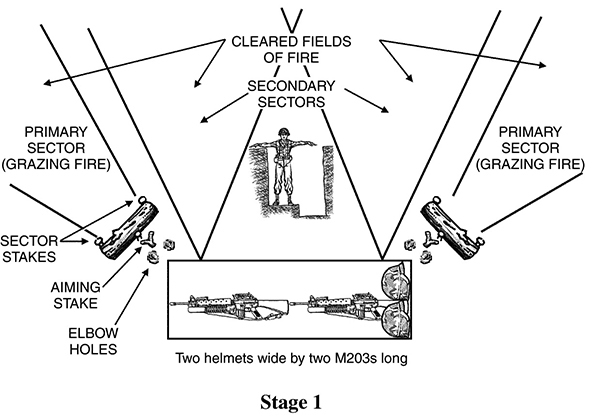
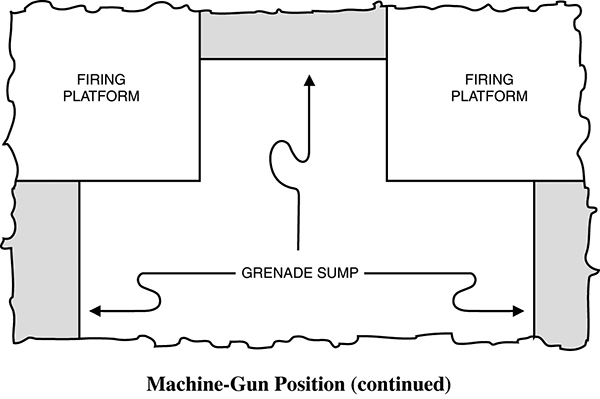
MACHINE-GUN POSITIONS
The primary sector of fire is usually situated obliquely so that the gun can fire across the platoon’s front. The tripod is used on the side with the primary sector of fire, and the bipod legs are used on the side with the secondary sector. When changing from primary to secondary sectors, the machine gun is moved but the tripod is left in place. Dig a trench for the bipod legs in the secondary sector. After the platoon leader positions the gun and assigns sectors of fire, mark the position of the tripod legs and the limits of the sector of fire. Then trace the outline of the hole and the frontal cover.
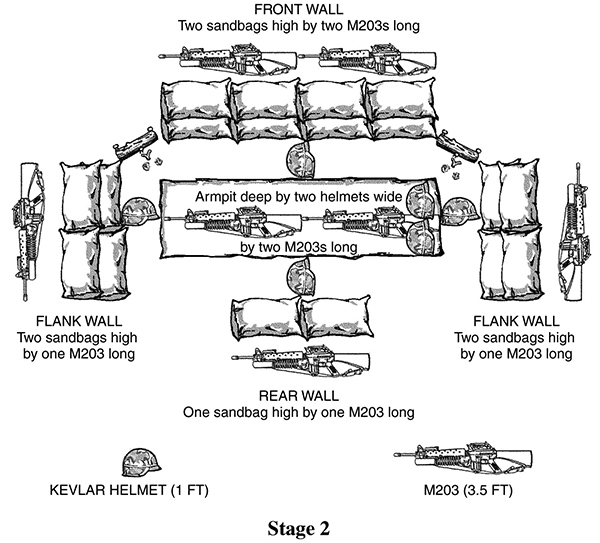
The gun is lowered by digging down the firing platforms where the gun will be placed. The platforms must not be so low that the gun cannot be traversed across the sector of fire. Lowering the gun reduces the profile of the gunner when he is shooting and reduces the height of the frontal cover needed. Dig the firing platform first, to lessen the gunner’s exposure in case firing is required before the position is completed.
After the firing platforms have been dug, dig the hole, placing the dirt first where frontal cover is needed. The hole is dug deep enough to provide protection and still let the gunner shoot, usually about armpit deep. When the frontal cover is high and thick enough, the rest of the dirt is used to build the flank and rear cover. Three trench-shaped grenade sumps are dug at various points so that grenades can be kicked into them. Overhead cover is constructed following the steps of stage 4.
Note: If only a primary sector of fire is given, dig only half the position.
JAVELIN POSITION
The Javelin can be employed from initial or completed positions. However, some changes are required: