•One-person drag, with or without line.
•Two-person drag, with or without line.
•Hawes carry—the wounded soldier wraps his arms around your neck from behind; lean forward to pick up and carry him.
•Fireman’s carry—the wounded soldier is carried over your shoulder.
C-Spine Stabilization
Penetrating head and neck injuries do not require C-spine stabilization, as the spinal cord is either already compromised or is in less danger than normally caused by blunt trauma.
Injuries from blunt trauma, such as motor vehicle accidents, fast roping injuries, or falls greater than the height of the individual, may require C-spine stabilization.
Note: Apply stabilization only if the danger of hostile fire does not constitute a greater threat.
Level of Consciousness
When possible, determine the casualty’s level of consciousness using the AVPU system:
•A—casualty is alert and knows who he is, the date, where he is, etc.
•V—the casualty is not alert, but does respond to verbal commands.
•P—the casualty responds to pain but not to verbal commands.
•U—the casualty is unresponsive (unconscious).
Ask questions that require more than a “yes” or “no” answer. Examples of questions include: “What is your name?” “What is the date?” and “Where are we?” Recheck the casualty’s level of consciousness about every fifteen minutes to determine if his condition has changed.
Airways
Assess and secure the casualty’s airway. If the casualty is conscious, able to speak, and not in respiratory distress, no airway intervention is needed.
If the casualty is unconscious, perform the following:
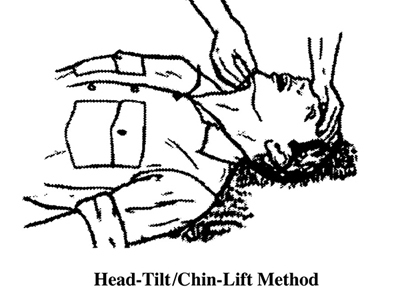
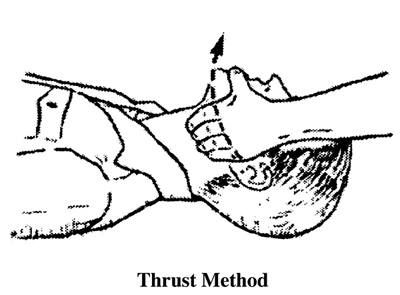
•Use a head-tilt/chin-lift or jaw thrust to open the airway. The head-tilt/chin-lift method is the normal way to open the casualty’s airway. Use the jaw thrust method if you suspect the casualty has suffered a spinal injury.
•Check the casualty for breathing. While maintaining the casualty’s airway (head-tilt/chin-lift or jaw thrust), place your ear over the casualty’s mouth and nose with your face toward the casualty’s chest. Look for the rise and fall of the casualty’s chest and abdomen. Listen for sounds of breathing. Feel for his breath on the side of your face. If breathing is not present, begin rescue breathing.
•If the casualty is breathing on his own, use a nasopharyngeal airway (NPA) to maintain the airway.
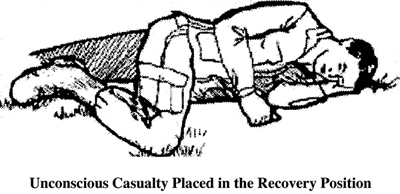
•If the casualty has no additional injuries, roll the casualty into the recovery position (on his side). This allows accumulated blood and mucus to drain from the mouth instead of choking him.
Nasopharyngeal Airway. The nasopharyngeal airway (NPA) is used to maintain the airway when the casualty is breathing on his own. It is well tolerated by conscious patients.
•Lube before inserting.
•Insert at a 90-degree angle to the face, not along the axis of the nose.
•If the patient gags, withdraw slightly.
•Tape in place.
Note: Avoid the use of oral pharyngeal airways on a conscious patient as they are easily dislodged and cause the casualty to gag.
Chest
Assess and treat the casualty for chest injuries:
•Expose the chest and check for equal rise and fall. Remove the minimum of clothing required to expose and treat injuries. Protect the casualty from the environment (heat and cold) as much as possible.
•Examine the chest for wounds. Check for both entrance and exit (sucking chest) wounds.
•Immediately seal any penetrating injuries to the chest with airtight material. Sealing the wound keeps air from entering. If air can freely enter through the wound, the casualty’s lung may collapse. Use a three-sided seal (one side of airtight material left untaped), which prevents air from entering but allows trapped air to escape. You can also use an approved manufactured chest seal.
•Monitor the casualty. Watch carefully for progressive severe respiratory distress (breathing becomes more labored and faster). If respiration becomes progressively worse, assume tension pneumothorax (see next section).
Caution: Only perform needle chest decompression (see next section) on a casualty with a penetrating (sucking) chest wound.
If the casualty has been treated for an open chest wound, position or transport him with the affected (injured) side down, if possible. The body pressure acts to “splint” the affected side.
Open Pneumothorax. All open and/or sucking chest wounds should be treated immediately. The first course of treatment should be a vented (three-sided) chest seal, or a non-vented chest seal if a vented one is not available. If neither of these is available, substitute any material that will not allow air to flow through it, such as petroleum gauze or the wrapper, or latex gloves.
If the casualty develops increasing respiratory distress, hypotension and a tension pneumothorax should be suspected. Treat by burping or removing the dressing.
If there is no relief of symptoms, follow the steps below to perform a needle decompression:
1.Locate and secure a 14-gauge catheter.
2.If not already done, remove any outer clothing and expose the chest area completely.
3.The needle should enter at the second intercostal space in the midclavicular line, two to three fingers’ width below the collarbone and in line above the nipple on the same side of the chest as the injury.
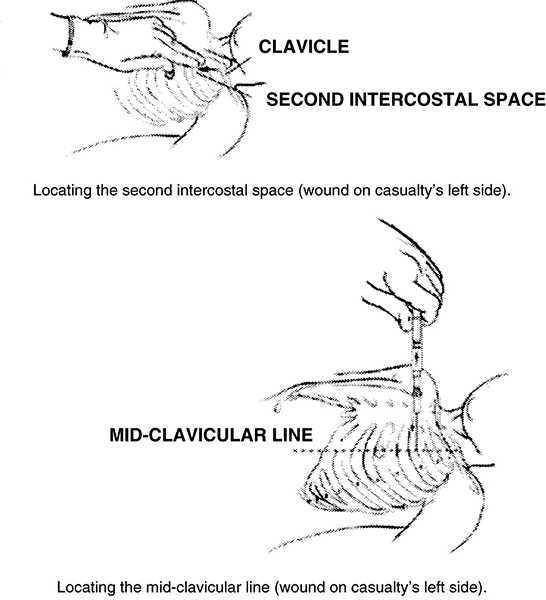
4.Needle entry should be at a 90-degree angle directly over the third rib. You can touch the third rib and then slide the needle upward and over.
5.Once in place, remove the needle, leaving the catheter, and continue to monitor the casualty.
6.A lateral approach from the side and under the arm may be faster and safer given body-armor configuration and the ability to reassess. This would be performed at the intercostal space at the axillary (mid-side) line. Use the same technique as you would for the second intercostal space.
HEAT INJURIES
Heat injuries are disabling to varying degrees and can be fatal. They occur when water and salt lost in sweat are not replaced. Heat injuries are especially liable to occur in individuals who are not acclimatized (accustomed) to the heat, are overweight, have fevers (sunburn, infection, or reaction to immunizations), or are already dehydrated (have insufficient water in their bodies) because of diarrhea, alcohol consumption, or simply not having drunk enough water.
Sweating
The evaporation of sweat is the only way the body can cool itself when the temperature is above 95 degrees Fahrenheit. Evaporation is less efficient and more water intake is required in the humid jungle than in the dry desert. Soldiers working hard in the heat can lose and need to replace more than 3 gallons of water and salt.
Water. It’s best to replace water as it is lost—soldiers should drink when thirsty. There is no benefit in withholding water until later. It is impossible to train soldiers to get by on less water than the amount required to replace that lost in sweat. Water requirements can be reduced only if sweating is reduced by working during the cooler hours of evening, night, and early morning.
Salt. Extra salt is required when soldiers are sweating heavily. Salt tablets should not be used to prevent heat injury, however. Usually eating field rations or liberal salting of the garrison diet provides enough salt to replace what is lost.