At this stage, I tie a buckskin thong around the basket to hold it to shape, then strip off any remaining ragged outer bark that may have popped loose at the folds. I also check the evenness of the top circumference; if one side is taller than the other, or other irregularities exist, I mark with charcoal what to trim off. You can either open the basket back out flat to trim (easiest, I think), or wait ‘til the sides are laced up and trim just prior to applying the rim reinforcement strip.
Drilling Holes and Lacing the Basket
The holes for lacing are drilled in two parallel rows up each side of the basket about an inch in from each edge, or just beyond where the overlap stops, and thus through only a single layer of bark. The lacing will run back and forth through the holes to encase the double layer overlap.
On the very first juniper bark basket I made, having neither instruction nor experience with the medium, I started punching lacing holes with an awl, but soon realized my error when all the holes started to connect by a long split. By switching to the stone-tipped hand drill, employing abrasion rather than punching, I eliminated the splitting problem. Holes can also be successfully burned in.
The number, placement, and spacing of holes depends on the size of your basket, your aesthetic whim, and the style of lacing you choose. The two most common are a single lace that spirals around and around through the holes from bottom to top, and a double lace where each end crosses back and forth through the holes (which can be one long lace begun at its middle through the bottom two holes). This creates a pleasing X-pattern to the lacing. The sides can also be simply tied closed through corresponding pairs of holes rather than continuously laced. This could be advantageous in situations where long laces are not available.
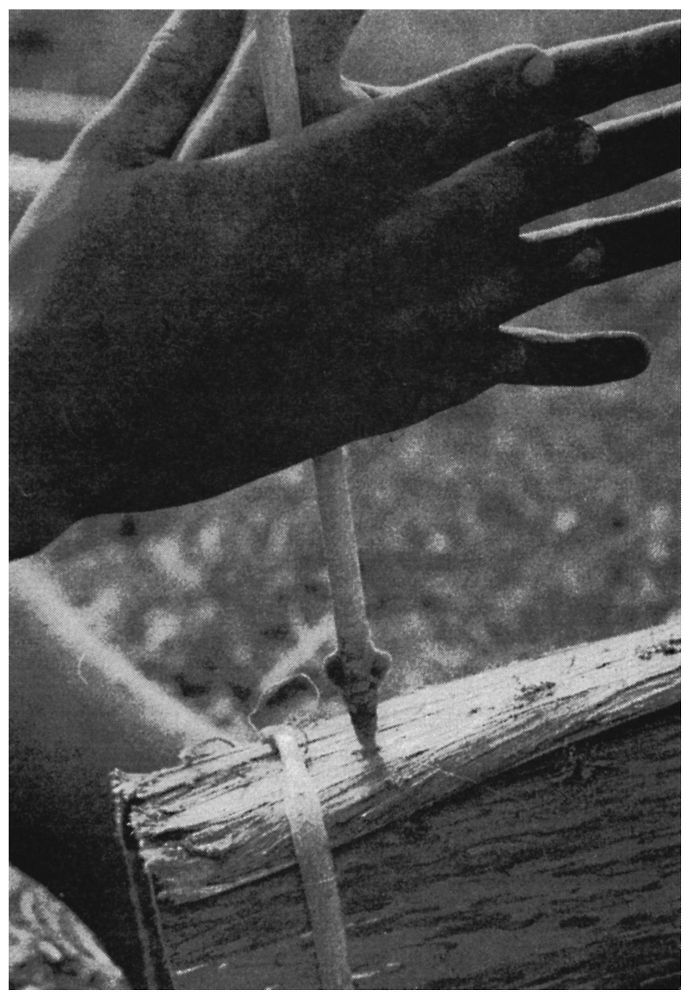
A chert-bitted hand drill is used to drill lacing holes through the side of a juniper bark basket. (Photo: Jim Riggs)
Holes can be drilled while you have your basket temporarily tied to shape, although the edges tend to bend downward from the drill pressure unless you prop them in place with a couple of short sticks wedged inside. You can also shove your foot or a conveniently sized chunk of wood inside to serve as a back brace for drilling. Or you can just mark your desired hole placements with charcoal, then open the bark and lay it out flat on a more stable surface for drilling. If you already have your rim strip sized, you can measure its width in from the top edges of the basket panel and drill those holes too, though I normally wait until the sides are all laced up because some rim holes may have to be drilled through the double thickness overlap at each side.
Lacing material can be whatever you have on hand or can find in the immediate environment, including buckskin thongs, wet rawhide thongs, two-ply dogbane or other fiber cordage, sinew, long strips of willow bark, whole or split, thin willow withes, pliable roots or vines like honeysuckle or clematis, shreddy barks such as big sagebrush, strips of peeled juniper cambium, tule stems, cattail leaves, ad infinitum! While lacing material of high tensile strength is easier to use and to cinch tightly, super-strength is not imperative. The main function of the side lacing is to hold the overlapped edges in place while they’re still pliable; as the whole basket dries, the bark becomes quite rigid and retains the shape it was trained to.
Forming and Lacing the Basket Rim Reinforcement Hoop
The main functions of the rim reinforcement pieces are to protect and prevent splitting or other damage to the top edge of the bark sides, to hold the basket mouth to desired shape while the rim and basket body dry and take on a set, and to increase overall durability of the basket. I prefer the convenient availability, flat configuration and neatness of the juniper bark strip for. the rim, but I’ve also frequently used green lengths of willow or red osier dogwood shoots split in half. The flat side lays in contact with the basket.
Functional rims can be laced around either the outside or the inside of the basket mouth, or on both sides. Aboriginal baskets exhibit all three variations, and some have bundled rims that appear to be willow shoots, bark strips or other fibrous material laced on. The term rim “hoop” is slightly misleading in that I’ve never seen nor made a bark basket where the rim piece was first separately bound into a hoop shape before being laced onto the basket.
To prepare a juniper bark strip for the hoop, trim it to a uniform width (about an inch), then pre-bend it in your hands or over your leg to relax stiffness and train it to better conform to the curvature of the basket mouth. Lay it around the basket and cut it an inch or two longer than the actual circumference so that there will be some overlap of the two ends when it is laced into place.
Measure the rim strip’s width down from the top of the basket, mark that, and drill your lacing holes roughly three-quarters to one inch apart all the way around. Begin lacing on the strip near one end (the distance in from the end that the other end will overlap) and continue lacing all the way around the basket mouth. Your final lacing stitches will bind down the overlapped area and end at your point of origin.
Leading ends, splices, and finishing ends of your lacing material are normally not tied off, but simply tucked under a previous or forthcoming stitch; once dry, they shouldn’t come loose. Actual rim material, number of holes you drill, lacing material and technique can be whatever you choose to experiment with, as long as they work! The more baskets you make, the more interesting variations and refinements you’ll come up with. For example, you can thin or feather out each end of the rim strip prior to lacing so that the over lap is hardly noticeable.
Finishing Touches and Variations
A freshly completed juniper bark basket should still be somewhat malleable and, if desired, you can do some cosmetic manipulating to adjust the shape of the mouth, flatten or round out the sides, etc. When I get one to the configuration I want, I place a short stick or two inside to prop and hold it in that position while it dries. Kept in the sun, sufficient drying should take only two or three days, depending on the thickness of the bark.
The final step is attaching a carrying strap long enough to loop over the neck and shoulder so the top of the basket hangs at about waist level. I usually affix a buckskin-thong loop to each side of the basket through a pair of lacing holes, then tie a longer shoulder strap to those.
When I first began making bark baskets I marvelled at the simplicity of the one-piece folded design, but the inevitable inverted U-shaped bottom (typically deeper on the standard aboriginal more cylindrical forms that were my only models) seemed impractical. Then, while picking currants one day I suddenly realized that the curved basket bottom meshed perfectly with the opposite curvature of my upper thigh. This position, with the strap around neck and one shoulder, props the mouth of the basket upward and forward and frees both hands to rapidly and efficiently strip berries into it. How neat! However, I’ve found no documentation that this handy position was either intended during aboriginal construction or practiced during use.
While the aboriginal use of juniper bark appears limited to constructing the basic berry basket type described here, I find it to be nearly as versatile as poplar bark, but much less efficient to harvest in quantity. Once you have made a basket or two, you learn to visualize exactly what size and shape of bark panel you need to construct specifically dimensioned baskets or containers intended for other uses.