Aboriginal Examples
Two aboriginal examples of one-piece folded baskets of western juniper bark from the Harney County Museum in Burns, Oregon, illustrate considerable variation in construction and craftsmanship. They are included here as examples from the past that may compliment contemporary construction and reinforce our ties with the past.
Burns is within the Northern Paiute culture area, but it is not known for certain if the two baskets were of local manufacture. The lacing and trim materials are not positively identified. Age is unknown, but portions of commercial cloth on each indicate use during post-contact times. Some measurements are included, but are not complete.
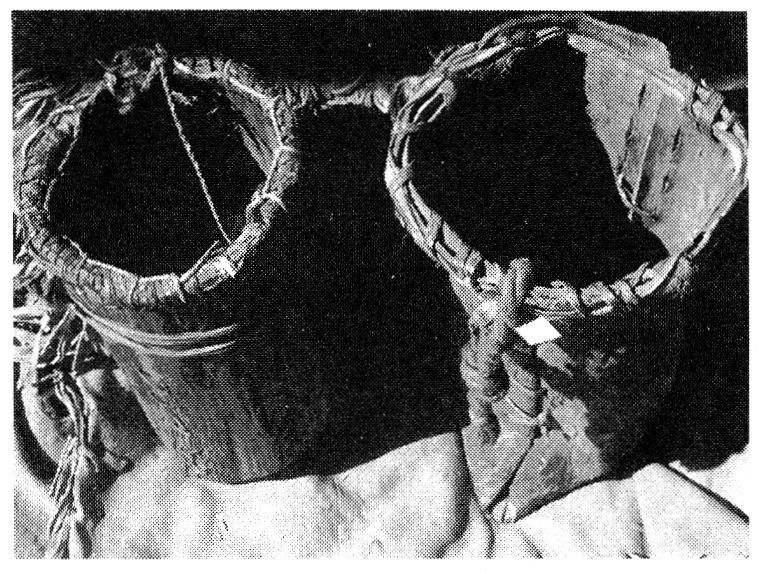
Left Basket Height: (corner to rim) 15”; (center of bottom to rim) 12-5 /8”; diameter: (at mouth) 6-3/4”; circumference: (at middle) 19”.
This is a finely crafted specimen showing external scoring at the base and tightly-laced rim. A cloth strip wrapped twice around the body with two-ply, hand-twisted, plant fiber cordage tied to the rim that appear to form part of the carrying strap. Another continuous length of two-ply cordage runs through periodic rim lacing holes and chain-links back under itself around the entire rim circumference. The specific function of this neatly affixed cordage is not known.
Right Basket Height: (corner to rim) 17”; Diameter: (at mouth) 7-1/ 8”; Circumference: (at middle) 19-3/4”.
This is a more crudely made specimen of much thicker bark. The bottom has not been scored, but appears more to have been mashed and manipulated into shape as the sides were folded up. The top is not evenly trimmed and the rim binding is not continuously wrapped. A knotted length of twp-ply cloth rope affixed to one side of the rim appears to be part of a carrying strap.
In my advanced aboriginal skills courses I’ve found it an excellent project involving multiple primitive technologies and skills using only natural materials and replicated aboriginal tools—no steel allowed! Therefore, you have to manufacture the tools. These include:
A percussion-flaked hand axe or “chopper” of obsidian, chert, basalt, etc., used to outline and groove through the bark panel on the tree and to initially pry up the bark edges for peeling. While some Acheulian hand axes were works of art, yours need not be, as long as it works. Sometimes you can just find a fortuitously shaped and sized rock that will suffice with minimal edge retouching. Hafted edge-ground axes and celts also work fine.
Spalled obsidian flake blades for trimming and scoring the bark, cutting lacing materials, etc. It’s a good idea to back these (dull all but the intended cutting edge) so that bark and finger trimmings don’t occur simultaneously!
A pressure-flaked stone drill, usually chert or basalt for strength, hafted with sinew, pitch, hide glue, etc., to a straight shaft for hand drilling side and rim lacing holes.
Occasionally, a spud for prying the bark panel from the tree. This could range from an appropriately shaped, unmodified antler tine to a stick found on the spot and modified to a chisel shape using a hand axe or flake knife, or by simply abrading it on a gritty rock. If you’re not inclined to be a purist, just employ correspondingly appropriate modern tools. You’ll learn less, but you’ll still be making a bark basket.
Selecting a Suitable Tree
Unlike tulip poplars where most of the bark from a single tree can be utilized, juniper species in general are not noted for growing tall, straight, unbranched or clear-barked. You may have to scour dozens of trees before finding an unblemished and sizeable enough panel of bark suitable for making one basket. Denser stands of junipers will usually have proportionately more clean-barked, branchless portions of trunks than bushier trees growing in the open.
It is rare to find any single tree that will yield multiple suitable panels of bark. Trees about one foot in diameter are excellent. On much larger trees both the furrowed outer bark and the cambium are proportionately thicker, harder to cut through and peel from the trunk, and harder to accurately manipulate later in the process. However, huge-based junipers often branch into several parallel, smaller trunks; you may have to exercise the ape in you to climb up and survey them, but the sides of those facing each other, especially when shaded by dense outer foliage, are often quite free of twigs and knots. Clear sections of larger limbs will also work.
To replicate a typically proportioned aboriginal basket you are looking for a clear panel of bark approximately three times longer than it is wide. While aboriginal examples I’ve seen have ranged from quart-size and smaller up to baskets that could hold several gallons, the most common initial panel dimensions are nine to eleven inches wide by twenty-seven to thirty-three inches long. The surface should be as free as possible of any branch stubs, major scars or deep dives where the bark furrows down into the wood. These irregularities don’t mean that cleanly removing the panel is impossible, just potentially more difficult. Since normally only a single vertically oriented rectangle of bark is removed from any one tree, the tree is not completely girdled and thus does not die.
Removing the Bark Panel from the Tree
When I’ve found what appears to be a suitable panel, I strip and peel off the roughest of the flaky, shaggy outer bark; it usually comes off in long strips. This sometimes reveals initially unnoticed flaws making the panel less desirable, but it also reduces unnecessary thickness of extraneous outer bark that you’d have to chop through with the hand axe. On most panels you can safely strip the brownish outer bark down to the depth of any furrows, but slow down when the newly exposed layers of bark begin to show a more reddish-purple color. The white cambium lies just beneath this. At this stage you needn’t remove all extraneous bark; more can be cosmetically peeled later after the basket is bent to shape.
Depending on the style and sharpness of your hand axe, you might want to wear a glove. Using glancing, chopping, overlapping blows, outline the perimeter of your panel. If possible, make the panel an inch or so wider than necessary so a longitudinal strip can later be cut along one entire edge to be used for the rim reinforcement hoop.
Once you have the panel clearly delineated, use your hand axe as a grooving tool. Hold it with both hands, apply pressure and slide it back and forth in the cut to connect all the chop marks and deepen the groove all the way through the cambium to the wood proper. The cambium will be whitish and the wood more yellow-tan. It is especially important to make sure the cambium is cleanly grooved through to the wood in the top and bottom horizontal cuts; any still-connected spots there can cause splits in your panel if you’re a bit careless in peeling it from the tree.
Begin at or near a corner in one side groove and, with fingers or the point of the hand axe, gently pry under and lift the edge. Work fingers or axe up and down, sliding under the bark, until an inch or so along the entire edge of the panel is free. If you’re peeling during an optimal sap flow and the bark seems to be separating easily from the trunk, just continue shoving your fingers and hands further under the bark, then up or down toward each end.
On a large panel, if working under from only one side becomes awkward, repeat the initial edge-lifting along the opposite side and work back toward the freed area. If the bark is being a bit stubborn and finger and hand pressure are insufficient to cause separation, use your spud, but carefully! Prying too forcefully at any one spot may easily split the bark. Also be extra careful when freeing the panel at the top and bottom cuts (end grain of the bark) where splits are most likely to occur. Never try to just pull the slab off from one side or to back-bend it severely—it will split for sure.