Sometimes a few splits are inevitable. Short ones at the ends will be held in check later when the reinforcing rim is laced in place. Longer splits can be laced closed before the basket is bent to shape, but splits that extend more than half the length of the panel, even when laced closed, can make folding the bottom difficult without worsening them.
The main ingredient in successfully removing the bark panel reasonably undamaged is to begin slowly and carefully to get the feel of the material, then proceed accordingly. When the sap is extra juicy I’ve had panels literally pop free with very little coaxing. When more finesse is required, it is similar to carefully fisting the hide from a deer. Steel knives, axe heads, flat pry bars, etc., will work, but cause more unnecessary bruises, gouges, slices and splits in the bark than kinder and gentler methods.
In my experience in eastern Oregon I’ve found June through early August the optimal period for peeling bark without much difficulty. Years of drought or excessive moisture can vary those parameters. Typical western juniper habitat is a fairly arid environment though, and by late August many trees are too dry to peel. There are alternatives however, and one failed attempt need not mean another won’t work. Moisture content can vary considerably between individual trees. Try trees growing more densely, higher elevation trees, trees growing closer to a direct water source or the north side of a tree instead of the sun-baked south side. Conversely, in early spring, the pre-warmed south sides of lower elevation trees may be ripe for easy bark removal.
Your freshly removed bark panel is best scored and bent to shape within a couple of hours of peeling or it may dry too much and become brittle. Sealing slabs in your standard, large-sized, aboriginal trash bag can keep them malleable for several days. Panels that have dried too much can be soaked in water until pliability returns, or even more quickly reconstituted by thoroughly wetting, sealing in a black plastic bag and placing in the direct sun for a few hours (the non-abo method).

Template for an average sized and proportioned aboriginal western juniper-bark basket.
Scoring and Folding the Bark Panel
If you planned your rim reinforcement to come from your bark panel, lay the bark out, cambium side up, and cut an approximately one-inch-wide strip from along the entire length of one side of the slab (other rim options are discussed later).
Now measure and mark the midpoint of the panel’s length with a straight line across its width (I use a piece of charcoal from the campfire). You don’t need a tape measure; just stretch a piece of cordage to the length of the bark, then fold it in half to mark the midpoint. Now draw a symmetrical, bi-pointed ellipse (this is a contradiction of definitions that says exactly what I mean—eye—shape or football-shape) with its points and midline aligned along the midline of the bark.
The tips of the points should barely reach, or remain a hair short of, the bark margins. The width of the ellipse will be the width of the bottom of the basket. The width and shape of the ellipse, in relation to the width and length of the bark panel, will largely determine the shape or style of the finished basket. A narrow ellipse will dictate a flatter, more flask-shaped basket; a broader ellipse will produce a rounder, more cylindrical basket. Either way, the ellipse must come to a point at each side for the ensuing fold to bend and overlap properly. Most of the aboriginal juniper bark baskets I’ve seen were of the broader-bottomed, more cylindrical style.
The next step is to score or groove the entire circumference of the ellipse to a depth of approximately one-third to one-half the thickness of the cambium layer. Be careful not to cut all the way through! I use a sharp obsidian flake (large enough to hold securely) and cut a V-shaped trough, slicing out the cambium from inside the V. The V-cut, or kerf (a cutting slit), allows the sides to fold up with less binding.
Inside scoring appears to be the prevalent method on the aboriginal juniper bark baskets I’ve looked at, but the two examples illustrated here from the Harney County Museum in Burns, Oregon differ. One is neatly scored from the bark side (outside) as is most commonly done with poplar baskets. I personally believe the smoother, more uniform outer poplar bark lends itself to outside scoring more efficiently than the shaggier, uneven juniper or even red cedar bark, where it is easier to err in determining the appropriate cut depth. The other basket is much cruder overall, and appears to have not been scored, but rather mashed and manipulated into adequate shape as the sides were bent up.
An intermediate method on some abo bark baskets (that I’ve not tried yet) involves no actual cutting, but rather delineating the fold line along the ellipse by deeply compressing the cambium fibers with a wedge-ended stick used as a stylus. I imagine the spud, or similarly shaped antler, bone or stone, would work as well. These variations illustrate that no single method is prescribed, even within a single culture area, or considered the only right way to insure the bark will fold exactly where you want it to.
By whatever means, method or madness you’ve scored your panel, you are ready to form the basket by folding the sides up. Remember, the bottom is not going to be flat—as the sides are bent upward, the points of the ellipse must be free to bend downward. Thus, laying the bottom over a ‘round’ such as your leg or a small log gives you a solid surface to press against without inhibiting downward movement of the points.
To begin the fold, I like to spread one hand across the ellipse, thumb at one point and remaining fingers evenly spaced across to the other, and apply downward pressure, more concertedly at the points, as the other hand gently coaxes one side panel upward. Evenly distributed support and pressure from your hands, fingers, and arms contacting as much surface of the bark as possible gives you more control and lessens chances of lengthening existing splits or causing new ones.
Bend slowly, a little at a time, and make sure the fold is following the score line, especially at the points. If the panel really fights you and just does not want to bend, you may have to deepen or widen the score line and/or strip off additional outer bark that could be inhibiting flexibility.
Juniper bark does not often just flip into shape; it takes some manipulating and training. As you bend you may hear some cracking and popping. This may scare your ears, but normally it is just brittle sections of outer bark breaking and should not adversely affect the process or result. When you have won with one side let it relax but keep it at least slightly up-curved as you repeat the folding process with the other side. During this phase you may wish you had an extra arm and hand to help support, brace, hold and bend, and you may have to invent some interesting new holding positions to get both sides folded up evenly.
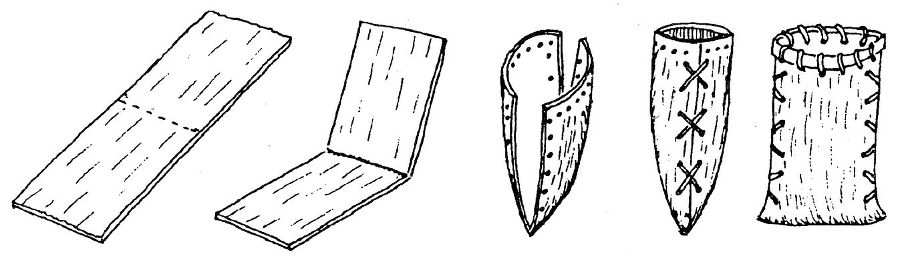
Construction sequence for a single-fold style bark basket.
When you have trained both sides to fold up freely to a vertical position, you will want to bring them together to form the basket so the edges along each side overlap about an inch. Overlap will be less, of course, down at the corners, but if you drew and scored your ellipse well at the points, there shouldn’t be any opening there before the overlap starts. If you are not quite satisfied, you can usually improve them with some specific pinching and manipulating.