PROJECT 1: SOLAR RECHARGING
This project will show you how to make a simple setup that charges a 12V car battery using solar power.
SOLAR PANELS
Photovoltaic (PV) solar panels are silent, require minimal maintenance, and will just sit there happily generating electricity. They generate a lot more electricity when the sun is out, but they still make useable amounts of electricity on an overcast day. Obviously, they’re useless at night, which is why you’ll use them to charge batteries, not power a device directly. They also need to be situated with a clear view of the sky and out of zombie climbing height, as an undead entity partially obscuring a solar panel will drastically reduce its efficiency.
You may find solar panels to scavenge on the roofs of houses or even in arrays on the ground. Your electricity needs are likely to be relatively modest, so one or two panels will be plenty. After all, we’re talking about survival here; the hot tub can wait.
As you might expect, the generating capability of solar panels is measured in watts. But make no mistake: a solar panel labeled “100W” may generate just about 100W at noon on a cloudless day on the equator, but most of the time, it will generate a lot less than that.
Solar panels incorporate different types of technology, the most common types being monocrystalline silicon and polycrystalline silicon. The mono panels are more efficient and produce more power per square foot, but the poly panels still make perfectly good electricity. They just need to be a little larger to make as much. It does not matter what type you take; all you really need to be aware of is the number of watts. If you turn the solar panel over, you should find a label that gives you all the key data about the panel.
CHARGE CONTROLLERS
Domestic solar installations don’t charge batteries. Instead, a complex piece of equipment converts the low-voltage DC produced by the solar panels into high-voltage AC. The converted power is first used to meet the demands of the house’s AC wall sockets and lighting. Then anything left over goes into the power company’s AC lines, and the power company pays for the contribution of excess electricity. Well, that’s what happens if you’re reading this before the apocalypse. Otherwise, it’s likely everyone at the power company has become a zombie, and money has become meaningless.
Instead of giving your excess electricity away to a power company that doesn’t care and won’t pay for it, store it in batteries for later use. This project works just like the way you’d manage electricity for a motor home or boat that uses PV cells to charge its batteries when the vehicle is not in use.
Rather than build an electronic circuit to control the charging, it’s much easier and more reliable to use a ready-made charge controller. If you’re buying preapocalypse, then pick one up on eBay, at another online retailer, or at a physical store, like Fry’s. If you’re buying postapocalypse, then they’re available free of charge from physical stores.
WHAT YOU WILL NEED
To make this project, you’ll need the following items.
ITEM
NOTES
SOURCE
7A (or more) 12V
eBay, Fry’s (4980091), abandoned RVs and boats
20W-100W
eBay, Scavenge
12V
Auto parts store, Scavenge
7A or more
Auto parts store
7A
Scavenge
10A
Home Depot, Lowe’s, Menards
Simple multimeter
Auto parts store, eBay, Fry’s
Solar panel specifications have become pretty standardized. Look for a solar panel that generates between 20W and 100W and is labeled as 12V. That means the panel is suitable for charging 12V batteries. Nominally, 12V solar panels will actually produce upwards of 18V.
The power cable needs to be long enough to connect the solar panel to the charge controller. This cable could be an AC outlet extension with the connectors cut off each end. Thin, low-current cable has a higher resistance to the flow of current than higher-current cable, which will waste precious power. For example, a 10A AC outlet extension cable that’s 30 feet (10 m) long will waste about 0.5W of power for a 20W solar panel charging at about 12W. For this reason, use a thick cable and keep its length short if you can.
Since you will be making your multimeter a permanent part of this project and you will also be chopping up the test leads, I urge you to use the cheapest possible multimeter. You will probably also find it useful to have another multimeter to use for testing.
In addition to the components listed above, you will need the following general construction tools:
• Drill
• Screws (assorted sizes)
• Screwdriver
You’re going to use multimeters a lot in this chapter, too. Take a look at “Using a Multimeter” on page 237 to find out more about how to use this useful little tool.
CONSTRUCTION
The most difficult part of this project is likely to be fixing the solar panel somewhere reliable, where the zombies and wind cannot displace it. A roof is probably a good idea, but it’s up to you to figure out the best place for the panel in your compound. Remember, you’re going to need to run a cable from the solar panel to the area where you plan to keep the battery and charge controller.
The diagram shows the wiring for the project (Figure 2-5).
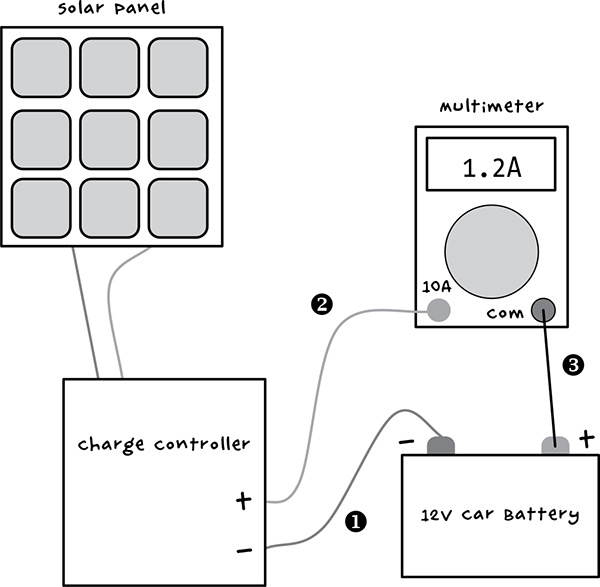
Figure 2-5: Solar panel wiring diagram
Charge controllers are all a little different from each other, but most will have six terminals, each in pairs of + and–. One pair will connect to the solar panel, another will connect to the battery, and the third pair (not shown in Figure 2-5) will connect to whatever you want to power with the battery. For now, let’s just worry about charging the battery; I’ll show you how to use that stored energy later.
The charge controller will monitor the battery voltage and the voltage coming from the solar panel to ensure that the battery doesn’t overcharge or deplete so far that it stops accepting charge. More advanced models may have a display to show you what’s going on, but I used a very basic model, so I also used a multimeter to show how much current is flowing into the battery. If your charging controller does this for you, then you can probably do without the multimeter. In that case, the charge controller’s positive connection goes straight to the positive battery connection, without the meter in between.
STEP 1: FIX THE SOLAR PANEL
It should go without saying that the solar panel should go somewhere sunny and far out of a zombie’s reach, but near a window inside your base won’t be good enough. Ideally, it needs to be on a south-facing roof. The angle depends on your latitude. For optimal performance, the further from the equator you are, the closer to the vertical the panel should be tilted. If your base has a slanted roof, you can probably just attach the panel to the natural slope of the roof, as roofs tend to have steeper angles further from the equator to allow snow and rain to run off more easily.