A pair of long drill pants can also be used to support a nonswimmer. The trousers are wetted, and the cuffs tied in a thumb knot, and then, holding the fly to the front with the legs hanging behind the back, the trousers are swung up, forward and then suddenly down into the water, so that air is trapped in the legs. The crutch is put across the chest, and the two legs under the arms. By this means any nonswimmer can be taken across a river with safety. The experienced swimmer who may have to travel for some distance along a river will find his trousers or long-sleeved shirt a veritable life-saver if used in this manner. He can tread water while inflating the legs, and they will remain buoyant for from ten minutes to a couple of hours, depending on the material from which they are made. One aircrew man who bailed out into the sea kept himself afloat for more than thirty-eight hours by this means.
RAFTS
Small bolsters made of ground sheets can be rolled up and lashed together if there is a party travelling together. These make an excellent raft, stable and buoyant, for either ferrying the party over the river or for actual travel along the river itself.
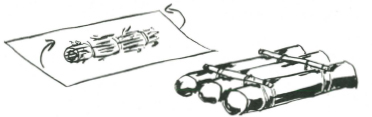
Showing how to make a bolster, and how the bolsters are lashed together into a raft.
Rafting is a practical means of water travel. The raft is built up from dry driftwood, and can be secured and made tight by lashing. In still water the raft can be poled along if the water is shallow. In travelling upstream it must be towed if the current is strong, or if travelling downstream, a “kellick” made either from a log of hardwood or a heavy stone is dragged astern in rapids. A sweep or long paddle ahead enables the raft to be steered because the water sweeping past the structure travels faster than the raft and this provides “steerageway” in reverse.
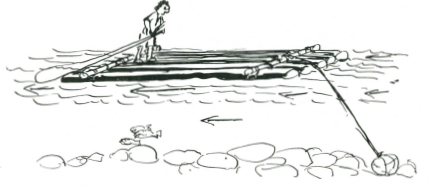
A raft, witii kellick and sweep.
CORACLE
When a canvas or heavy duck fly, or waterproof tent, or Japara or Willesden cloth tent is available, an excellent Coracle or boat can be made easily and quickly. The dimensions of the coracle are determined by the size of cover when laid flat. This is first measured and an allowance of at least eighteen inches for “turn up” is deducted from each of the two sides and the ends.
To these dimensions an oval is drawn on the ground, and nine inches inside this oval a second line is drawn. A number of straight sticks each about two feet long are cut and these are driven into the ground every six or eight inches around the two ovals.

Sticks in double row around the two ovals. This is the appearance of the frame structure for coracle building.
Between these double rows of stakes green or half-dead fern, light branches and other waste bush material is packed to a height of about fifteen inches. This material does not need to be packed very tightly, but should be firm. When the required height is reached the wall is bound with vines, strips of bark, or other available material. A few long sticks,
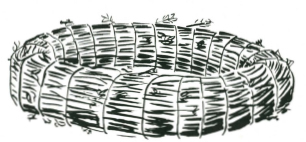
This is the wall of the coracle complete, but without the floor sticks.
The canvas which is to be the cover for the coracle is laid flat alongside the structure. It is necessary to put a six-inch (unpacked) layer of fern, grass or other soft material over the whole of the centre area’. The coracle wall is lifted straight up from the double wall of sticks, turned over, and laid on the centre of the canvas. It may be found desirable to lay it diagonally rather than square. The sides are turned up, and tied over the wall to the floor sticks, and when this is done the coracle is ready for launching.
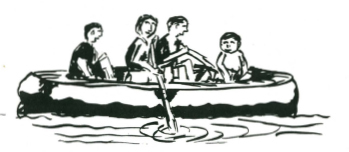
This is a completed coracle launched. A coracle six feet by four wide with fifteen-inch walls will easily support four men.
Care must be taken to sit inside the walls and not on them. Any weight pressing on the walls will tend to break them down, and allow water to flow over the sides. A coracle is perfectly stable, and when poling or paddling along a shallow river it will be found more convenient to stand. For long trips paddles, as for a canoe, can be used, or even oars lashed to the top of the wall in place of rowlocks will enable good progress to be made.
Long river journeys can be made by coracle–travelling in it by day, and at night removing the coracle cover from the walls and pitching it as a tent.
BARK CANOE
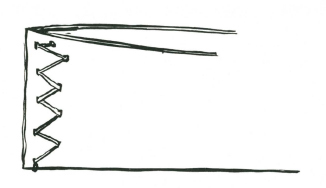
Where timber is plentiful, and the destruction of a green tree is permissible, a bark canoe can be made. The essential quality is that the bark must not be brittle, that it shall be reasonably pliable (considering its thickness), and that it be fibrous, and easily stripped from the tree. Also the barrel of the tree must be straight and free from branches and knot holes. The bark is cut around the lower portion of the tree, and then a ladder is made and it is ringed again fifteen or more feet above the lowest ring. The two rings are joined with a series of zig-zag cuts running straight along the barrel from one ring to the other.
A tree ringed and ready for the bark to be removed.
The entire sheet of bark is carefully removed in one piece by means of two long poles chisel shaped at one end which is inserted (one on either side) in the vertical cut. By working these poles up and down under the bark, it will gradually be lifted and spread, coming off the tree in one sheet. This is spread with the opening on the lower side, and a quick fire of leaves is lit inside. The heat from this fire will drive the sap, in the form of steam, through the dry outer bark, and make the sheet more pliable. When it is flexible, the whole sheet if possible should be turned inside out after the fire treatment. Do not attempt this if there is any sign that the sheet of bark will split; instead allow the rough outside to be outside of your canoe.
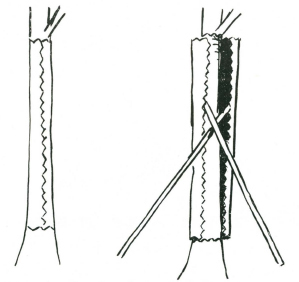
The two ends are drawn together as closely as possible, and six inches to fifteen inches from the ends a series of holes are cut with a sharp knife. These holes should be cut in a zig-zag pattern. Vine, or very tough bark strips or other strong tying material is laced through these holes and the lacing pulled tight to draw the ends together. Inside, the ends are packed with clay which will make them completely watertight.
The first stage in the construction of a bark canoe. The ends have been drawn together, and the inside is packed with clay.
Spreaders are required across the centre of the canoe, and to fit these, two split pieces of round timber about two feet long and at least four inches across are cut. Holes are cut in the bark near the centre of the canoe at the top and through these the lashing material for the spreader ends are lashed. These two spreader ends are nicked in the centre to provide a seating for the spreader itself. The spreader is simply a straight strong stick wide enough to keep the centre of the bark canoe spread open; the ends are seated against the two nicks cut in the spreader ends.
Except for paddles the canoe is now ready for launching. Paddles are shaped out of any convenient straight-grained dead timber with the blade about six inches wide if possible.
A bark canoe must be kept in the water all the time. If taken out or allowed to dry it will almost certainly split or crack and be unserviceable. If left in the water it should remain in serviceable condition for two or three years.