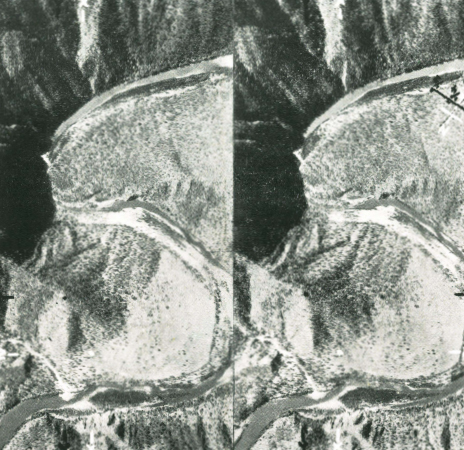
Photo U.S.A.A.F
Correctly paired.
This is an eye exercise which at first will make your eyes rather tired, but keep it up. The exercise is good for your eyes, and soon you will be able to look at a pair without tubes and fuse the two images instantly. Try it with tubes on these two pictures. The photo is of a mountain gorge in Dutch New Guinea.
When you have trained your eyes to see each image through the paper tubes you can take the tubes away, and hold the stereoscoped image in your vision.
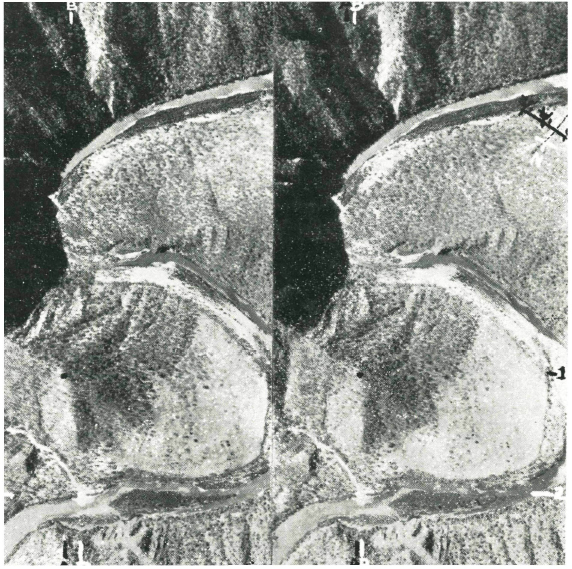
Photo U.S.A.A.F.
Incorrectly paired.
In stereoscopic use of aerial pairs you must know how to recognise right eye from left eye pictures. If by chance you reverse the images the mountain crests will be deep craters, and the valleys will be ranges. Here is the same stereoscopic pair reversed, viewed stereoscopically you will see this happen.
Note too that in reading stereoscopic pairs it is not necessary for the shadow to fall towards you.
RECOGNITION OF RIGHT AND LEFT STEREOSCOPIC PICTURES
To discover which is the left eye image select two identifiable points similar in each photo of the pair. One is the black spot on the line YY crossline 1 on the end of the mountain range, and the other is the white spot to the right where the little river joins the main stream on the line XX crossline 2.
One of these points must be on what would be one of the points of highest elevation of the land, and the other on one of the lowest elevations. The two points must be as close to a vertical line as practical. The parallax will show you which is the right and left eye image. In the left image Y and X are closer than in the right image.
Explanation: The parallax is the angle between the point nearest to and the point farthest from the camera. Compare this with same photos reversed. Notice the space between A and B in both photos. In the left image A and B are further apart than in the right image.
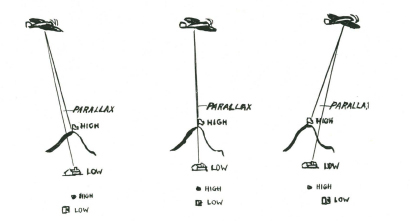
The two pictures must be equal in density of print, and must be placed side by side to be viewed. The maximum distance between two points for comfortable stereoscopic viewing with unaided eyes should not be more than three inches; by straining you may be able to fuse separations four inches apart.
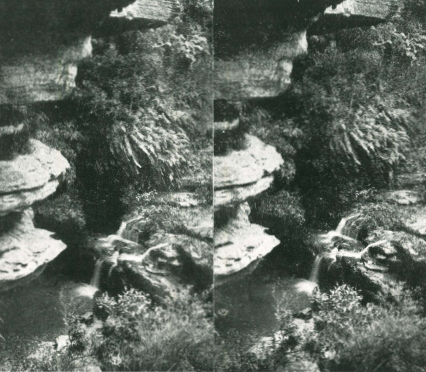
Photo Reg Perier
NOTE: You can make three dimensional pictures with an ordinary single lens camera by taking two pictures from different positions with exactly the same exposure and aperture. The distance between the two positions is governed by the distance of the nearest object in the foreground from the camera. For every thirty feet the nearest part of the foreground is distant there should be not less than nine inches, and not more than one foot separation in position.
ROUTE FROM AERIAL PHOTO
When deciding a route from an aerial photo, or from an aerial stereoscopic pair which you have stereoscoped it is essential that you mark the TRUE North on the photo and also determine a scale. The scale will probably be approximate, but it should be sufficiently close to give you not more than half a mile error per five miles of travel.
It is also advisable to prepare a route or sketch map based on your study of the aerial photo or pair. If you do this you will work to your sketch map, and only refer to your aerial when some point of doubt arises.
LOGGING YOUR ROUTE, AND MAKING A CHART
A log is a record of the essential information of your journey. This information must include distances and bearings, and may include any other information which the log writer considers helpful to himself or others.
Distances for log making in cross-country travel are calculated from the factors of rate of travel, and time.
Rate of travel varies. On open undulating country with short grass underfoot a walker will average a mile in between seventeen and twenty minutes, but in steep rocky country overgrown with scrub and thick growth underfoot a mile in sixty minutes might be good speed, and I have known places in New Guinea where one had to cut one’s path through thick pit-pit (a giant grass up to 12 feet high) and there a mile forward would not be made in eight hours.
The following table may be considered a fair guide to walking paces. Remember there is a tendency to overestimate rate of travel.
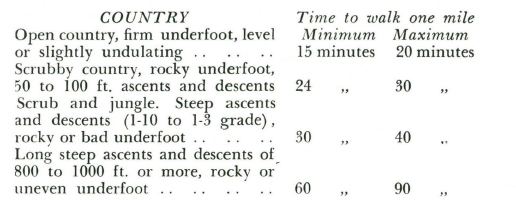
These figures are for an active man laden with a 30 to 40 lb. pack. With heavier loads the maximum time would apply. Rate of progress can be checked by each individual walker for himself. He can assume that 110 paces equal 100 yards, on level walking, and by multiplying the time to walk 100 yards by 17½ he will have a very accurate indication of his walking speed per mile.
In climbing or descending rocky or broken ground his pace will be very much shorter and slower, and the walker will take about 150 to 170 paces (depending upon slope) to equal 100 yards. On very steep slopes there may be 200 paces or more per 100 yards of lateral distance. ‘
Time of course can be obtained from your watch, or, failing that, from your sun clock - sun compass (previously drawn on your map) or drawn on the piece of paper on which you are keeping your log.
A log is kept most easily by recording the information in vertical colums.
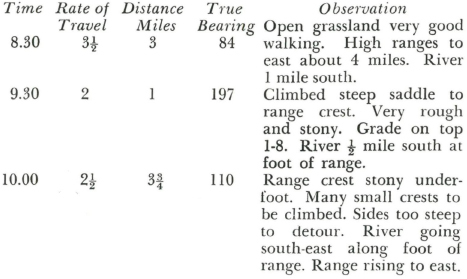
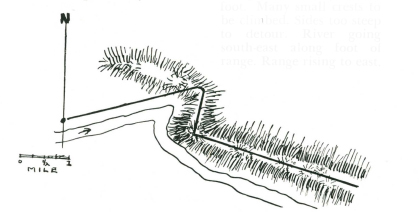
This information is later plotted, and in this form it becomes a chart of your route.
With this chart plotted you are never lost, because you always know where you are in relation to the point from which you started. It was in this manner that early explorers recorded their routes into unknown lands.
CHOICE OF ROUTE
Given a free choice it is always advisable in cross-country travel to choose a route up spurs and ranges and down streams, unless in very mountainous country. By following this principle there is less likelihood of getting lost for the simple reason that all spurs lead to the main range crest, and all streams lead to the main river course. By travelling down spurs, or up rivers it is very easy to take the wrong spur; or follow the wrong watercourse and so in a few miles to find oneself hopelessly bushed.
This applies to country which is sparsely populated. Therefore before setting out across country it is advisable to carefully study your map, and plan your route, remembering all the time the general rule to choose if possible, a route up spurs and down rivers.
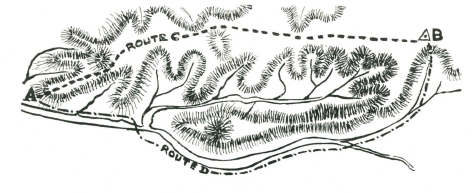
This sketch map will show you how very easy it is to get “bushed” by either travelling down a series of spurs, or up a watershed. The wise bushman, wishing to go from A to B, will go by the route C rather than by the route D.
You will find these alternatives are often presented to you in cross-country travel.
MAP READING
While many maps show man-made features such as prominent buildings, roads, railways, and canals. It is advisable to read the ground shape of the land and not place too much reliance on man-made works. The surface of the land will never change, but man-made constructions may vanish.
The most obvious natural features are ranges and rivers. The ranges may be very steep, or gently sloping, and to show this map makers either use 'contour' lines or hatchuring.