TRACKS, BAITS AND LURES
Trapping calls not only for a knowledge of the mechanics and construction of a particular trap or snare, but also for an intelligent knowledge of the habits of the animal to be captured.
This knowledge can be gained by observation of its movements and its feeding habits, and of course by its tracks. For example, you know that all animals with cloven hooves are grazing (ground feeding) animals, but did you realise that all animals which leave the track of a thumb, or even two thumbs, are all tree-climbing animals, or that all animals which burrow show the track of their digging claws quite clearly? Similarly all animals which leave pad-like tracks are carnivorous, that is, flesh eaters.
The same principle can be read into birds’ tracks. Hopping birds are generally insect eaters, tracks of walking birds show they may be grain, insect or flesh eaters, and when you learn to recognise the talons of the tracks of a hawk or crow from the insect-digging toe of a lyre bird or an ibis you are well on the way to being able to’ read correctly the story book of tracks and trails.
All the traps given in this book are ineffective unless they are sited correctly and baited properly.
As a human being you regard siting as a matter only for your eyes. You SEE things. You must remember when trapping that wild animals rely much more upon their sense of scent than upon their sense of sight. They ‘see’ things with their noses, not with their eyes. Your scent if left on a trap will warn an animal of danger. You can destroy this scent by either drowning it, or by scorching the trap to burn it clean, or by allowing it to stand for a long time to ‘weather’ and so lose the human scent.
Human scent on a trap or snare can be drowned by the use of a stronger scent which is also a ‘lure.’ A lure is a smell which will attract an animal. Two excellent lures are oil of aniseed and oil of rhodium. Both will attract most bush animals.
Before setting up any trap you would be wise to test bait the locality to find out which baits will attract the animals, and also to find out what creatures are in the locality.
To test bait, select your site on a piece of clean dusty ground. Drive fifteen to twenty small stakes into the ground, and attach to each a different bait, some with lures, and some without. Mark each peg with a number, and make a note of the number and the bait which each carried. This work should be done in the afternoon. When you have all the baits fastened to the pegs, brush the ground clean. When you visit the test baited area next morning you will see the tracks of all the creatures that came to it in the evening, during the night and in the early morning. These are the times when all wild animals feed.
The tracks will tell you which animals took the baits, and also what baits were taken, and then, if you make your traps and bait them with the correct baits, they will be effective for you.
In general, tree climbing animals will take fruits as a bait, digging animals will take sweet potato or carrot or anv of our edible roots, while flesh eating animals of course will only take flesh. Herbage eaters will often take a cabbage or lettuce leaf as a delicacy and, in many civilised areas, bread will be an effective bait.
CHAPTER 9
TRAVEL AND GEAR
It may be necessary to travel through unknown country, and this, without map, compass or any equipment. Under some conditions the traveller may have been totally unprepared and on his ability to travel and arrive may depend his ultimate survival.
In this book a little known or used ability of the eyes to stereoscope aerial or other pairs of photographs, and view the subject in true three dimensions, unaided by any optical equipment, has been included. Under some conditions this knowledge may be useful.
Apart from this, the exercise itself is a valuable and exiting experience in the use of the eyes.
There are many suggestions in this book that will provide real opportunities for adventure, which could be simply doing ordinary things differently.
Travel and gear is of necessity directly associated with “Time and Direction,” Chapter 10.
MAPS
Before you set out on any journey through the bush you must have a map of the area or else you must make one as you go along.
A map is a plan of a section of country. Being a plan it is drawn to a scale or proportion, and thus is nearly always shown prominently, generally at the foot of the map. As a plan it should also show either TRUE North, MAGNETIC North, or both, which by convention is generally at the top of the map. Unfortunately this useful convention is not always followed, and therefore you must check your map if the North is not shown. If it is not marked you must add this essential information. Show TRUE North as a strong line and MAGNETIC as a dotted line and mark each, so that anyone else using your map will know the difference.
Being a plan of a section of the country, your map will show ground features such as rivers and mountain ranges in relation to one another, and it may show man-made features such as buildings, roads and railways.
AERIAL PHOTOS
An alternative to a map is an aerial photograph of the country, or better still, aerial pairs of photographs. To read either an aerial photograph or aerial pairs you must learn to hold them correctly.
With aerial photographs but not necessarily with aerial pairs, the shadows must fall towards you as you look at the photograph.
If you hold an aerial photograph upside down, that is with the shadows falling away from you, you will almost certainly read hills as valley, and vice versa.
Aerial pairs if looked at stereoscopically must be looked at in a special manner, but if a single one of an aerial pair is being studied, it must be viewed with the shadows falling towards you. This is important.
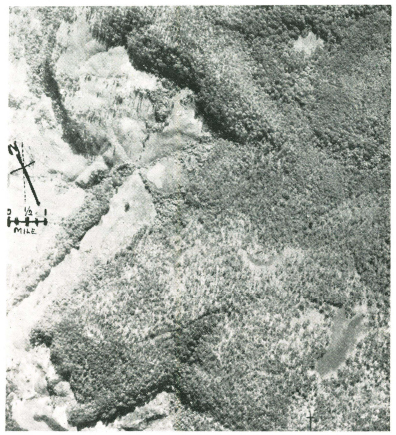
Photo U.S.A.A.F.
In this aerial the shadows fall towards you, and you can “see” the mountain ranges. Turn it upside down, now the hills become valleys, and the valleys hills.
An aerial photo can give more information than is commonly given on a map, but you must be specially skilled in reading” the photograph, and it takes a real expert to look at a photo and say, “That is ploughed land, and that is forest land, while that is grass country.”
The texture of the earth’s surface photographed tells the story to the eye of the expert.
STEREOSCOPIC VIEWING OF AERIAL PHOTOS
This is true too of aerial pairs. These are photos taken hundreds of feet apart while the plane is flying several thousand feet above the ground. When looked at stereoscopically the mountains and the valleys show form in full three dimension. You can stereoscope these pairs with your eyes alone, unaided by any mechanical means, provided you have two points of vision, that is provided that there is equal or nearly equal vision in both your eyes. The stereoscopic effect is obtained by making each eye see a different image.
The easiest way for you to do this at first is to roll two pieces of paper into tubes about ten inches long and one inch diameter. The exact size is not critical.
Put one tube to your left eye, and place it a few inches over the left eye picture (see last paras, of this section to know how to recognise left eye picture and right eye picture). Now place the other tube to your right eye, with the other end of the tube a few inches above the right eye picture. The two pictures must be side by side, and identical spots on each picture must not be more than three inches apart.
Each eye will see a different image, and with a slight exercise that feels rather like “crossing your eyes” you will see the two pictures merge together, and by concentrating on the single image when they come together you will suddenly see it become fully stereoscopic. (Try and bring the two black dots on each picture together.)