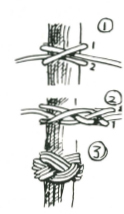
TURK’S HEAD
This is a highly ornamental knot which, instead of being made with the rope strands of the rope itself, is formed with smaller cordage on the rope.
A clovehitch is made as in Fig. 1. This is made slackly to allow the extra strands to be worked through it. Pull the bottom part of the hitch above the top part and put the free end under and up (Fig. 2). The now bottom strand is pulled above the top part and the free end now over and down. This repeat till the circle is complete. The free end follows round three times. The completed Turk’s head is shown in Fig. 3.
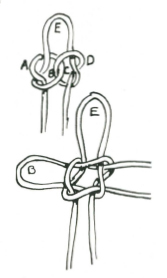
SHAMROCK KNOT
This may be formed the same way as the true lover’s knot, but the bottom loop is not spliced. It may also be used to form three loops for stays for a mast. It may also be formed by making a knot as top sketch. The loop C is drawn up through loop D and the loop B is drawn up through the loop at A. These form the side loops and the top loop is formed naturally at E.
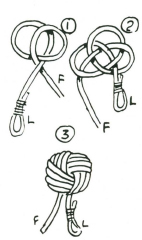
BUTTON KNOT
Form two crossover hitches, as Fig. 1. Pass the loop end to the left and with the free end form another loop as shown. Now, with the free end, follow the lay as indicated in Fig 2 and lay the strands side by side as for the Turk’s head. When three to five lays have been put through, work the knot tight and use the free ends to fasten the button to the garment. A bootlace makes an excellent button.

SELVEDGE
To secure a block to a standing spar. The middle of the selvedge is laid on the spar and the two ends are crossed over in turns until the bights at the ends come together. The hook of the block is then put through these two bights.
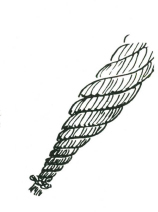
POINTING A ROPE
The rope is unlaid and a tie put on to prevent it unlaying further. The strands are thinned down gradually, and relaid again. The end may be stiffened with a small stick or piece of wire. The end can be finished off with any of the crown or wall knots.
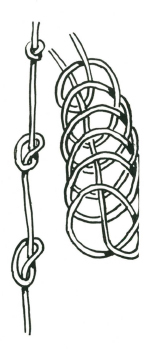
KNOTTED ROPE LADDER
The length of rope is coiled in a series of half-hitches and the end of the rope is passed through the centre, as in illustration on right (except that the coils are held close together as for a coiled rope when it is to be thrown). The coil of half-hitches with the end passed through the centre is turned inside out, that is, the succeeding coils are pulled over each other. The coil is now thrown, and as it pays out a series of overhand knots are made at fairly equal intervals. In making a knot ladder this is the quickest and most efficient method
SINGLE ROPE LADDER WITH CHOCKS
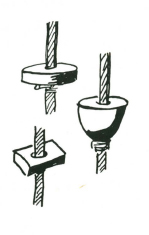
This type of ladder has the advantage of being portable and quickly made. The chocks of hardwood are about 6” diameter and 2” deep, and are suitably bored to take the diameter of the rope. Splice an eye at the top end and seize in a thimble to lash the rope head securely. To secure the chocks, put two strands of seizing between the strands of the rope and then work a wall knot.
Alternatively, insert small pegs between the rope strands, and seize the rope with a binding below the pegs.
LASHING
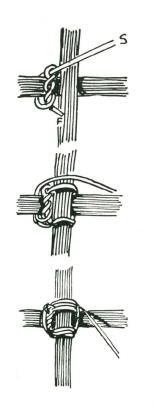
SQUARE LASHING to join poles at right angles.
Start with a timber hitch or a clove hitch below cross bar. If using a timber hitch see that the pull is straight through the eye and not back from it. Pulling back will cut the lashing material.
Put lashing material tightly around upright and cross bar about four complete times.
Frapping turns.–Make about two or three frapping turns. These are turns that go round the lashing and pull it taut. These pull the lashing tight. Secure end of frapping turns either by half-hitches or by passing between lashing at the crossover and secure with a half-hitch.
DIAGONAL LASHING for bracing or joining spars at irregular angles.
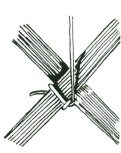
Start with a timber hitch or a clove hitch and take about three or four full turns vertically.
Pass rope under top spar and make about three of four full turns horizontally.
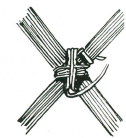
Make two or three trapping turns and either secure by two half-hitches on pole or by passing the end between the lashing and the pole and use halt-hitches, on the lashing.
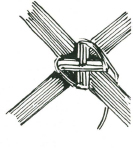
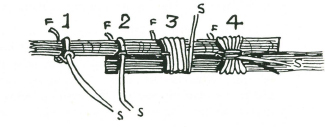
SHEER LASHING to join two poles end to end.
Start with a clove hitch or timber hitch, lash as in 1 and 2 tightly around the two spars four to six times as in 3. Pass free end under lashings and draw tightly two or three times. Secure by passing it through itself, as in 4.
There should be at least two lashings if spars are being joined together.
SPLICES
SHORT SPLICING
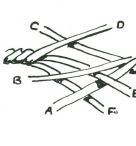
Unlay the strands and marry them together; butt hard up to each other. The strand D first goes under the standing end of A, but over strand B and over C on the standing end. Thus each strand at either end goes over one strand of the standing end on the opposite side and under the next strand, so that there is a strand of the standing end between each short side of the splice. Continue working the free strand of each end four or five times into the strands of the standing end.
LONG SPLICING
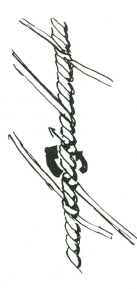
The strands are unlaid for a considerable length and then married as for the short splice. Then the one strand is unlaid and its married counterpart is laid along its place in the rope.
The two centres are simply held with a crossover knot, and the strands thinned down and spliced as for a short splice. The end strands are finished with a crossover knot and again the strands are thinned down and finished as for a short splice. This long splice does not appreciably thicken a rope which may be thus spliced to go through a sheave.
LOOP SPLICE WITHOUT A FREE END
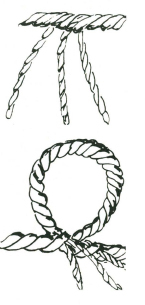
The rope is untwisted to the required place, as in top illustration. The free ends so formed are then spliced back along the rope after the loop has been formed.
EYE SPLICE
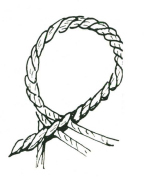
A neat eye can be made in a rope end by an ordinary short splice after the loop or eye has been formed.
WHIPPING
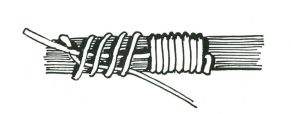
This is another method. After pulling taut, the two free ends are cut close in and the whole binding is smooth and neat.
TO FOLD A FLAG FOR “BREAKING”
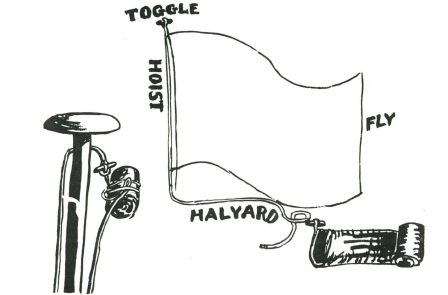
The flag is folded neatly along its length four to eight times, and then the fly is either folded, concertina fashion, or rolled towards the hoist. The toggle is uppermost on the hoist, and the halyard is on the lower side of the hoist.