
CROSSOVER LARK’S HEAD
Used for purposes above.
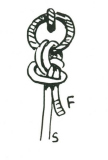
DOUBLE LARK’S HEAD
The bight is first made. The ends passed through it. This knot is very secure.
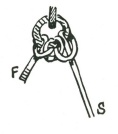
TRIPLE LARK’S HEAD
The apparently complicated knot is easily made by taking the bight of the rope through the ring, the ends are passed through the bight and up through the ring, then down through its own bight. Like the double lark’s head, this knot is absolutely secure.
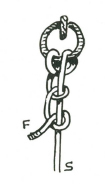
SAILOR’S BACKHAND KNOT
Used to secure a rope to a ring or hook. This is very similar to the Rolling Hitch (page 9) and Sailor’s Backhand Knot (alternative variation) shown overleaf.
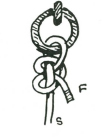
SAILOR’S KNOT
Simply two half hitches round the standing end of the rope.
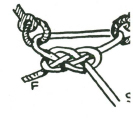
GUNNER’S KNOT
This is simply a carrick bend and used to hold two shackles or rings together.
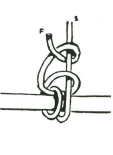
SAILOR’S BACKHAND KNOT
(Alternative variation.) Used to fasten a rope securely to a spar.
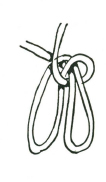
CATSPAW
This knot is used for attaching a rope to a hook. The two bights are rolled two or three times and then put over the hook.
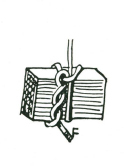
KELLICK HITCH
Used for fastening a stone (for a kellick in lieu of an anchor), that will hold in rocky sea bottoms where an anchor might foul. It is a timber hitch finished off with a half hitch.
TOM FOOL’S KNOT
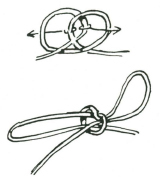
Formed by making a clove hitch as two loops not exactly overlaying each other. The inner half of each hitch or loop is pulled under and through the outer side of the opposite loop, as indicated by arrows.
This knot can be used to improvise a handle for a pitcher by pulling the centre knot tight around the lip of the pitcher and using the loops as handles.

SHEEPSHANK
This is a convenient knot to quickly shorten a rope.

One method of securing the end.
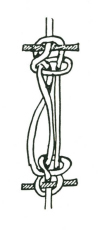
SHEEPSHANK TOGGLED
The insertion of a toggle in the end secures the sheepshank against slipping.
DRUM SLING
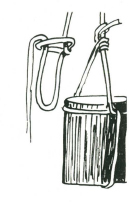
A slip knot is made as indicated. The drum, can or barrel is placed in the slip knot and the free end is secured with a stopper hitch to the standing end.
CHAIN KNOT
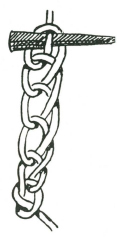
When a rope is too long for its purpose one means of shortening it is the chain knot. Remember to put a marlinspike or toggle through the last link before you put a strain on the rope.
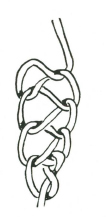
DOUBLE CHAIN KNOT
This is the most ornamental of all the rope shortenings. A turn is taken round the standing end and the free end is passed through the loop so formed. In doing this a loop is formed through which the free end is brought. The end is thus passed from one side to the other through the loop preceding. It may be pulled taut when sufficiently shortened and will lock upon the last loop.
TWIST KNOT
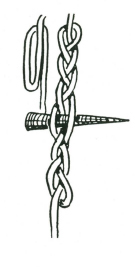
This is another easy method of shortening a rope. The rope is laid as in Fig. 1 and then the strands are plaited or braided together. A marlinspike or toggle is placed between the ropes in the centre to secure the hold of the plait.
FANCY KNOTS
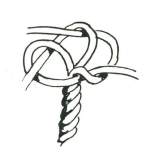
WALL KNOT
Unlay the rope a few inches and then pass each strand through the bight of the strand in front. Illustration shows the wall knot ready to be pulled taut.

STOPPER KNOT
Bring the ends of the wall knot round again and up in the centre of the knot and pull each one taut separately.
CROWNING KNOT
Commence the crowning as shown here.
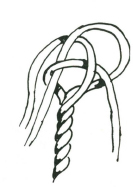
The crowning is now ready to be pulled taut. The strands can be back spliced to permanently secure the end of the rope against ravelling or fraying. Crowning may also be used with other fancy knots such as crowning first, then pulling on a wall knot or a Mathew Walker.
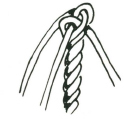
MANROPE KNOT
This is a fancy knot to put a stop on the end of a rope. Top sketch shows the crowning (in the centre), and lower sketch shows the man-rope knot pulled taut.


DOUBLEDOUBLE CROWNING KNOT

This knot is started the same as the manrope, but not pulled taut. The ends are laid for a second crown above the crown (similar to the manrope knot) and with the spike the bends of the lower crown are opened, and the strands brought through these bends and pulled taut.
MATHEW WALKER 1
The strands are laid as in the diagram and then each in turn is pulled taut till the knot is close and tight. The knot itself is rolled up slightly to lay the twist evenly. Pull the strands tight again after this.
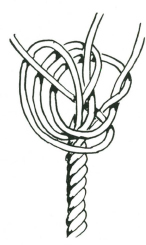

MATHEW WALKER 2. Finished and rolled tight.
The Mathew Walker is reputed to be one of the most difficult of all knots to undo. The Mathew Walker can also be made some distance from the end of the rope and the strands then relaid.
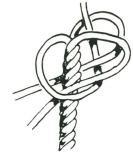
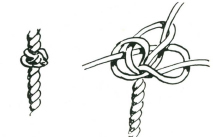
DIAMOND KNOT
Like the Mathew Walker, the diamond knot is ornamental–can be made same distance along the rope. The rope is unlaid carefully. Each strand is brought down alongside the standing end, as illustrated (top). The strands are then put through the loops formed by the other strands in lower sketch. The strands are hauled taut. The rope relaid. Shows the finished diamond knot.

DOUBLE DIAMOND KNOT
This is made as for the single diamond knot, but the strands follow the lead of the single knot through two single loops. The last strand comes through two double loops. The strands come out through the centre when the knot is pulled taut. All these stopper knots can be used for the ends of lanyards, halyards, yoke lines and also as stoppers on cleats, and for rope buckets.