Coiled weaving is one of the oldest and most universally used methods of basket making. By adding one coil to another and then stitching them together you can make many different sizes and shapes of containers and mats.
To begin your basket, first pull or break off the sheaf at the top of the pine needles. Then, pointed end first, fill the gauge with as many needles as possible. This bundle of needles is called the core. Once the gauge is full, stagger the pointed end of the needles so they taper down to a small tip. Next, lay the narrow end of the raffia (threaded through the sewing needle) along the core that is sticking through the gauge and wrap about 2 inches over the raffia end so it is held in place by the wrap (fig 1). This ties the raffia and needles together. Now, flex the core of pine needles around your finger until it bends into a very small doughnut. Then thread the sewing needle through the center of the doughnut, and pull it as tight as possible (fig 2). Next sew around the doughnut, going down through the center, up and over the top, then down through the center again until you have circled the doughnut completely. If you mark your starting point with a small colored thread, it will be easy to know where to stop. To secure this wrap, take a stitch into the core.
At this point you should know approximately what type of basket you plan to make. It’s a good idea to begin with a small basket so you can see your progress quickly and don’t become discouraged.
Now you are ready to begin building the coil around the start. Be sure to keep your gauge filled and work from the back to the front (this works best for pine needle basketry). Hold the doughnut between your thumb and middle finger and wrap the raffia around the needles in your gauge of the needle is the right size. Tapestry needles have nice large eyes and work well for this purpose. If you smooth the end of the raffia it will slip easily through the opening. If it tends to split when you try to thread it through, simply bend it over the needle to crease it, then force the creased end through the eye of the needle. Sometimes, if the raffia strand is too wide, you will have to split it into a smaller piece.
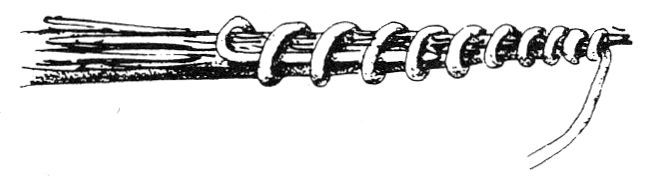
Figure 1: To start, wrap the core of needles with raffia about 2 inches.

Figure 2: Thread the sewing needle through the center of the donut, and pull it tight as possible.
Coiled weaving is one of the oldest and most universally used methods of basket making. By adding one coil to another and then stitching them together you can make many different sizes and shapes of containers and mats.
To begin your basket, first pull or break off the sheaf at the top of the pine needles. Then, pointed end first, fill the gauge with as many needles as possible. This bundle of needles is called the core. Once the gauge is full, stagger the pointed end of the needles so they taper down to a small tip. Next, lay the narrow end of the raffia (threaded through the sewing needle) along the core that is sticking through the gauge and wrap about 2 inches over the raffia end so it is held in place by the wrap (fig 1.1). This ties the raffia and needles together. Now, flex the core of pine needles around your finger until it bends into a very small doughnut. Then thread the sewing needle through the center of the doughnut, and pull it as tight as possible (figure 2.1). Next sew around the doughnut, going down through the center, up and over the top, then down through the center again until you have circled the doughnut completely. If you mark your starting point with a small colored thread, it will be easy to know where to stop. To secure this wrap, take a stitch into the core.
At this point you should know approximately what type of basket you plan to make. It’s a good idea to begin with a small basket so you can see your progress quickly and don’t become discouraged.
Now you are ready to begin building the coil around the start. Be sure to keep your gauge filled and work from the back to the front (this works best for pine needle basketry). Hold the doughnut between your thumb and middle finger and wrap the raffia around the needles in your gauge once, then start around once more and insert the needle into the middle of the doughnut, pull the raffia through. This makes a wrap and a long stitch. Continue doing this until you have completely circled the doughnut. Each time you take a stitch, use your forefinger to push the needles down and forward to make the stitches tight, this is called the lazy squaw stitch or the short and long stitch (fig 3).
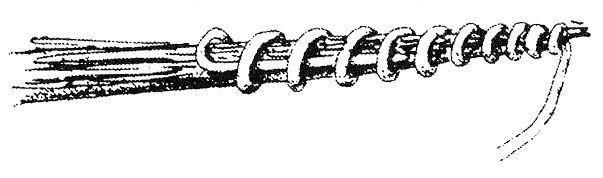
Figure 1.1: To start, wrapt the core of needles with raffia about 2 inches.
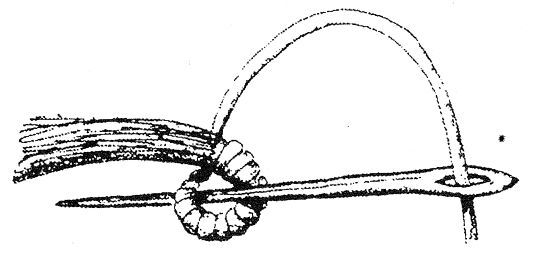
Figure 2.1: Thread the sewing needle through the center of the donut, and pull it tight as possible.
Sometimes more than one wrap is taken around the top coil before wrapping around the two coils-and sometimes more than one wrap is taken around both coils. Every few stitches, be sure to feed your gauge with more pine needles.
Other types of stitches are easily adapted to pine needle basketry, such as the split stitch, where you work two rows in the plain stitch and on the third row, pierce through the center of the stitching material, taking with it a portion of the core (fig 4).
An open wheat stitch or double split stitch can be made by taking a second stitch through the split stitch, into the same hole. This results in a slanted stitch and a straight stitch coming from the same place. It adds firmness to the basket and can be used either throughout the basket or just on the rim (fig 5).
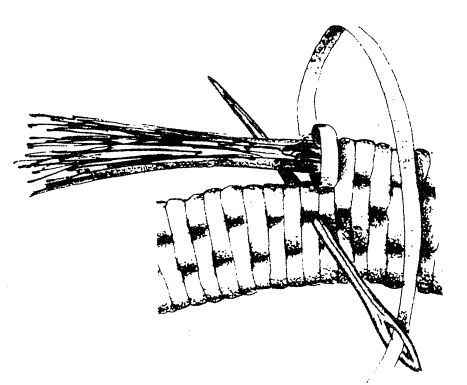
Figure 3: Squaw Stitch
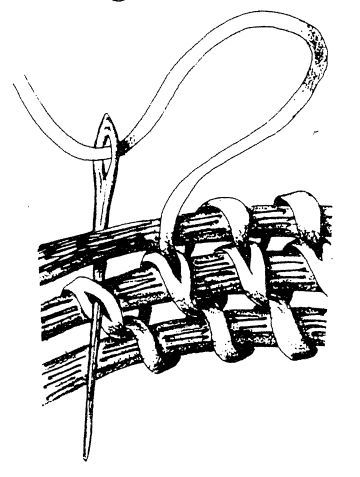
Figure 4: Split Stitch
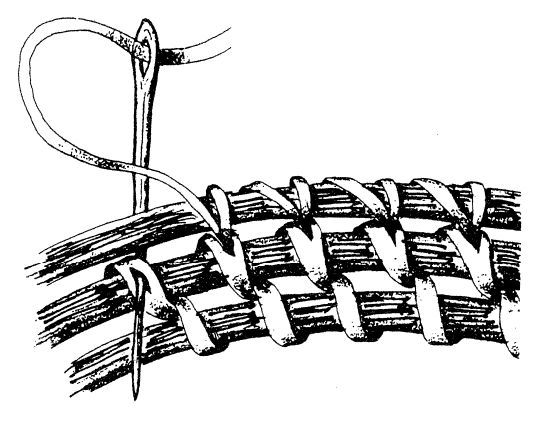
Figure 5: Double Split Stitch
As you pull the needle through the basket, pull the raffia to tighten your stitch and reduce the chance of breaking the weaver. Another trick to keep the raffia from breaking is to change the position of the strand on the needle occasionally.
When adding a new piece of raffia, try to select one about the same width as the one you end with, this will make the overall appearance more uniform.
If you make a basket with steep sides, you will have to work each coil on top of the next, but in order for it to hold you need to stitch through the center of the bottom coil using a plain stitch (fig 6). Do one complete round with your needle in a horizontal position; your coil will be locked into the correct alignment, and from there you can go back to the one wrap and then the long stitch. This makes a beautiful, solid basket.
If you decide on a basket with a gentle slope, just build the sides gradually, manipulating the coils as you work. If you want a small neck on your masterpiece, there are ways to accomplish that task, too. Your imagination is your only limit. If you want a lid for your basket, make it the same way you made the bottom of your basket and add a lip that fits down inside the opening or, if you prefer, over the outside of the basket. The lip can be made from a slender willow (Salix) or red osier dogwood (Cornus sericea) stem attached to the lid with raffia wrap.