Frequently, I’ve set deadfalls in areas where tabular rocks were perfectly sized and shaped, but too thin and lightweight to be effective. Here the solution is to stack additional rocks on top of the deadfall rock until it’s heavy enough to work. Rock on!
Also, be aware that sandy, dusty, wet, or other soft ground can ineffectualize a deadfall. Some compensations include placing a base piece, a thin flat rock, wood or bark chip, under the post to stabilize it and prevent it from sinking into the ground. You can also pave the ground beneath the deadfall rock, especially where the quarry’s head and chest should be, by slightly imbedding smaller flattish rocks or a few hard, straight sticks laid paralleled to each other to create a more unyielding surface. Or you can set the whole deadfall on bedrock or on top of another flat rock or bark slab that you can move to where you want the set to be.
Trigger Parts—Always use dead (not rotten), dry wood if possible for all components. For lever and post, I prefer barkless, somewhat weathered, straight shoots up to about finger thickness of willow, currant, red osier dogwood, etc. Anything rigid, straight, and preferably not smooth-surfaced will work. Green shoots or really wet wood can be too pliable, tend to slowly bend or buckle from the weight of a large rock, and can prematurely trip the deadfall.

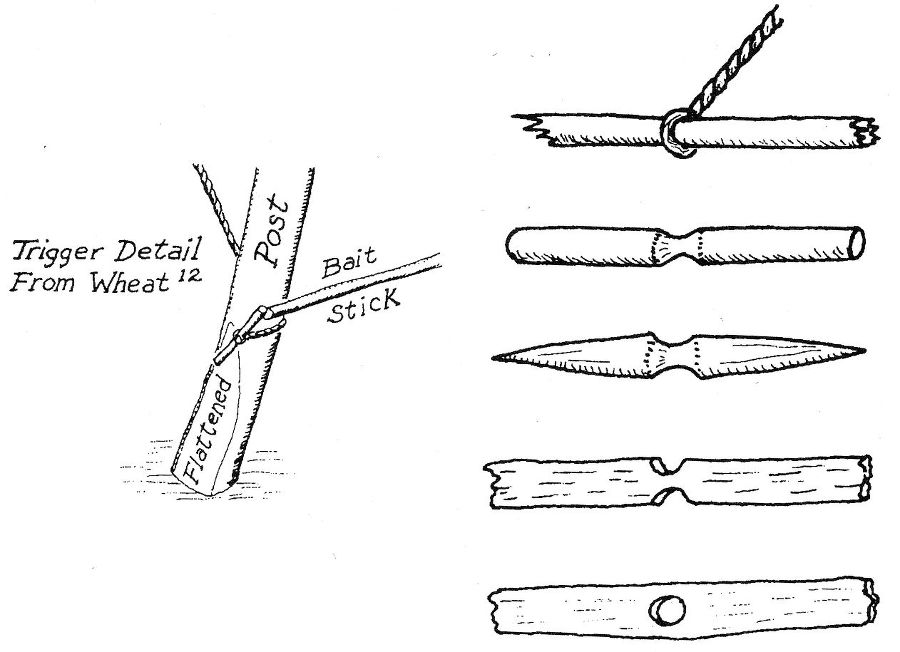
At left: Trigger detail (from Wheat12). At Right: Trigger pin variations from top; unmodified broken twig, cut and grooved, bi-pointed, notched flat splinter, and flat splinter with hole for knotted end of cordage.
Actual lengths and thicknesses will vary with your rock size and intended quarry, but a handy relativity for sizing trigger components is to make the lever, the post, and the working section of cordage all the same length. For my standard woodrat or squirrel sets this is 6 to 7 inches long and approximately a half inch in diameter. Remember, the initial piece of cordage must be a few inches longer so it can be affixed to the trigger pin and lever. The above proportions are not gospel—you may encounter sets where more dissimilar lengths of components work better—but I’ve found it efficient to make up a bunch of matched trigger pieces ahead of time, then choose rocks that suit them.
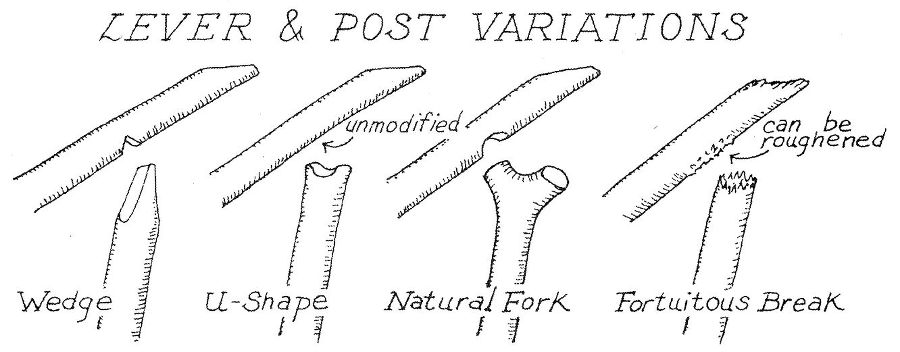
As previously mentioned, completely functional deadfalls can be spontaneously made and set with little or no modification of materials, but given the choice, I prefer to make some refinements. For example: I normally groove the back end of the lever so the wrapped and tied cordage won’t slip, and I slightly flatten the top side of the other end to increase its surface contact and stability where the leading edge of the rock will rest. This second modification can wait until you are matching individual levers to specific rocks. It is also advantageous to shape the top of the post and/ or the underside of the lever to prevent sliding or rolling where those two contact each other.
With sincere thanks to John McPherson for the tip (why didn’t I ever think of this?!?), I’m now a devout convert to selecting posts that have a natural fork or at least a broadened diameter at the base; this configuration retards the post from twisting, greatly increases stability and can make setting infinitely easier.1
The trigger pin, stiff, straight, approximately 1 to 3 inches long, can be round, partly or wholly flattish, bi-pointed like a gorge hook for fishing or a completely unmodified twig, but I prefer to point at least one end and groove its center. It can usually be slipped through the initial twist loop of your cordage and will hold itself in place in the groove, eliminating the need for a bulkier knot.
Since the bait stick remains under the rock when it’s tripped, you want something as straight and thin as possible, but having a strong enough spine (rigidity) to span the distance between the trigger pin and the rock without undue bending or finally buckling from the pressure the trigger pin will exert against its butt (non-baited) end. A flimsy, rubbery bait stick just won’t work.
In the Great Basin, I generally use dead willow or rabbitbrush shoots or basal stem sections of giant wild rye grass. Always, cut bait sticks a few inches longer than you believe necessary. Unless you’ve found one of those perfect rocks, uniformly gritty enough to grab the tip of the bait stick anywhere you position it, you can’t predetermine its final working length until you locate a solid friction contact point. I do this by feel with the tip of the bait stick probing for a spot as far under the rock as possible. When a spot is found, I note where the back end of the bait stick should be cut or snapped to abut with the trigger pin.
If you happen to have such goodies as nuts, raisins, candy, cheese, peanut butter, carrots, doughballs, etc., your success is almost predestined. Of course, with all that on hand, why would you want or need to kill small furry animals?
I normally try to rely on finding adequate bait within the natural environment-wild rose hips, berries in season, seeds extracted from pine or fir cones, a succulent bulb, root, or mushroom—anything your quarry might eat that it finds more easily obtainable on the end of a bait stick than by working for it (by digging, climbing, traveling, etc.). Normally, herbivorous critters can also, perhaps more through curiosity that hunger, be attracted to meat, including grasshoppers, fish innards, jerky, etc., and these baits can attract other potential quarry such as raccoons and opossums.

Woodrats, especially, can be enamored by items other than actual food (see below). In most primitive living, even survival, situations one frequently has on hand some pre-gathered or brought-with foodstuffs. You then must decide whether you’re better off this yourself or to gambling on expending some for bait to potentially catch something greater.
Whatever your bait, affix it solidly to the bait stick. If the bait is not strong enough to thread onto the stick and stay there, wrap and tie it on with cordage, plant fibers or even a couple of your own hairs (harder for survivalist skinheads). Your chances of success will increase the farther under the rock you can set the bait. Use the lowest possible angle, rock-to-ground, that still allows room for the quarry’s head to reach the bait. When tripped, the contact between the falling rock and the most vulnerable anatomy of the quarry is almost immediate and immobilizing and the quarry has almost no time to react and pull away.
Setting the Trap
When you attempt to set your first Paiute deadfall, you may question my labeling it as simple. You may even scream loudly and profanely at the deadfall components (or at me!), especially after several aborted attempts in which the rock smashes your hands! Please persevere. It is a delicate trigger mechanism; familiarity and success require practice.
Since I am actually setting the deadfall when I determine the working length of the bait stick, I usually snap it with my teeth rather than cutting it because my left hand is already occupied in holding the trigger pin to the post to prevent the rock from falling. Then relocate the friction contact point with the tip of the bait stick, then very slowly allow the free end of the trigger pin to swing slightly forward until it contacts, and subsequently is apply all its pressure against, the butt end of the bait stick. If all goes well, the bait stick does not slip from the rock and the deadfall is set!
To prevent crushing your hands under your own deadfall (which can be serious with a heavy rock), place a fist-size rock under the deadfall rock but not obstructing the space where you’ll position the bait stick. This will block the complete falling of the deadfall rock should it slip while you’re setting it. Of course, remove the block once the deadfall is set. I offer thanks to the long-forgotten person who suggested this improvement. For years I just figured having a perennial case of “bloody deadfall knuckles” was part of the game!