I continued to watch as the basket developed. He wrapped raffia around the coil of pine needles and then took a stitch down over the bottom coil to tie it together. It was absolutely fascinating, and I bought that little basket during the Rendezvous trading session.
Traveling over Wolf Creek Pass on our way home to Monte Vista, Colorado we drove past some ponderosa pine trees, and I encouraged my husband, Ernie, to stop so we could gather needles for me to try my hand at this newly-learned craft.
Once home, I pulled out my craft catalogs and found where to order raffia. Ernie was going to Denver to get taxidermy supplies, and I decided to go along and look for basket weaving instruction books. From the many books displayed at Western Trading Post, I chose three basketry books that provided enough information to get me started. After determining what materials I needed, I did just that.
Since watching that first pine needle basket being made, I have had occasion to spend many precious hours creating what I consider to be my own masterpieces. I know they probably don’t compare with the baskets made by many of the talented Native American basketmakers, but it has been a thrill for me to develop my talent and to teach others this craft as well-including some native Americans. It is very humbling for me to see their joy in re-creating something in the tradition of the Old Ones.
I’d like to share the experience of making a pine needle basket with you, too. Here are the things you’ll need to get started:
▲ Pine needles
▲ Raffia, yarn or whatever material you choose to use to sew the coils together (Long grasses work well, too, but they should be dried first, then dampened before they are used.)
▲ Blunt-end sewing needles (tapestry #18, 20 or 21 are my choice)
▲ Scissors
▲ A gauge-this can be made from a piece of bone with a hole in it the size of the basket coil, a three-quarter-inch plastic tube like those used for aquariums or even a plastic drinking straw
▲ A pair of small needle-nosed pliers
▲ A plastic bag
▲ A thimble
▲ A pan or jar for soaking the needles
Making a pine needle basket can be an adventure, and the first step is to gather plenty of needles-whether from your own back yard or by taking a day trip to the mountains. Either way, you should begin by appreciating that Mother Nature has provided this wonderful material for you.
If you live in a warm climate, you may find longleaf pines like (P. australis) with their long nubby needles or (Pinus palustris), whose needles are often 12 to 18 inches long and ideal to work with. Pine needles can be gathered at any time of year, but in high elevation areas you will have to gather early enough to beat the snowfall. Choose from the top layer- of brown needles that have just fallen from the trees. If you dig down too deep, the needles will have started to deteriorate and they will have dark mottled or mildewed spots, which make them weak and unsuitable for weaving.
I seldom collect green pine needles from the trees unless there has been a wind storm that has broken off branches, in which case I collect the needles and lay them in the shade to dry. Once dry they will stay pale green. If you use fresh pine needles without first drying them, they will shrink and your basket will be too loose.
Wash the needles by swishing them in water with a little natural soap to remove dirt or insects, then rinse them several times to remove all remaining residue. Next, spread the needles out over a blanket in the shade or on some other flat surface to dry.
If you don’t plan to use all the pine needles right away, you can store them. If you’ve used a blanket or towel to dry them, just pick up the corners, shake them into a pile and put the whole thing in a box until you are ready to make a basket.
If you don’t have much space for storage and you have plenty of time, you can bundle the needles. Group them according to size with all the sheaths in one direction, and wrap them with a piece of raffia or bind them with a rubber band. These bundles can then be stacked in a cupboard or put in a drawer. This works great when I am teaching a class because the bundles can be distributed quickly. But it is also very time-consuming, so I generally sort as I work the needles into coils, using short and long needles alternately. I usually use the same species for each basket.
The instructor from BOSS kept his needles in water as he worked, but when I tried this I found that my baskets became wobbly as they dried. So I experimented and found a way to make a nice firm basket that stays that way. Granted, the center, or start, of the basket does require dampened pine needles; but, how long do you need to soak them? It depends on what needles you use. The Canary Island (P. canariensis), digger (P. sabiniana), loblolly (P. taeda) and longleaf pines all have soft needles and take 10 to 15 minutes in warm water to soften them enough for the start (1-2 inch center). While coulter (P. coulteri), jeffery (P. jeffreyi), ponderosa (P. ponderosa), torrey (P. torreyana) and slash (P. elliottii) pines have rigid, thicker needles that require 2 to 4 hours of soaking in cold water, or 45 minutes in warm water. If you use hot, boiling water, they will be ready in 15 to 20 minutes, but boiling water darkens the needle color.
A good way to judge the flexibility is to bend the needles around your finger or tie them in a knot. If you can do this without the needles splitting or breaking, they are suitable to work with. Once the needles are pliable, remove them from the water and put them in an airtight container (a zip-lock bag works well). If you don’t plan to use them right away, dry them out or they will mildew. Or, circumstances permitting, put the baggies of wet needles in the freezer until you are ready to use them.
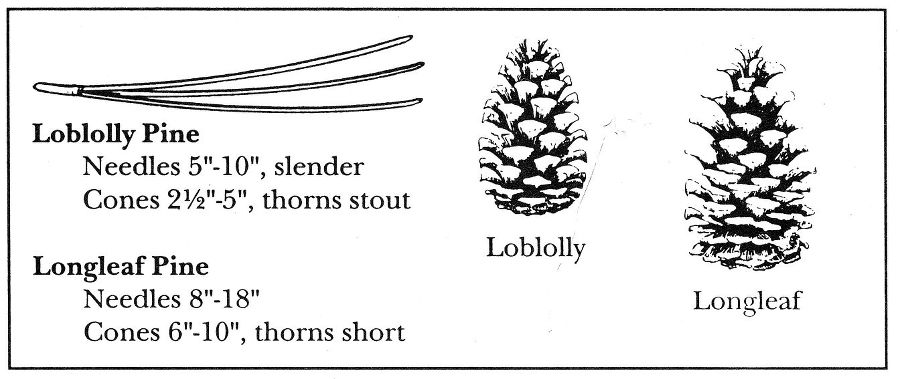
Loblolly and longleaf pine cones and needles.
I use raffia as my weaver. Raffia comes from the raffia palm that grows in Madagascar, an island off the east coast of Africa. The young palm leaves are cut green and the outer, transparent skin is pulled off and hung to air-dry in the sun. It is then stripped and graded into different categories and exported. I particularly like the raffia that has a waxy feel because it seems to work unusually well with the pine needles. I avoid dyed raffia because it is too dry. Sometimes, I prepare the raffia by letting it stand overnight in a plastic bag with a little water and some glycerin. This seems to make it more pliable and easier to work with, but it can be used either wet or dry.
Sometimes the edges of the long strands will be rolled; just dip the strands into a pan of water and manipulate them a bit until you can unroll the curl and have a nice wide piece. You should also remove the side hairs from the raffia, and if it is extra wide, you can split it to the size you prefer to work with. Threading the raffia through the needle the right way is very important. The fiber starts to grow at the palm leaf stem and continues out to the width of the leaf, and the short, less mature fibers are shorter than some of the others. So if you examine it closely, you will see that one end is thick where it was cut from the stem of the palm leaf and the other end has a slight taper. If you thread the thickest end through the needle, the fibers will lay flat and flow through the eye smoothly. Otherwise, the edges will fray and cause extra splitting and ultimately the strand will be too narrow to work properly. You can reduce the possibility of fraying if you keep the raffia a little damp as you work with it.
Threading the needle isn’t too difficult if you make certain that the eye of the needle is the right size. Tapestry needles have nice large eyes and work well for this purpose. If you smooth the end of the raffia it will slip easily through the opening. If it tends to split when you try to thread it through, simply bend it over the needle to crease it, then force the creased end through the eye of the needle. Sometimes, if the raffia strand is too wide, you will have to split it into a smaller piece.