Another decorative technique known throughout the Southwest was modeling. Sometimes it was nothing more than forming a crude head and tail of a bird on a bowl or jar, or painting the wings and any other details which were represented. Or the handle of a pitcher might be formed in the shape of the body of an animal with all details painted on except the modeled head. Complete shaping of the entire figure of a human or animal may also be done to produce an effigy.
Painting
Painting was favored above all other styles of decoration and was greatly varied. For example, decorative treatment by spattering was common, performed, no doubt, by blowing paint through a hollow reed. Stippling, the application of a pattern of dots, was also popular.
Banded layouts are perhaps the most common painted decoration of all. A band is created by drawing two parallel lines. These lines can be vertical, creating square or rectangular areas; oblique, creating parallelograms; or horizontal, which make narrow bands. Designs can then be placed within each of these differently shaped areas. An important aspect of painted decoration in relation to form is where design will be placed, inside or outside a vessel.
It is often difficult to fit a pattern to the surface since the field is continuous. Therefore, the decoration of pottery requires not only a steady hand and coordination between hand and eye, but also great sensitivity to spatial values. Further, difficulty visualizing the design in relation to the surface is increased by the fact that you can’t see the whole decorative field at one time.
Plan your design mentally before the work begins, then draw it on the vessel. Paint can be applied to a polished or an unpolished surface, but it must be done very carefully as a drip can ruin the polished surface.
Color
Certainly, great variation is possible in the employment of color. White, gray, cream, buff, orange, red and black have all been used as base colors at one time or another in the Southwest, and this by no means exhausts the possibilities afforded by the geological environment. White is generally used as the base and achieved with a slip to give an outer coating to the body of the vessel.
The most common vegetable paint used in the Southwest was obtained from a very common weed known as the Rocky Mountain bee plant (Cleome serrulata). Tansy mustard (Descurainia) was also used occasionally. In either case, the plants are gathered during April and May when the shoots are only six to ten inches high and still tender. They are covered with water and boiled in an open container; usually half a day is sufficient, but sometimes a whole day is required.
Once the liquid is boiled down to a thick syrup, it is drained from the pulp and placed in the sun to harden into a solid, black, rather sticky mass. When it is completely solid it can be stored for future use and will keep indefinitely. The longer it is kept the better black it produces. (If used during the first year, the resulting color will be slightly blue-black.) Guaco, as this organic paint is called, is prepared for use by breaking off a chunk of the dry, hardened mass and dissolving it in water.
Guaco can be used alone as a paint, or as a binder when mixed (about one-quarter guaco to three-quarters mineral paint) with finely pulverized minerals such as hematite and limonite, causing the paint to stick to the polished surface.
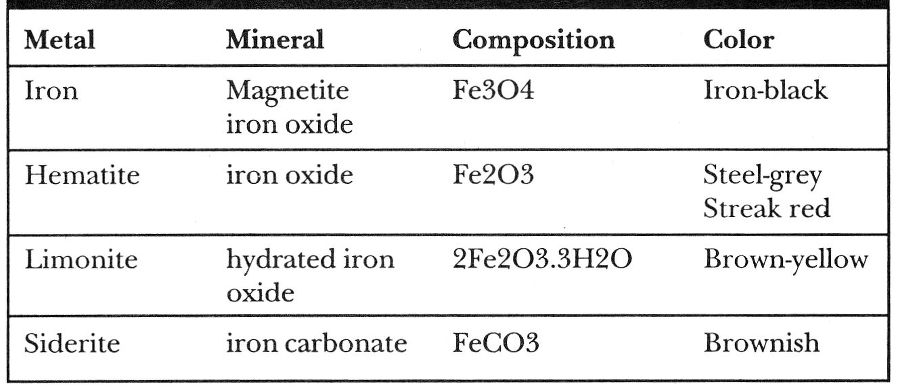
Mineral paints come from deposits formed at the earth’s surface. They are, in effect, simply special kinds of sedimentary rocks. Table A is a summary of the chief characteristics of some common ore-minerals that can be used for paint.
It is important to remember that color in design is subject to many forces, both within the color itself and, frequently, in relation to the quantity and quality of the minerals or organic paints, the amount used, the results of longer or shorter firing, and higher or lower firing temperatures.
Table A
Oxygen present when the pots are fired also influences the color of the final product. Where oxygen is present in sufficient amounts, pots will fire brown, orange, reddish or white, depending upon whether a brown-firing or white-firing clay is used. If the pots are covered by bark or other stifling material when fired, oxygen is kept out and the pottery turns gray or black, regardless of the clay used.
Firing
Firing is the last and most crucial step in pottery making. Ironically, pottery is both durable enough to last thousands of years, and yet so sensitive to change that insufficient heat may warp the pots, or an errant draft or too much heat in firing can break them. You can spend days shaping, drying, polishing, carving and decorating pots, only to chance losing one or all of them during the firing.
If flames from the fire lick at the sides of the pot, it will produce a smudged area called a fire cloud. Fire clouds are not necessarily undesirable features on a pot, depending on the intensity of the clouds and the personal preference of the potter. On plain ware they can be quite attractive, softly blending with the natural color of the clay. But on polychrome vessels, particularly those with decoration on the exterior, fire clouds may obscure the design.
To minimize your risks, choose a warm day with little or no wind and burn a bed of coals to pre-heat the area where the firing will take place. Place the finished pots around the perimeter of the fire to warm thoroughly. After a generous amount of coals has been prepared, spread them out with a stick and let them cool to white ashes. Next, place a rack of green sticks, several rocks or some large pieces of broken potsherds on the warmed area and carefully arrange the vessels on top. If you use rocks, be sure they are completely dry or they will explode when moisture in them expands from the heat. Finally, protect the vessels from ashes and flames by covering them with large potsherds.
Once the pottery is arranged, work quickly to construct a beehive of sheep dung, cow manure or other hot-burning fuel around and over the top of the pots until they are completely covered. Then surround the mound with a tepee of wood and set it on fire at the base.
During the firing, the molecular structure of the clay vitrifies, or fuses, in the soaring temperatures of the burning beehive, and bonds together into a hard, durable form.
After the flames subside, it may take four to five hours for the coals to return to atmospheric temperature. It is an exciting time because you will soon learn whether your firing was successful or not, but you must be particularly careful at this stage because if you expose a hot vessel to the cool air too soon it may crack. This is the moment of truth!
Certainly we can have only the greatest admiration for the first humans who took the mud from under their tired feet and fashioned it into beauty with their hands. True artistry is an inherent quality of potters of ancient times, as well as today. But to me, the greatest joy comes from delving into a bucket of clay up to my elbows, feeling the silky texture of the wet silt as I squish it through my fingers. The earthy smell of it takes me back to my childhood to relive the many hours I spent playing in mud, stirring dirt “batter” round and round to make imaginary cakes and pies. Thank you Mother, for allowing me to play in the mud!
Glossary of Pottery Terms
Carbonates—An organic compound; calcium, shell, limestone.
Found Clay—Clay from local sources; other than commercial clay.