Next, fill the container with water, stir well and allow the clay to settle overnight, or until the sediments separate; the heavier elements descend to the bottom, the clay remains in the center of the container, and the water rises to the top. Discard the water and pour the clay into another container, taking care not to scoop up any of the debris that has settled in the bottom. Finally, you can either pour the clay into a canvas bag and hang it in a shady place to drain, or spread it on a flat surface and allow the moisture to evaporate until it is either suitable to work, or completely dry for storage. If you plan to use the clay right away, watch the drying process closely—if it dries a little too much, wet the bag. If it dries completely you will have to crush it and start again.
When you are ready to use your clay it must first be mixed with temper, then moistened and kneaded and wedged (slammed against a flat surface) to remove any air pockets that cause pop-outs during firing.
Crushed igneous (volcanic) rock and sand make good temper, as do pulverized pot shards because they have already been naturally fired at high temperatures. The purpose of adding tempering material is to counteract the tendency of pure clay to crack during the shrinkage that takes place as it dries and when it is fired. Clay with no temper will be apt to lose its adhesiveness and crack during drying and firing, while clay with too much temper will be short and brittle in working. If your pot cracks badly while drying it can be ground up and more temper added. If, on the other hand, your pot will not retain its shape while being molded, pull it down, add more dry clay to the paste and re-knead.
As my experience grows, I find that I can determine with some accuracy which clays contain enough temper in their natural state and those which require the addition of temper by simply rubbing the wet clay between my fingers to feel the grit. Another way to tell is to wash a portion of clay through a sieve and measure the amount of temper it contains.
The dry clay method consists of mixing the clay and temper while both ingredients are dry. There is no particular formula, although experience helps you judge the color of the resulting mixture—it is generally about one-fourth temper and three-fourths clay. When following the wet-clay procedure, add temper to the water-soaked clay until you arrive at the desired texture and color.
Next, knead the entire mass until the water is thoroughly absorbed—the consistency should be like putty, just dry enough to crack if pinched. Then divide the clay into chunks about the size of loaves of bread so they can be easily handled. Work the paste to a uniform consistency in exactly the same way you knead dough on a board or canvas, then wedge it by slamming it against a hard surface to remove air pockets. Finally, cover the clay with a piece of damp cloth to keep it moist until you are ready to use it.
Form
Before you begin to mold your pot, you should have some idea of its function. Your limitations are determined more by your skill in mixing the materials, building the vessel and firing it than by the inherent nature of the material; therefore, forms are dictated by the purposes for which they are designed. In hand-built pottery there is no limitation to the circular forms that are inevitable when pottery is turned on the wheel.
I fell in love with a small “horned toad” canteen that Wayne replicated from one he saw in a museum. It was flat and rounded with an opening on one end and carried by means of a tether around the neck. I’m sure the piece would have been less captivating, albeit still functional, if produced on a potters wheel.
There are only a few basic forms in Southwestern primitive pottery: equal height and width, tall and narrow and short and wide; yet there are many variations. So once a form is established for a general purpose, such as a bowl for eating, mixing or holding various items, you are free to develop that form.
Paraphernalia
Before you begin, collect several molds, scrapers, polishing stones, a board, a water container, mops, wiping rags, a sanding stone, paint and receptacles and brushes. You can gather your materials from nature as the ancients did, or you can substitute modern, craft-store conveniences that meet the same need, but there is a lot to be said for replicating an ancient tradition in the old ways. (I keep a basket of tools conveniently at hand to take with me when I travel, and I have even set up a pottery workshop in my motel room on occasion.)
In ancient times the molds, called pukis, were the bases of broken bowls or ollas (large jars). Pieces of pottery can be made especially for this purpose, or any open, globular mold can be used. Sprinkle a small amount of sand, temper material or wood ashes in the puki so the clay doesn’t stick. A small piece of cotton cloth also works nicely.
Potsherds with edges sharpened on a piece of sandstone were formerly used as scrapers. Experienced potters have many scrapers of different shapes and sizes for different areas of the pot.
Very smooth, fine-grained weatherworn pebbles without any acute angles or sharp edges are used to put the final finish on the pottery. Like scrapers, several polishing stones of various sizes should be collected, including some larger ones that are more flat than spherical. Because they are distinctly the personal property of the potter, polishing stones historically (or pre-historically) often became heirlooms. The same is true today.
Traditionally, the potter sat on the ground with a flat board (or some other flat surface) on her lap on which the puki was continually turned as she worked. You may find, as I do, that sitting on the ground in this manner for a long period of time is difficult. I prefer a small table and chair. When I have completed several pieces, I place them in rows on a board to dry. This lessens the possibility of dropping them if they must be moved. (Flat-bottomed vessels can be built directly on boards.)
Always keep a small container filled with water at your side to moisten parts of the pot from time to time, and to clean your hands. When scrapers are not being used they can be kept in the water container.
Mops consist of a rag, a piece of leather or a soft rabbit’s tail, attached to a stick to serve as a large paint brush for applying slips.
An apron, or any piece of cloth, can serve as a wiping rag for your hands. If you get clay on your clothing, simply let it dry and brush it off.
A small piece of sandstone is handy to sand and smooth the dry vessel.
Slips and paints that are ready for use can be kept in open glazed basins. Generally, large quantities of slips and paints are mixed at one time and stored in these paint receptacles for later use. Allow the paint to dry before you store it.
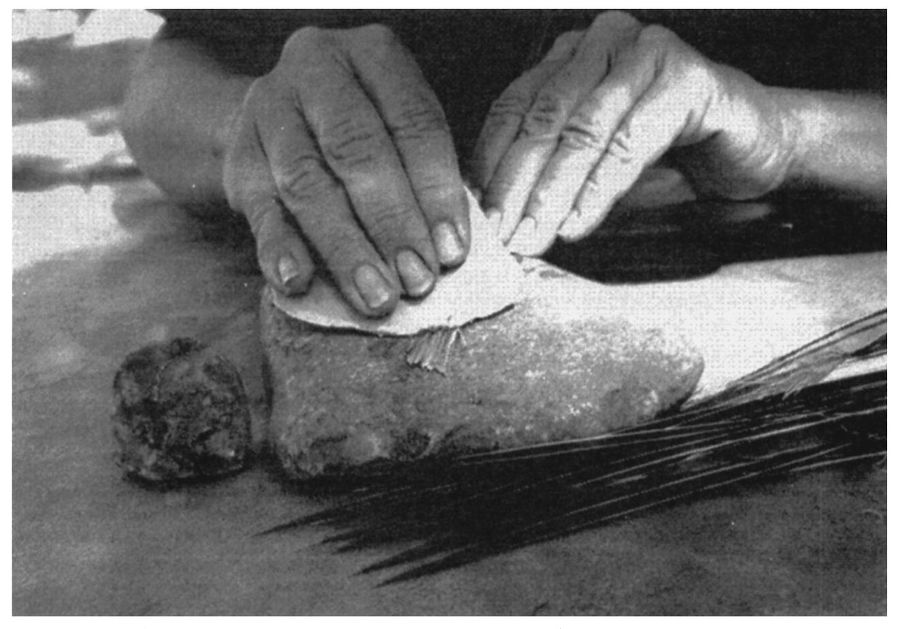
To make a yucca paint brush, cut a thin leaf to about six inches, then pound the end to remove the pulp and thin the remaining fibers. (Photo: Richard Jamison)
Paint brushes made from the main ribs of yucca leaves are traditionally used to apply designs to the pottery. Cut a thin length about six inches long, then chew or pound it about one inch from the end of the leaf to remove the pulp and separate the fibers. Finally, trim off most of the chewed fibers to make a narrow brush. The number of fibers you leave will determine the fineness of the point; for very thin lines use a brush with only one or two fibers. The dry fibers will be stiff and brittle and must be handled with care, so when not in use, protect your yucca brushes in a receptacle that will cover the shredded ends until you are ready to use them again, then soften the ends by soaking them in water for two or three minutes.