To begin, rivercane is gathered, bundled and allowed to dry. Cane can be harvested and cut to length with unmodified stone flake knives or with more formalized bifaces. Choose a length between four and seven feet for your first attempt. Once dry (give it at least a month if possible), the blank must be straightened using heat as in the historic technique.
Rivercane tapers in diameter from the bottom to the top. The mouthpiece end (the larger diameter end) is trimmed up and smoothed. It is best to locate the mouthpiece directly on or near a joint for strength.
The muzzle end is likewise trimmed and smoothed. This end should have an inside diameter near to the diameter of your thumb. Trimming the ends can be accomplished using unmodified stone flakes and smoothed using a fine sanding/grinding stone. A smooth mouthpiece allows for comfort and a tight, no-leak seal with the shooter’s lips. A smooth muzzle end insures speedy release of the dart from the end of the gun.
Next, the blank is split from end to end beginning at the smaller muzzle end. Splitting is relatively easy if care is taken. A flake makes a cut in the direct center of the muzzle end to begin the split. The flake itself, or a thin sliver of hardwood, is then pushed down the length of the blank. This splitting results in two halves, exposing the inner joint walls in cross-section.
The interior wall halves are then cut away using flakes or bifaces and the remnant material ground smooth using a properly sized grinding stone. No grinding or smoothing of the walls between joint sections is required.
All that now remains is to rejoin the two halves. Hide glue, pitch or beeswax can be used. The important thing is to insure an air-tight seal between the two halves from mouthpiece to muzzle. Once the chosen adhesive is in place and the seams properly joined, the blowgun is bound at points along its length using buckskin, rawhide or lengths of plant fiber cordage. South American Indians often wrap the entire gun with bark after rejoining.7 A final interior treatment is the passage of a hardwood shaft with a buckskin swab attached through the gun several times to insure the removal of any adhesive which may have seeped to the inside.
This is but one possible aboriginal-style method of blowgun manufacture. There are, of course, many others. One craftsman I know, for instance, accomplished the successful construction of a blowgun by knocking out the joint walls with a hardwood shaft and then reaming the interior with a rasp made of a long cattail shoot with quartz sand attached to the working end with hide glue. I sure didn’t think it would work, but it did.8
The Darts
Of course, no consideration of blowguns can be complete without giving attention to the ammunition—the darts. The Southeastern Indian blowgun dart is a rather large affair when compared to those used by their South American cousins. Unlike South America, no poison was used in blowgun hunting, so the Southeastern dart must carry a little more heft to complete the task of shock and penetration. It works in many ways like a small arrow. In fact, the Catawba word for arrow and dart are the same: “wa” (Speck 1938).
The shafts of these darts were historically constructed of a variety of materials. The most common were split out pieces of hardwood, eight to ten inches in length, up to 3/8 inch in diameter, shaved to a round cross-section and pointed on one end (Speck 1938).
Black locust is the wood of choice among Cherokee today. Chitimacha dart shafts were sometimes constructed from a rivercane splinter which, after being subjected to heat, was twisted into a corkscrew shape. The Choctaw also manufactured such shafts (Nash 1963). Longer shaft lengths have been found. There are Cherokee darts in collections which exceed twenty-one inches in length.9
Likewise, the fletchings found on these darts are made from a variety of natural materials. The fletching material must fill the inner cavity of the gun so as to catch the air and send the dart on its way. Yet, it must be of a material that is flexible enough to expand at the large mouthpiece end and contract at the small muzzle end of the blowgun. It must be fairly durable, yet light enough so as not to slow the dart’s flight once it has left the gun.
Although cotton was preferred as a fletching material among the Gulf Coast tribes, and feathers and fur were used by the Catawba, the fletching of choice among the Cherokees and others was, and is, thistle (Carduus L.) This plant, viewed by most today as a pest, is still found growing along roadsides and in open fields throughout the South. The flower heads are gathered in the late summer and early fall by craftsmen and stored for a winter of dart making. Once dry, the thistle down (soft inner fibers of the flower) are removed and they alone are used for fletching.
Thistle flowers allowed to dry at will open up and send their fibers flying in all directions. To prevent this, dart makers wedge the freshly cut flower heads between two strips of hardwood or within the cleft created by splitting a piece of rivercane. In this way, the thistle can be stored, allowing one flower head at a time to be removed and the fibers processed. Proper cleaning and manipulation of these fibers is crucial to successful dart making. It is a craft that can only be learned by much trial and error and is best learned first-hand from an experienced dart maker.
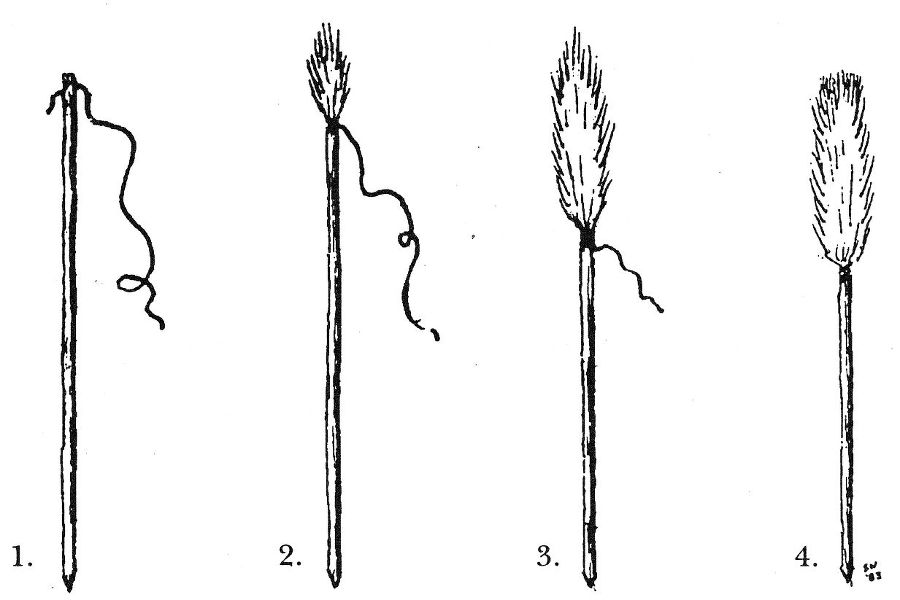
1. Whittle and smooth hardwood shaft—8-12” long and up to 1/8” in diameter. Insert thread into split cut in butt end. 2. Begin wrapping thistle down to shaft in spiral of overlapping layers. 3. Cover 2-4” of shaft with down—ending with a few wraps around the shaft and an overhand knot. 4. Completed dart-blunt cut or burn end of thistle down even with butt end of shaft.
A split is made in the blunt end of the dart shaft and a length of fine thread is inserted. A few twists of the shaft bind the thread in place without a knot. Today most dart makers use cotton thread. The Cherokees say that in the past milkweed or stinging nettle cordage was used.10 The free end of the string is held in the teeth. A bundle of prepared thistle down is held in one hand, fanned out into a row between the thumb and index finger. The other hand holds the shaft, and with its upper end lying on the index finger with the down, it is simultaneously rotated clockwise and moved up and in toward the base of the thumb.
The result of this is that thistle fibers are caught at their base between the string and the shaft, creating a continuous spiral of attached fibers. When completed, the fletching appears to be a uniform gathering of down, the string being hidden.
Once two to four inches of fletching has been applied, the end of the string is wrapped several times to catch the base of the last fibers and an overhand knot is tied. The fibers on the upper end are trimmed or burned flush with the blunt end of the shaft. The completed dart is then spun between the palms, fluffing it out and releasing any unattached down.
If this sounds like some kind of impossible magic trick requiring more hands than most of us have, then you’ve come close to the feeling a beginning dart maker has as he attempts to juggle shaft, string and thistle. At the same time one is doing this, he or she is trying to judge just how much down to feed into the process, in what concentrations so as to wind up with a fletching that is full enough to do the job, but. not so large as to cause the dart to become stuck in the blowgun’s bore.
It is the skilled dart maker who, through much experience, consistently matches the caliber of his dart with his gun. To watch a master Cherokee craftsman roll darts at a rate of one every couple of minutes is to experience the elegance of primitive technology in action.