If my goal is just getting the hide adequately scraped for the next step in making buckskin, I quickly shear off both hair and grain (epidermis) together with only one or two brisk strokes at any specific area as I work down and across the whole hide. When I want shavings for glue, however, I scrape lightly to remove only the hair. When done, I clear it away from the base of the frame. Then I go back over the whole hide again, shearing off the now mostly hairless epidermis.
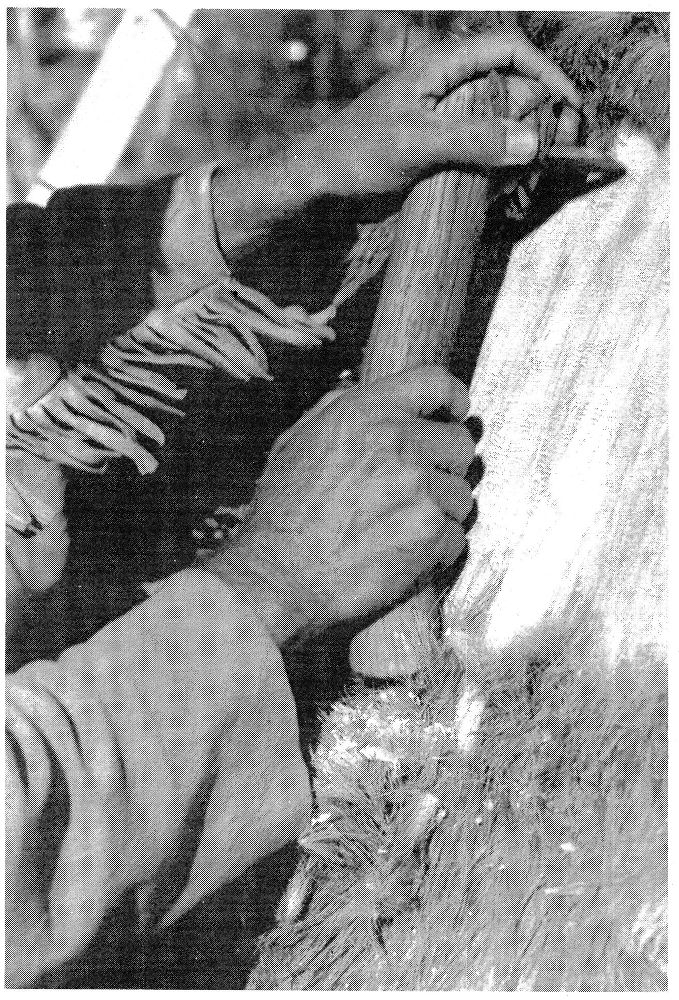
After a light once-over to remove most of the hair, go back over the whole hide again, shearing off the epidermis in thin curled shavings. (Photo: Richard Jamison)
With long, smooth strokes of the scraper blade, this comes off in thin curled shavings much like a plane removes shavings of wood. I collect all these shavings which, since dry, will not spoil and store them until I need a batch of glue. Some hair remains in the root follicles of the shavings, and other fluffs of hair unavoidably get mixed in, but are immaterial at this stage.
For additional information on obtaining and caring for hides, making and using hide scrapers and frames, etc., (as mentioned in this article), plus an in-depth “how-to” account of the complete buckskin process, aboriginal uses of the deer, making skin clothing and much more, all laced with both experience and humor, read Blue Mountain Buckskin: A Working Manual To Dry-Scrape Brain Tan, by Jim Riggs, 2nd Edition, 140 Pages. Profusely illustrated with photos and drawings. Order from: 72501 Hwy 82, Wallowa, OR 97885.
Making Glue . . .
My standard, all-purpose, old reliable camping pots, stew pots, tea pots and glue pots are #10 cans (a two- or three-pound coffee can size). I punch opposite holes just below the rims and attach wire bails for easy manipulation.
For glue, I jam a couple of big compressed handfuls of hide shavings into the pot, say, a well-packed two-thirds full, and fill the can with hot or cold water to about three-quarters full.
Since the shavings are so thin, they immediately soak-up a lot of water. I bring this to a rolling boil, uncovered to reduce boil-over potential, and maintain the boil for an hour or so, adding more water as needed. At this stage don’t worry about too much water—more is better than less to prevent burning the skin.
I stir this glop frequently. After an hour, the shavings should be swollen and gelatinous. I pour all the liquid through a screen or strainer into a second pot, refill and reboil the first for another half hour, then strain that into the second pot. This time I also hand-squeeze the skin to get most of the liquid out and discard the skin as compost. By this time, most of the glue from the skin should be in the water.
Besides the fact that the skin shavings soak and boil up more quickly, I believe this mostly epidermal layer contains proportionately more glue than the rest of the hide, though this theory remains objectively untested. In my experience with shavings, one pot-full makes enough glue to back one bow, with a considerable amount of glue left over.
Again, for an expected ration of raw skin to finished glue, more experimentation could be done; I’m simply not into the real statistical end of it!
Whether you’ve boiled up fresh skin or dry skin, hairy skin or skin shavings, after straining the liquid you will have quite a pot of milky, to tan-colored soup, free of most hair and actual pieces of skin, but still too thin for glue. As you boil this down further and the water evaporates to a quarter pot or less, the incipient glue should become more viscous (thick and gluey) and somewhat darker.
I use different viscosities of glue for different jobs, but generally seek a consistency slightly thinner than the commercial LaPage’s mucilage in the pear-shaped bottle with the pink rubber spreader on top (the stuff you probably used in grade school, if you’re old enough, anyway!).
To check your glue for adequate adhesive qualities, try the previously described finger/thumb test. If it’s not sticky enough, boil it down further. Make sure you cool it down before use though, or it’ll cook and rubberize your sinew! For immediate use, that should do it, but, there is definitely more to know about your newly-made glue.
The Nature and Care of Hide Glue . . .
I must confess that I consider hide glue, like sinew, to be a nearly magical medium, sort of like a living organism with a mind of its own! By most of our contemporary concepts of logic and application, it should not be able to accomplish what we know it can (by the laws of physics, a bumblebee should not be able to fly either), but we must produce, manipulate and treat it within its own necessary parameters for it to serve us well. Ignore or forget it too long in the wrong condition (that can mean you, or the glue!) and it’ll turn fickle quite rapidly, molding or rotting with the stench of death. Since I feel I’ve already done almost everything wrong with hide glue at least once, I feel qualified to offer some do’s and don’t’s.
Let’s say you’ve made a batch of glue but aren’t going to use it right away, or have glue left over after a project and want to store it. The only way I know to store hide glue indefinitely is to completely dry it down, and this is an active process using a direct heat source. Without heat, a pot of glue, even perhaps only one to two inches deep, if left to sit, will soon glaze over and begin to harden on top, but under the glaze it will remain liquid and soon spoil. The glue does not have to be boiling to be drying, though with low heat the surface glaze should be broken through periodically to allow quicker evaporation from beneath.
Refrigeration or freezing may delay spoilage or mold for a few days, but I’ve had small cans of glue go bad within a week, whether frozen or just cold. The other two safe but temporary conditions are actively reconstituting dry pieces or crystals with water, and heating the glue to the consistency for use, or actively drying it back out after use.
My wood heater is perfect for either process as the heat source is continuous and the temperature adjustable by the amount and kind of wood and by moving a glue pot to different areas of the stove surface. I also keep a grate set on a couple of bricks a few inches above the stove top and have drying screens above and behind the stove. Thus, when I add water the glue is reconstituting and after use it is automatically drying back out. With a large pot of glue intended for storage, I usually just dry it down to a solid layer and leave it in the can. When thoroughly dry, this hard, flat, translucent disc of brownish glue has shrunk away from the sides and bottom of the pot and can be removed for travel or storage elsewhere if desired. Dry chunks can be pounded or ground into finer pieces or crystals like the commercial hide glue. The crystals, of course, reconstitute faster than chunks.
In actively drying down a pot of glue, it naturally becomes thicker and thicker until it congeals into the gelatine phase, then through the rubber and leather phases on its way to the inert rock phase. Once it is no longer liquid, care must be taken not to burn it. When congealed and dry enough to be rubbery and not sticky to the touch, the entire glob can usually be eased from the can with a butter knife and dried on a screen as is, or sliced like cheese into thinner slabs for quicker drying.
If you don’t have time to carefully boil a whole batch all the way down, you can rapidly boil it until quite viscous but still liquid, then pour a thin layer into a flat pyrex or enamel casserole dish, onto a non-greasy cookie sheet or even foil, and sun dry it or place it in an oven set on “warm”. A thin layer will usually dry quickly with little chance of spoilage.