Individual Fighting Position
While building a fighting position, soldiers should camouflage it and carefully dispose of the earth spoil. They must also remember that too much CCD material applied to a position can actually disclose it. Soldiers should obtain CCD materials from a dispersed area to avoid drawing attention to the position because of the stripped area around it.
Camouflage the position as it is built. To avoid disclosing a fighting position, soldiers should observe the following guidelines:
•Do not leave shiny or light-colored objects exposed.
•Do not remove shirts while in the open.
•Do not use fires.
•Do not leave tracks and other signs of movement.
•When aircraft fly overhead, refrain from looking up, as one of the most obvious features on aerial photographs is the upturned faces of soldiers.
When CCD is complete, inspect the position from the enemy’s viewpoint. Check CCD periodically to ensure it stays natural looking and conceals the position. When CCD materials become ineffective, change or improve them.
12
Land Navigation and Map Reading
GPS
Global positioning systems (GPS) use radio signals from satellites to determine highly accurate locations and the time of the user. The GPS has become the standard for navigation on today’s battlefield. The accuracy and speed with which soldiers can determine their own positions and those of other friendlies and enemies has substantially increased survival. However, the GPS is not a replacement for the fundamental skills of map and compass reading.
There are many types of GPSs available to the soldier, and an intimate knowledge of its use is paramount to successful operations. The GPS receivers come in several configurations, including hand-held, vehicular-mounted, aircraft-mounted, and watercraft-mounted models. During the train-up phase prior to deployment, all soldiers should train and rehearse with a GPS.
Take care to set up the GPS correctly prior to use. It will have a variety of setup options, and it is important that the screens reflect the theater SOP for calling for aircraft, fire support, etc. Some assets will use latitude and longitude, whereas others will use the military grid system. Training and use will show you how to set up the individual menu screens for optimum use and performance.
COMPASS
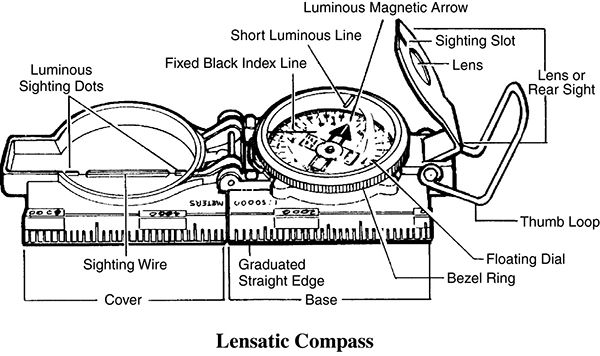
Compasses are the fundamental tool used when moving in an outdoor world where there is no other way to find directions. The lensatic compass is the most common and simplest instrument for measuring direction. It consists of the following major parts:
•The cover protects the floating dial. It contains a sighting wire and two luminous sighting slots or dots used for night navigation.
•The base or body of the compass contains a thumb loop and moving parts that include the floating dial, which is mounted on a pivot and rotates freely when the compass is held level. Printed on the dial in luminous figures are an arrow and the letters “E” and “W.” The arrow always points to magnetic north, and the letters rest at east (90 degrees) and west (270 degrees). There are two scales, the outer denoting mils and the inner (normally in red) denoting degrees. Encasing the floating dial is a glass containing a fixed, black index line.
•The bezel ring is a ratchet device that clicks when turned. It will make 120 clicks when rotated fully; each click is equal to 3 degrees. A short, luminous line used in conjunction with the north-seeking arrow is contained in the glass face of the bezel ring.
•The lens is used to read the dial. It contains the rear-sight slot used in conjunction with the front sight for sighting on objects. The rear sight must be opened more than 45 degrees to allow the dial to float freely.
Handling the Compass
The compass is a delicate instrument and should be closed and kept in its case when not being used. Metal objects and electricity can affect the performance of a compass. Nonmagnetic metals and alloys do not affect it. To ensure its proper functioning, observe these suggested safe distances:
High-tension power lines
55 meters
Field gun, truck, or tank
18 meters
Telegraph/telephone wires or barbed wire
10 meters
Machine gun
2 meters
Steel helmet or rifle
0.5 meter
Using the Compass
The compass must always be held level and firm when sighting on an object. Some of the techniques are as follows:
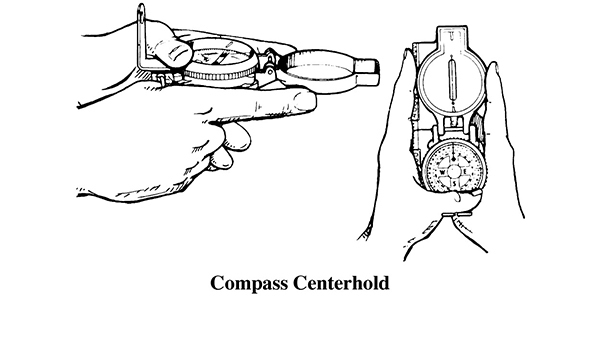
Centerhold. Open the compass to its fullest so that the cover forms a straight edge with the base. Place your thumb through the thumb loop, form a steady base with your third and fourth fingers, and extend your index finger along the side of the compass. Place the thumb of the other hand between the lens (rear sight) and the bezel ring; extend the index finger along the other side of the compass and the remaining fingers around the fingers of the other hand. Pull your elbows in firmly to your sides—this places the compass between your chin and belt. To measure an azimuth, simply turn your entire body toward the object, pointing the compass cover directly at the object. Then look down and read the azimuth from beneath the fixed, black index line.
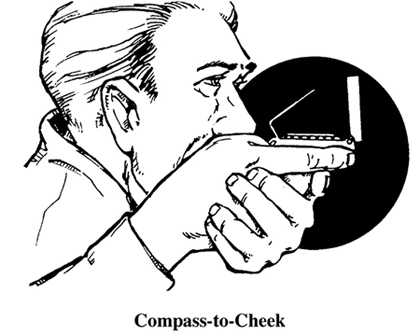
Compass-to-Cheek. Open the cover of the compass containing the sighting wire to a vertical position and fold the rear sight slightly forward. Look through the rear-sight slot and align the front-sight hairline with the desired object in the distance. Then glance down at the dial through the eye lens to read the azimuth.
Presetting a Compass and Following an Azimuth
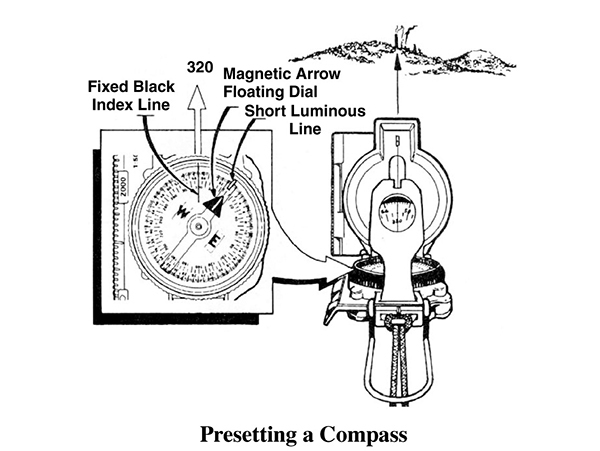
In Daylight or with a Light Source. Hold the compass level in the palm of your hand. Rotate it until the desired azimuth falls under the fixed, black index line. Turn the bezel ring until the luminous line is aligned with the north-seeking arrow. The compass is now preset.
To follow the azimuth, use the centerhold technique and turn your body until the north-seeking arrow is aligned with the luminous line. Then proceed forward in the direction of the front cover’s sighting wire, which is aligned with the fixed, black index line.
In Darkness or Limited Visibility. Set the azimuth by the click method (each click equals a 3-degree interval). Rotate the bezel ring until the luminous line is over the fixed, black index line. Find the desired azimuth and divide it by three. The result is the number of clicks that you have to rotate the bezel ring. If the desired azimuth is smaller than 180 degrees, the number of clicks on the bezel ring should be counted in a counterclockwise direction. If the desired azimuth is larger than 180 degrees, subtract the number of degrees from 360 degrees and divide by three to obtain the number of clicks. Count them in a clockwise direction. For example, if the desired azimuth is 330 degrees, then 360 - 330 = 30 divided by 3 = 10 clicks clockwise.
With the compass preset, use the centerhold technique and rotate your body until the north-seeking arrow is aligned with the luminous line on the bezel. Then proceed forward in the direction of the front cover’s luminous dots, which are aligned with the fixed, black index line.
Offset
A deliberate offset is a planned magnetic deviation to the right or left of an azimuth to an objective. It is used when the objective is located along or in the vicinity of a linear feature such as a road or stream. Because of errors in reading the compass or map, you may reach the linear feature without knowing whether the objective lies to the right or left. A deliberate offset by a known number of degrees in a known direction compensates for possible errors and ensures that upon reaching the linear feature you will know whether to go left or right.