Enter and Clear a Trench Drill
The enter and clear a trench drill is used when the platoon is moving and identifies enemy in a trench line, and the platoon leader determines that he can maneuver and assault the trench line.
Step 1. The platoon leader directs one squad to enter the trench and secure a foothold.
Step 2. The platoon leader designates the entry point of the trench line and the direction of movement once the platoon begins clearing.
Step 3. The platoon sergeant positions soldiers and machine guns to suppress the trench and isolate the entry point.
Step 4. The platoon leader directs the platoon FO to initiate a fire mission, if necessary, in support of the assault. The platoon FO maintains accurate battle tracking of all friendly elements to facilitate quick clearance of fires. He lifts or shifts fires to isolate the objective as the assault team advances.
Step 5. The assaulting squad executes actions to enter the trench and establish a foothold. The squad leader signals to the platoon leader that the foothold is secure and the follow-on elements can move into the trench. The squad leader remains at the entry point and marks it. The platoon follows the success of the seizure of the foothold with the remainder of the platoon as part of the platoon actions to clear a trench line.
Step 6. The platoon leader moves into the trench with the assaulting squad.
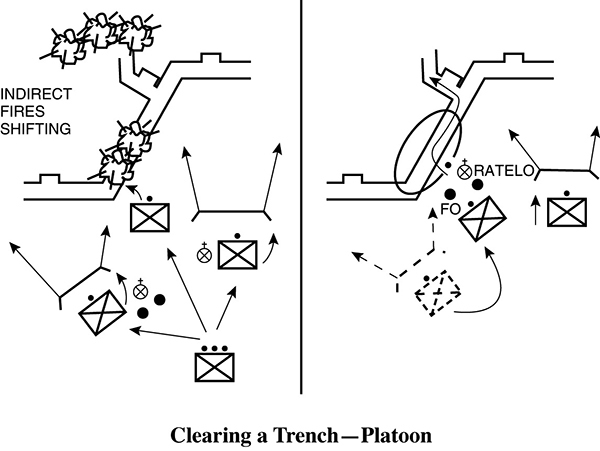
Step 7. The platoon leader directs one of the base-of-fire squads to move into the trench and begin clearing it in the direction of movement from the foothold.
Step 8. The base-of-fire element repositions as necessary to continue suppressive fires.
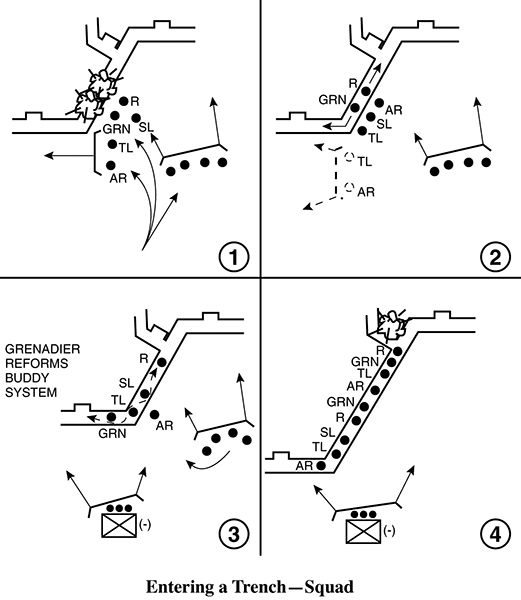
Step 9. The assaulting squad passes the squad that has secured the foothold and executes actions to take the lead and clear the trench.
•The squad leader designates a lead fire team and a trail fire team.
•The lead fire team and the squad leader move to the forward most secure corner or intersection. The squad leader tells the team securing that corner or intersection that his squad is ready to continue clearing the trench. The trail fire team follows, maintaining visual contact with the last soldier of the lead team.
•Note: The fire support element must be able to identify the location of the lead fire team in the trench at all times.
•Note: Throughout this battle drill, the team leader positions himself at the rear of the fire team to have direct control (physically, if necessary) of his soldiers. Other soldiers in the fire team rotate the lead to change magazines and prepare grenades. Rotating the lead provides constant suppressive fires down the trench and maintains the momentum of the attack as the squad clears the trench.
•The lead fire team passes the element securing the foothold. The following then occurs:
—The lead soldier of the fire team moves abreast of the soldier securing the corner or intersection, taps him, and announces, “Taking the lead.”
—The soldier securing the corner or intersection acknowledges that he is handing over the lead by shouting, “Okay!” He allows the fire team to pass him.
•The lead fire team starts clearing in the direction of movement. They arrive at a corner or intersection. The following then occurs:
—Allowing for cook off (two seconds maximum) and shouting, “Frag out,” the second soldier prepares and throws a grenade around the corner.
—Upon detonation of the grenade, the lead soldier moves around the corner, firing three-round bursts and advancing as he fires. The entire fire team follows him to the next corner or intersection.
•The squad leader:
—Follows behind the team.
—Ensures that the trailing fire team moves up and is ready to pass the lead at his direction.
—Rotates fire teams as necessary to keep his soldiers fresh and to maintain the momentum of the attack.
—Requests indirect fires, if required, through the platoon leader. The squad leader also directs the employment of the M203 to provide immediate suppression against positions along the trench line.
—Ensures fire teams maintain sufficient interval to prevent them from being engaged by the same enemy fires.
•At each corner or intersection, the lead fire team performs the same actions previously described.
•If the lead soldier finds that he is nearly out of ammunition before reaching a corner or intersection, he announces, “Ammo!” The following then occurs:
—The lead soldier stops and moves against one side of the trench, ready to let the rest of the team pass. He continues to aim his weapon down the trench in the direction of movement.
—The next soldier ensures that he has a full magazine, moves abreast of the lead soldier, taps him, and announces, “Taking the lead.”
—The lead soldier acknowledges that he is handing over the lead by shouting, “Okay.” Positions rotate and the squad continues forward.
•The trailing fire team secures intersections and marks the route within the trench as the squad moves forward. The trailing fire team leader ensures that follow-on squads relieve his buddy teams to maintain security.
•The squad leader reports the progress of the clearing operation. The base-of-fire element must be able to identify the location of the lead fire team in the trench at all times.
Step 10. The platoon leader rotates squads to keep the soldiers fresh and to maintain the momentum of the assault.
Step 11. The platoon sergeant (PSG) calls forward ammunition resupply and organizes teams to move it forward into the trench.
Step 12. The base-of-fire element ensures that all friendly forces move into the trench only through the designated entry point to avoid fratricide.
Step 13. The platoon leader reports to the company commander that the trench line is secured, or that he is no longer able to continue clearing. If trench line is secured, then the platoon leader directs the platoon FO to develop a fire plan to support the defense of the platoon position.
Breach an Obstacle Drill
The breach an obstacle drill is used when the lead squad identifies a wire obstacle, reinforced with mines, that cannot be bypassed, and when there are enemy positions on the far side of the obstacle.
Step 1. The platoon leader moves forward with his FO and one machine-gun team.
Step 2. The platoon leader determines whether he can maneuver.
Step 3. The platoon leader directs one squad to be the base-of-fire element, another to be the breach squad, and a third to be the assault squad once the breach has been made.
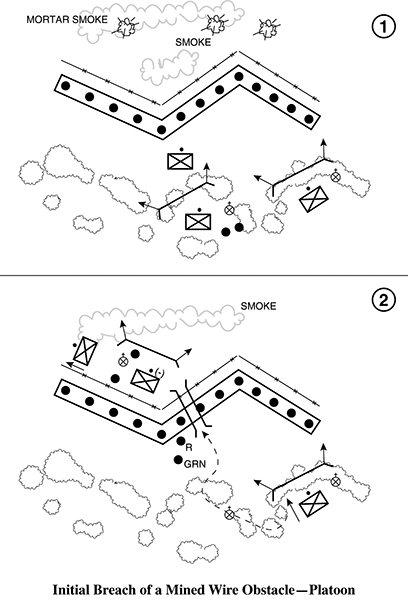
Step 4. The base-of-fire squad is joined by the platoon sergeant and the second machine-gun team. Together they begin to suppress the enemy and obscure the enemy positions with smoke.
Step 5. The platoon leader leads the breach and assault squads to the breach point.
1.The breach squad leader designates a breach fire team and a support fire team.
2.The breaching fire team moves to the breach point using the covered and concealed route. The squad and fire team leader obscure the breach point, using smoke grenades.
3.The breaching fire team leader and an automatic rifleman are positioned on one flank of the breach point to provide security.
4.The grenadier and rifleman of the breaching fire team probe for and mark mines and cut the wire obstacle, marking their path as they proceed. (If available, Bangalore torpedoes are preferred for clearing a lane through a minefield.)