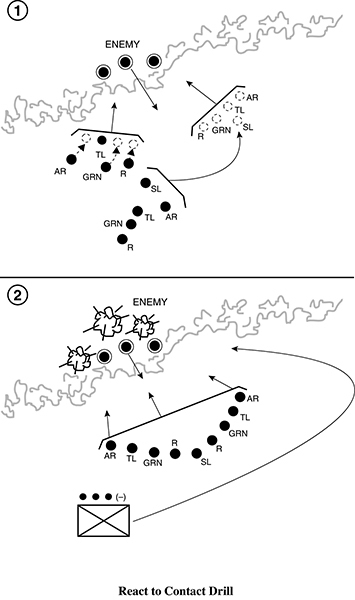
React to Contact Drill
The react to contact drill takes place when a squad or a platoon is receiving fire from enemy riflemen or an automatic weapon.
Step 1. Soldiers take cover and return fire.
Step 2. Leaders locate known or suspected enemy positions and engage with well-aimed fire. Leaders control fire using the following standard fire commands: alert, direction, description of target, range, method of fire, and command to commence firing.
Step 3. Soldiers maintain contact to left and right, as well as with leaders, and report enemy locations.
Step 4. Leaders check the status of their men.
Step 5. The platoon leader moves to the squad in contact. He brings with him his communications NCO, forward observer (FO), the leader of the nearest squad, and a machine-gun crew. The platoon sergeant moves forward with the second machine gun-crew and links up with the platoon leader, ready to assume control of the base-of-fire element.
Step 6. The platoon leader determines whether he must move out of an enemy engagement area. If he is not in an engagement area, he determines whether he can gain and maintain suppressive fire with his element in contact, based on the volume and accuracy of the enemy fire.
Step 7. The platoon leader makes an assessment of the situation, identifying the following:
1.Location of the enemy position and obstacles.
2.Size of the enemy force (the number of automatic weapons, the presence of vehicles, and the employment of indirect fires are indicators of enemy strength).
3.Vulnerable flanks.
4.Covered and concealed flanking routes to the enemy position.
Step 8. The platoon leader then determines his next course of action, such as fire and movement, assault, breach, knock-out bunker, or enter and clear a building or trench.
Step 9. The platoon leader reports the situation to the company commander and begins to maneuver, calling for an adjusting artillery or mortar fire.
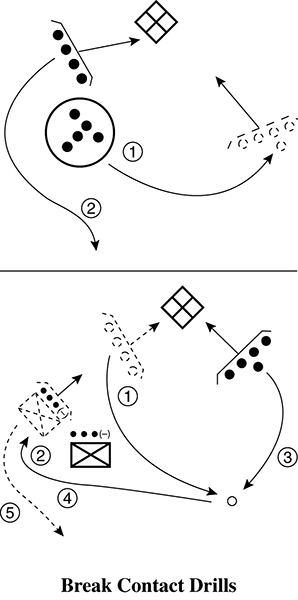
Break Contact Drill
The break contact drill takes place when the squad or platoon is under enemy fire and must break contact.
Step 1. The platoon leader directs one squad in contact to support the disengagement of the remainder of the platoon.
Step 2. The platoon leader orders the first squad to move a certain distance and direction or to a terrain feature or the last ORP. Meanwhile, the base-of-fire (supporting) squad continues to suppress the enemy.
Step 3. The moving element uses smoke grenades to mask its movement until it takes up its designated position and engages the enemy position.
Step 4. The platoon leader then directs the base-of-fire squad to move to its next location.
Step 5. While continuing to suppress the enemy, the platoon bounds away from the enemy until it either breaks contact or passes through a high-level support-by-fire position.
Step 6. Once contact is broken, the platoon should change direction, if possible, to avoid indirect enemy fire.
Step 7. Leaders account for soldiers, report (ACE), reorganize as necessary, and continue the mission.
React to Ambush Drill
In a near ambush (within hand-grenade range), use the following procedures:
Step 1. Immediately return fire.
Step 2. Take up covered positions.
Step 3. Throw fragmentation, concussion, and smoke grenades.
Step 4. Immediately after the grenades detonate, the soldiers in the kill zone assault through the ambush using fire and movement, while soldiers not in the kill zone identify enemy positions, initiate suppressive fire, take up covered positions, and shift fires as soldiers in the kill zone assault through the ambush.
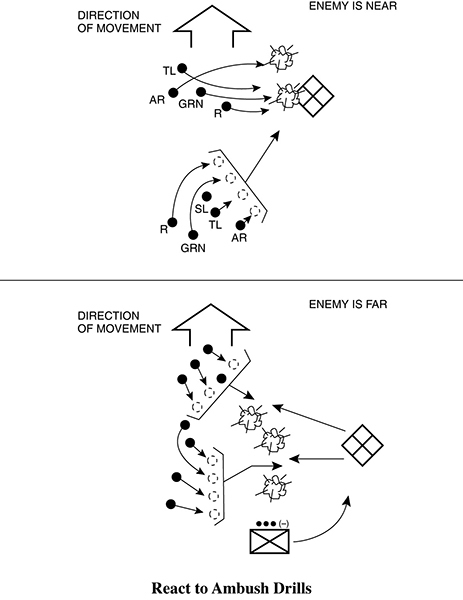
In a far ambush (beyond hand-grenade range), use the following procedures:
Step 1. Soldiers receiving fire immediately return fire, take up covered positions, and suppress the enemy by destroying or suppressing enemy crew-served weapons first, obscuring the enemy position with smoke, and sustaining suppressive fires.
Step 2. Soldiers not receiving fires move by a covered and concealed route to a vulnerable flank of the enemy position and assault using fire and movement.
Step 3. Soldiers in the kill zone continue suppressive fires and shift fires as the assaulting element fights through the enemy position.
In both near and far ambushes, the platoon leader then calls for mortar or artillery fire to isolate the enemy or to attack as the enemy retreats. Leaders account for soldiers, report (ACE), reorganize as necessary, and continue the mission.
Knock-Out Bunker Drill
The knock-out bunker drill is used when the platoon identifies enemy in bunkers.
Step 1. The platoon initiates contact.
1.The squad in contact establishes a base of fire.
2.The platoon leader, communications operator (COMMO), FO, and one machine-gun team move to the squad in contact.
3.The platoon sergeant moves the second machine-gun team forward and takes charge of the base of fire.
Step 2. The base-of-fire element destroys or suppresses enemy crew-served weapons first and uses smoke to obscure the enemy position. The FO calls for and adjusts indirect fire.
Step 3. The platoon leader determines whether he can maneuver by identifying the following:
1.The enemy bunkers, other supporting positions, and any obstacles.
2.The size of the enemy force engaging the platoon.
3.A vulnerable flank of at least one bunker.
4.A covered and concealed flanking route to the bunker.
Step 4. The platoon leader determines which bunker to knock out and directs a squad not in contact to assault it.
Step 5. If necessary, the platoon sergeant repositions base-of-fire elements to isolate the enemy bunker.
Step 6. The assault squad, along with the platoon leader and FO, moves along the covered and concealed route.
1.The squad leader moves with the assaulting fire team.
2.The assaulting fire team approaches the bunker from its blind side.
3.Soldiers constantly watch for other bunkers or enemy positions in support of the known bunker.
4.Upon reaching the last covered and concealed position, the fire team leader and automatic rifleman remain in place and add their fires to suppressing the bunker, while the squad leader positions himself where he can best control his teams.
5.On the squad leader’s signal, the base-of-fire element lifts or shifts fires to the opposite side of the bunker from the assaulting team’s approach.
6.A rifleman and grenadier continue forward to the blind side of the bunker. One soldier takes up a covered position near the exit while the other cooks off (two seconds maximum) a grenade, shouts “Frag out!” and throws it through an aperture.
7.After the grenade detonates, the soldier covering the exit enters the bunker, firing short bursts to destroy the enemy.
8.The squad leader inspects the bunker to ensure that it has been destroyed.
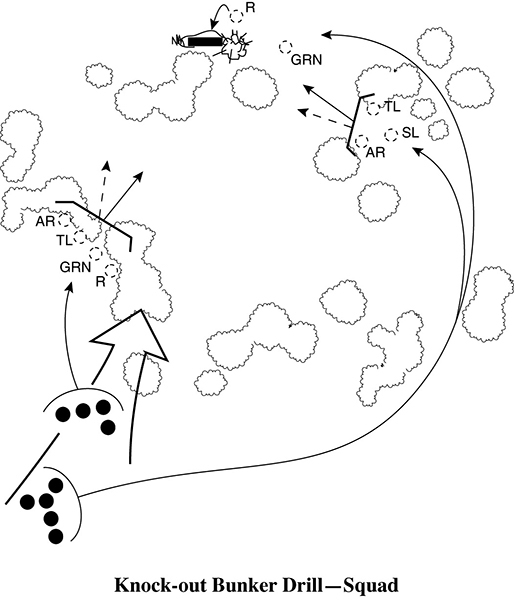
9.The squad leader then reports, reorganizes as needed, and continues the mission.
Step 7. The platoon leader repositions the base-of-fire element as necessary to continue to isolate and suppress the remaining bunkers as squads are maneuvered to knock them out.