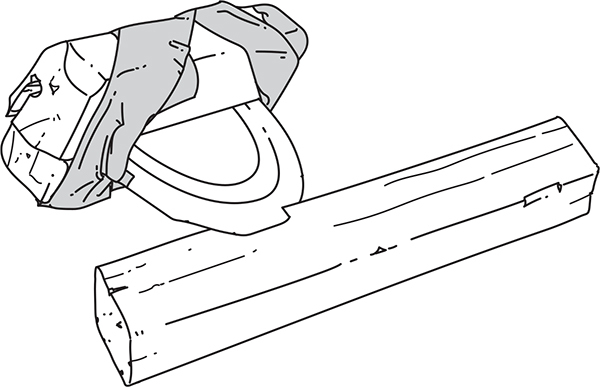
AN AMAIZEING FILE HANDLE
This is a hack I picked up from my grandpa in Kentucky. As a child I used to love rummaging through my grandpa’s tobacco barn. It was filled with tons of hand tools that had stories to tell, I’m sure. I’ll never forget my grandpa’s big wooden crate of files. He used them for sharpening axes, machetes, knives, and farm equipment. Rather than fancy wooden handles affixed to the rat-tail end of the files, grandpa had shoved the files into 5" sections of dried corncob. They made the perfect file handle. The dense inner pith held the file firmly in place and the rough cob made for an awesome grip, even with wet or muddy hands. Dried corncobs make great handles for all kinds of tools including knives, files, and fire pokers.
VIKING CLAMPS
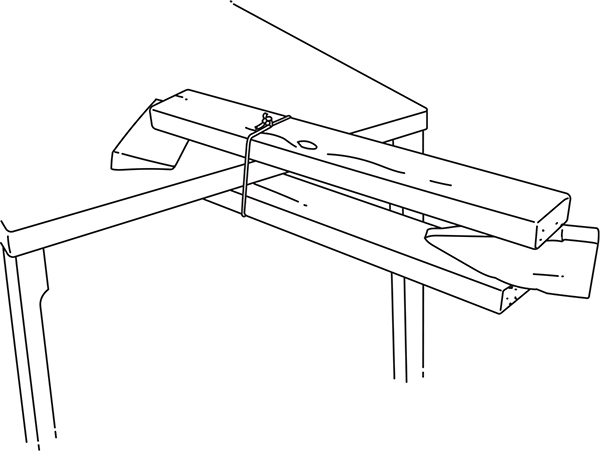
One of the main reasons I carry a multitool as a part of my everyday carry (EDC) is for the pliers. I’ve learned the hard way that there is no substitute for pliers in the wilderness. This hack, however, is how the Vikings used ingenuity and simple tools to make some very clever clamps that acted as vise grips when building boats. Its simplicity will amaze you.
Sandwich what you need held between 2 boards. Tie a rope around the 2 boards a few inches back from where they are to grip. Then from the opposite end of the gripping end, drive another board or wedge in between the 2 boards. The rope acts as a hinge point, and the gripping end is forced tighter together as the opposite ends are wedged more open. Vikings used this technique to build the hulls of their massive wooden ships, and you can use it too as a makeshift clamping system in a survival scenario.
TOOL AND GEAR MAINTENANCE HACKS
DVD CASE KNIFE SHEATH
There’s nothing worse (or more dangerous) than carrying a knife that doesn’t have a sheath. As many of you know, Kydex—a thermoplastic that can be heated and molded into almost any shape imaginable—is a very popular sheath material. Black DVD cases can be used as a hack Kydex material. These cases are made from polypropylene and can be heated and molded in a very similar way. Cut the front and back panel off of the case. Heat them over a fire or toaster or in an oven for a few minutes until pliable. When they’re nice and soft, sandwich the knife between them and press firmly between 2 folded towels (1 on top and 1 on bottom). Use a book to press the top towel, and do this on a hard surface such as a wood floor. Finally, trim the excess around the sheath with a saw and drill holes for lacing the sheath tightly together with paracord.
COPPER WIRE RIVETS
I learned this hack during a pioneer-living workshop when I was a boy. While fitting a knife blank with a wooden dowel handle, the blacksmith cut short pieces of copper wire and stuck them through one side of the handle, through a hole in the knife handle, and then through the other side of the wood handle. He cut the wire pieces long enough so that they stuck out about 1⁄4" on each side of the handle. He then slowly pounded the copper wire on each side, which caused it to mushroom out and hold the handle tightly in place, just like a rivet. This method of crude riveting can be used in the field to repair a broken knife handle or to replace rivets in another tool that may have worked loose or failed altogether. Metal nails would work as well, but the soft nature of copper makes it a prime candidate for this technique.
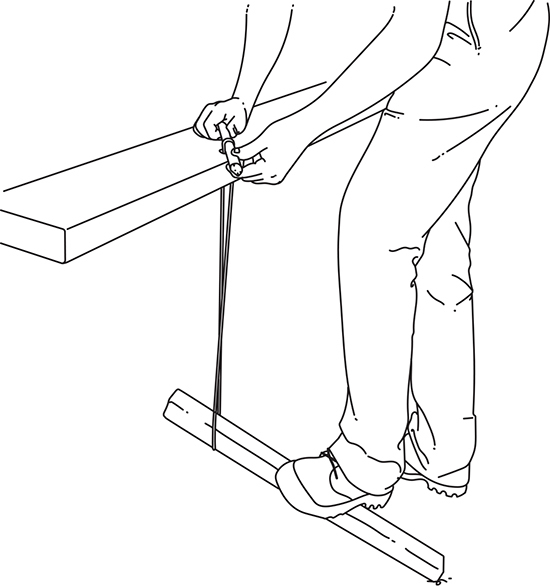
ROPE VISE
Sometimes there is no substitute for a good vise when repairing gear or sharpening tools. You can hack a simple foot-powered rope vise. All you need is a picnic table, some rope, and a wooden foot pedal (any old board or stick will do). The picnic table will serve as your workbench.
Start by folding your rope in half, and pull the folded loop up between the boards at the end of the picnic table. Now tie the other 2 ends of the rope together, using a simple granny knot. Make sure that this knot is suspended about 6" off the ground. Complete the vise by placing your pedal stick through the rope loop. Place your knife or tool under the rope loop sticking out the top of your workbench and depress the foot pedal. This will hold your tool firmly in place. The greater the pedal pressure, the tighter the hold.
KNIFE-SHARPENING SURFACES
Keeping your blade honed to a razor edge is important. A sharp knife is safer to use and requires less energy. In survival, every calorie counts. You may not know that 2 excellent sharpeners exist almost right under your nose. First is the bottom of a ceramic coffee mug. The bottom ring of most ceramic mugs is almost always unglazed, and unglazed ceramic is a perfect knife-sharpening surface. The underside of toilet tank covers are also unglazed. Then there is the abrasive upper edge of a car window. This edge is sufficient for sharpening most carbon-steel blades. Slide the blade from hilt to tip along the upper edge just as you would use a sharpening rod.
PLASTIC BAG TOOL SHEATH
Scrap plastic grocery bags can be repurposed into durable plastic sheets that can be molded, folded, and sewn into a variety of different pouches, including tool sheaths. Start by cutting the front and back panels from 10–20 plastic bags and lay them flat on top of each other in a pile. It helps to cut out similar rectangular shapes and just throw away the sides, handles, and bottoms. Sandwich this pile of plastic bag sheets between 2 flat rocks. I use large, flat paver stones. Finally, place these stones on the coals of a fire to heat up. As the stones heat, the plastic sheeting welds together into one solid piece of durable plastic that can then be folded and stitched into a very suitable knife sheath. I’ve also used one of these welded plastic bag chunks as an improvised cutting board with great success. Note: You can use a home iron to weld the sheets together. Set to medium heat and place a piece of craft paper on top of and below the stack of sheets.
PLASTIC BOTTLE REPLACEMENT KNIFE HANDLE
This hack involves using plastic high-density polyethylene (HDPE) bottles to make one of the best knife handles I’ve ever seen. HDPE plastic is marked by a number 2 inside of the recycle sign. Be sure to use bottles/caps labeled with HDPE or with the 2 as its resin identification code because the fumes from other bottles can make you sick.
First, find a metal tube that is about the diameter that you want your knife handle. Cut up the plastic so that the pieces will fit inside of the tube. Fill it full and place near the fire (or in the oven at 350°F) until the plastic melts. Continue to melt pieces until the tube is full. Once the tube is full and the plastic is still in a soft state, press it down using a wooden dowel or plunger to compress out all the air bubbles. Finally, press the knife handle into the tube and let the plastic cool. HDPE shrinks as it cools, allowing you to remove it from the tube when finished. Now, simply carve or file the handle to the shape you want.
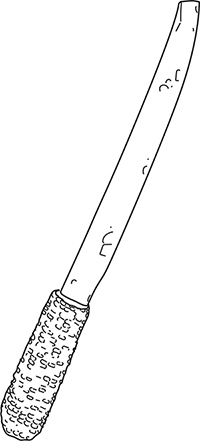
IMPROVISED NEEDLE AWL
A sail maker’s needle is a good item to keep in survival kits. These are large, thick needles that can be used to make repairs on durable goods such as packs, shoes, canvas pants, and leather items. Sometimes, however, you need an awl to punch through especially thick materials. A good sail needle can be reworked into a great awl by hammering the point 1⁄2" into a solid wood handle that you can carve from any hardwood limb. The eye of the needle can now be filed down to a sharp point with a smooth stone or file. The result is a sharp needle with a hole at the tip, which is exactly what an awl is. Thread the eye, push the needle and thread through the materials, and begin your lockstitch pattern.