Water which is very muddy, dirty or stagnant can be clarified and sterilised and made quite safe for drinking by filtering and boiling with hot stones. A good filter is made from a pair of drill trousers with one leg turned inside out and put inside the other leg. The cuff is tied, and the upper part held open by three stakes driven well into the ground. Fill with the dirty water, and then drop in the hot stones. The water will filter through, and must be caught either in a billy or bark dish and poured back until the dirt has been filtered out and the water is boiling.
CAMP FURNITURE
TABLES
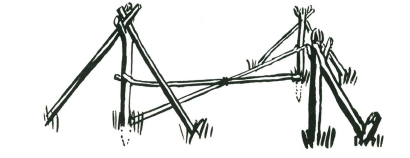
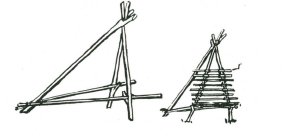
A camp table and seats are worth making if there are five or six people in a standing camp, even if only for a few days. The best pattern of camp table is one which also carries the seats, and which will not become unbalanced or unsteady, even though several people sit on one side.
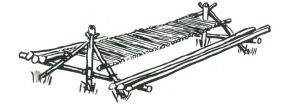
This is about the best style of camp table you construct. When you make it do not use green wood, but search through the bush and you will find dead timber, which is lighter in weight and quite strong, for forks and poles.
SHOWING THE FRAMEWORK WITH TABLE TOP POLES AND SEAT POLES.
For the framework select two forked stakes at least three inches thick and four to five feet long. The length depends upon the soil, and how far you will have to drive the stakes into the ground to make them quite secure. The lower end of each stake is sharpened and the head bevelled. The first stake should be driven well into the earth, so that the lowest part of the crotch of the fork is three feet above the ground. The prong of the fork should be pointing out from the length of the table. When this stake is set, measure off the length you want your table, say, from four to seven feet, and drive in the other stake with its prong also pointing out-wards-that is, away from the first stake. This stake must also be driven the same depth into the ground as the first stake. Cut four strong straight stakes, four feet six to five feet in length, and at least two and a half inches thick. Place these with one end in the crotch of the forks, and at right angles to the line of the forked stakes. Note where the sticks cross each other in the forks, and scarf out cuts in each, so that the two will nest together in the crotch. These side poles carry the table poles and the seat poles, so they must “seat” securely in the forks.
On to these side poles, and about two feet above ground level, two strong poles, two inches thick, are securely lashed. These poles are for the table, and later straight sticks are laced side by side across these poles for the actual table top.
Fifteen inches above ground level, two very strong poles, three inches thick and seven or eight feet in length, are lashed. These lashings must be very tight to make these two poles secure to the two side poles and also to the forked stakes you first drove into the ground. These poles serve both as a bracing to carry the seat.
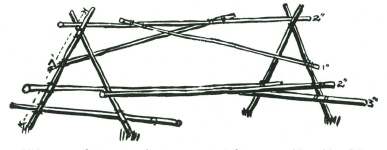
Your table is now ready for finishing. Cut short, straight sticks for the top. You will need eight sticks for every foot in length of table top. The method of lacing these to the table top poles is shown in the sketch below.
The seat-sticks–at least three to four inches thick–are cut a foot longer than the length of the table. You will need at least three of these seat-sticks for each side. They are not lashed to the cross poles, but allowed to lie on them, so that the distance of the seat from the table can be adjusted by either pushing the sticks back or pulling them in.
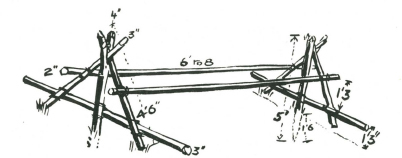
SHOWING HOW TO BRACE YOUR TABLE IF THE GROUND IS SOFT OR SANDY.
If the ground is soft, or loose sand, your table will require bracing, and this can be done simply by two diagonal braces from the table level of each of the forked stakes to the foot of the other. Where the bracings cross, they should be lashed. An alternative is to cut two five-foot forks and brace with these so that they “jam” below the forks of the stakes in the ground. Their own butts must be firmly seated on the ground and held from slipping; by a stout peg driven well in the ground.
This type of structure is recommended for a portable table. When securely lashed the whole table is extremely strong. A fly thrown over the top bar can be used to give shade.
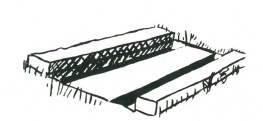
Another type of camp table, suitable for dry country, is to simply dig two trenches, two or three feet apart on their inside edges, and at least ten to twelve inches deep. This is only suitable when the earth is clayey or firm enough to be dug in clean sods. Sods are used to give height to the seat. When digging such a table, remember to replace the sods when you leave the camp site.
When using an earth table it is advisable to weave a couple of grass mats to lay over the seat. These will keep your clothes clean, and only take a few minutes to make on a camp loom.
CAMP CHAIRS
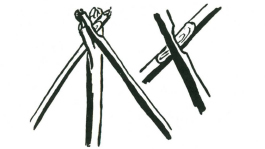
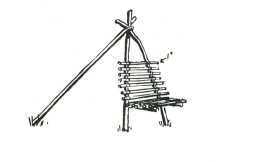
A comfortable camp chair can be made in ten or fifteen minutes and will give you hours and hours of comfort. Select two stout forked sticks, four feet long and three inches thick. The forks must be at a wide angle, and cut with the straighter of the two prongs about nine to ten inches long, and the other wide angled prong about twelve to fifteen inches. Cut another stout forked stick about four feet in length, and leave the prongs of this sufficiently long to hold the two sticks you have previously cut.
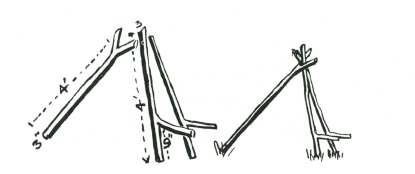
SHOWING THE THREE MAIN STICKS REQUIRED FOR A GAMP CHAIR.
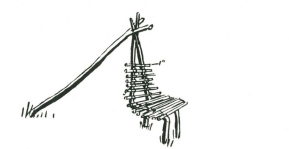
Across the seat portion of the chair, lash straight sticks about an inch thick, and continue these up the back of the chair. On the seat portion they must be close together, but on the back they can be spaced two or three inches apart.
SHOWING THE FRAMEWORK OF A CHAIR USING HOOKED STICKS.
There may be difficulty in finding two sticks with wide angled prongs, in which case you can make your chair by using two hooked stakes. The crotch of the hook should be about eight inches above the end of the stick, and the sticks themselves should be about three feet six inches long.
Two side poles, each about five feet long, are laid one each through the hooked portion of the sticks, which have their upper ends lashed together. These two poles are lashed together behind the chair, and a forked pole, leading from the upper end where the hooked stakes are lashed, comes back to these two side poles and is lashed again. This gives you the framework for your chair.
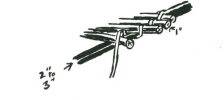
Occasionally you will find a pair of twisty sticks which, lying on the ground, will look like this–
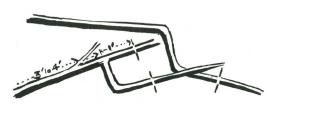
but, if you are quick to see the opportunity they present, you will convert them into a seat like this:
A good bushman makes himself comfortable wherever he may be. The simplest seat, of course, is either to roll up a log, or failing that, to select your site where a fallen tree will serve you. Such are not always to be found, and you can often make a comfortable seat by using a few stones to build up a platform, and between these you can lay two or three poles for your seat.