Considerations. When deciding where to have his bounding squad go, a platoon leader considers the following:
•The requirements of the mission.
•Where the enemy is likely to be.
•The routes to the next overwatch position.
•The ability of an overwatching element’s weapons to cover the bound.
•The responsiveness of the rest of the platoon.
•The fields of fire at the next overwatch position.
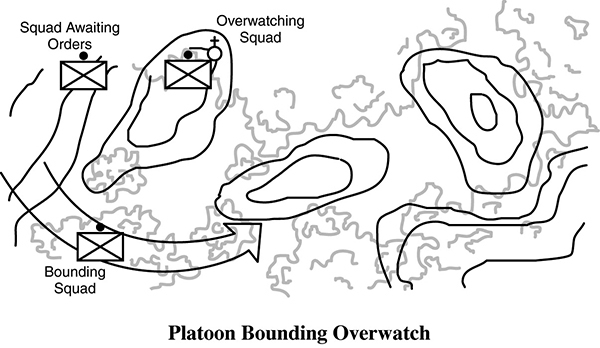
Instructions. Before a bound, the platoon leader gives an order to his squad leaders from the overwatch position. He tells and shows them the following:
•The direction or location of the enemy (if known).
•The positions of the overwatching squad.
•The next overwatch position.
•The route of the bounding squad.
•What to do after the bounding squad reaches the next position.
•What signal the bounding squad will use to announce that it is prepared to overwatch.
•How the squad will receive its next orders.
DANGER AREAS
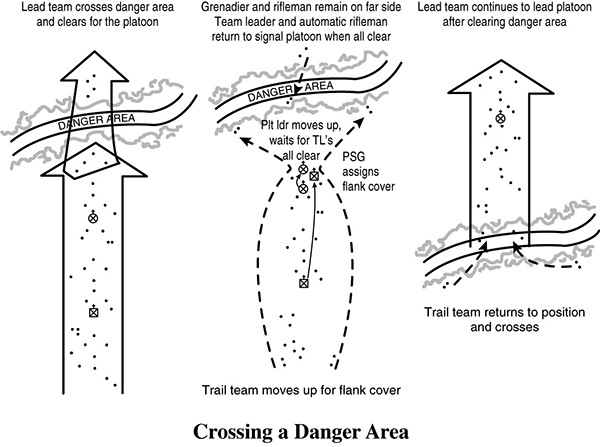
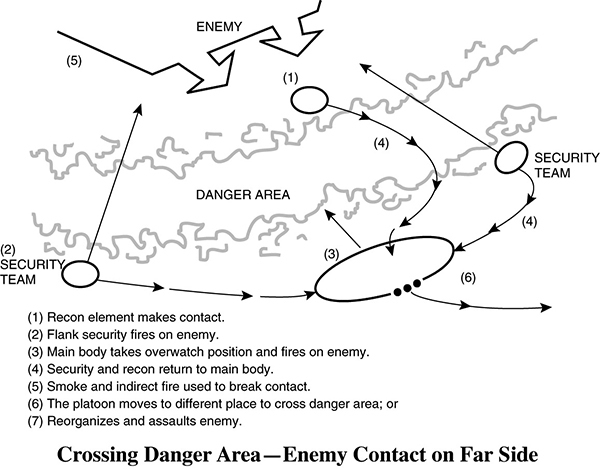
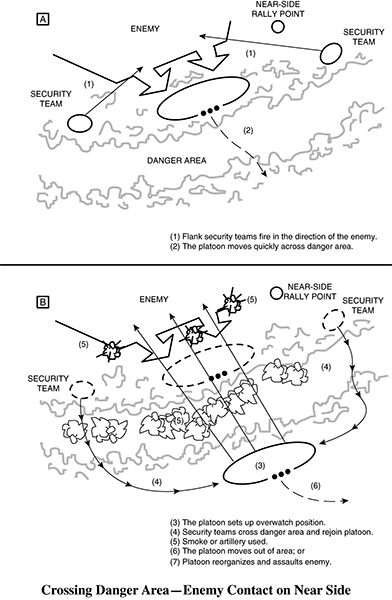
A danger area is any place on the movement route where the unit might be exposed to enemy observation, fire, or both. Units try to avoid danger areas. If a danger area must be crossed, it should be done with great caution and as quickly as possible. Before crossing a danger area, leaders should designate near- and far-side rally points, secure the near side (both flanks and rear), and reconnoiter and secure the far side.
The unit halts when the lead elements signal “danger area.” The leader confirms the danger area, then selects and informs subordinate leaders of near- and far-side rally points. Near-side security is posted to overwatch the crossing. The far-side security team crosses the danger area and clears the far side. Once the far side is cleared, the main body moves quickly and quietly across the danger area. A small unit may cross all at once, in pairs, or one soldier at a time. A large unit normally crosses its elements one at a time. As each element crosses, it moves to an overwatch position or to the far-side rally point. The near-side security element then crosses and resumes its place in the formation as the unit continues its mission.
Crossing Techniques
Open Areas. When crossing an open area, stay concealed and observe carefully from the near side. Post security to give early warning, and send an element across to clear the far side. When cleared, quickly cross the rest of the unit at the shortest exposed distance.
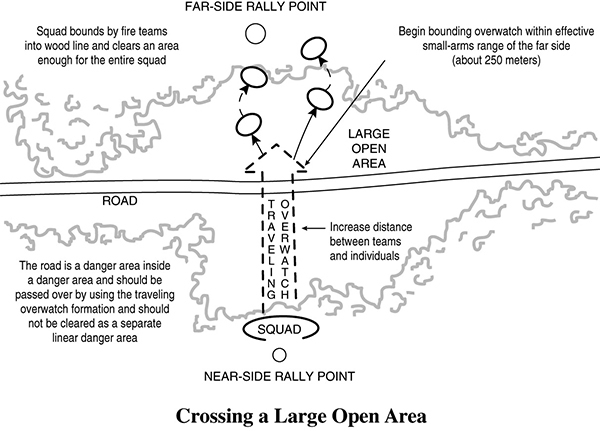
To cross large open areas, use a combination of traveling overwatch and bounding overwatch. Bounding overwatch is used at any point in the open area where enemy contact may be expected or when the element comes within small-arms range (250 meters) of the far side.
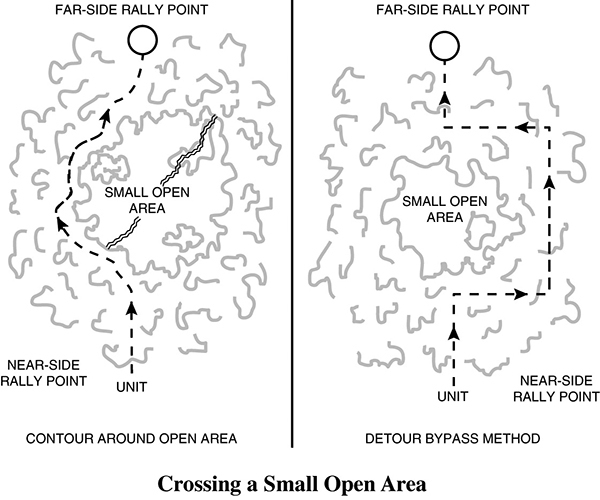
Small open areas may be bypassed by either using the detour bypass method or contouring around the open area. In the detour bypass method, the force moves around the open area using 90-degree turns to the right or left until the far side is reached. To contour around the open area, the unit uses the wood line and vegetation for cover and concealment until it reaches the far-side rally point.
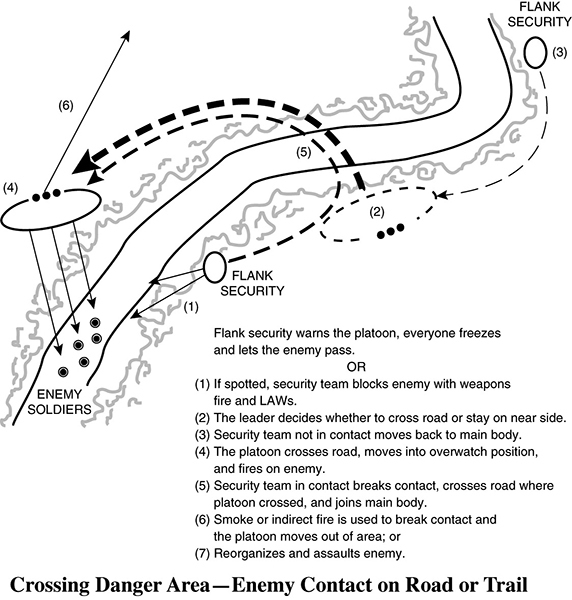
Roads and Trails. Cross a road or trail at or near a bend, at a narrow spot, or on low ground to reduce enemy observation and minimize the unit’s exposure.
Villages. Pass on the downwind side and well away from a village. Avoid animals, especially dogs, that might reveal your presence.
Enemy Positions. Pass enemy positions on the downwind side (the enemy might have scout dogs). Be alert for trip wires or other warning devices.
Minefields. Bypass a minefield, even if it means changing your route by a great distance. If you must pass through a minefield, the lead elements should clear a lane for the rest of the unit. Soldiers use their hands to detect trip wires and sharpened sticks to probe for mines.
Streams. When crossing a stream, select a narrow spot that offers concealment on both banks. Observe the far side carefully and place security out for early warning. Clear the far side, then cross quickly but quietly.
Wire Obstacles. Avoid crossing wire obstacles if possible, as they are normally under observation. If wire must be breached during daytime, use the method that exposes the unit for the shortest amount of time. Check the wire for mines, booby traps, and warning devices. To breach wire at night, either cross over or go under the wire using the following procedures.
To cross over the wire, grasp the first strand lightly and cautiously lift one leg over. Lower your foot slowly to the ground, feeling carefully for sure footing, then lift the other foot over the wire. Quietly release this wire and feel for the next strand. Cross it in the same way.
To go under the wire, move headfirst. Lie on your back and slide under the bottom strands, pushing forward with your heels. Carry your weapon lengthwise on your body, steadying it with either hand. To prevent the wire from catching on clothing or equipment, let it slide along the weapon. Inch along, holding the wire up with one hand. Do not jerk or pull on the wire. Feel ahead with your free hand for low strands or trip wires.
If you must cut the wire, cut only the lower strands to minimize discovery of the gap. Soldiers should work in a team if possible. Wrap the wire with a cloth near a picket, cut partway through, and then bend it back and forth until it breaks. Carefully roll the loose end back to clear the lane. Concertina is hard to control after cutting and can snap back. If you must cut it, stake down two loops far enough apart that a soldier can crawl between them. Then cut partway through and break it as previously described.
Enemy Contact at Danger Areas
If the unit makes contact in or around a danger area, the leader determines whether to assault the enemy or break contact, depending on the situation and mission. If the unit becomes disorganized, the near- and far-side rally points are used to link up and reorganize. Ideally, using movement fundamentals, the unit will see the enemy first, remain undetected, and ambush it.
SECURITY DURING MOVEMENT
Security during movement includes whatever the platoon or squads do to secure the unit or the larger force, such as the following tactics.
Terrain
When planning movements, consider how terrain affects security.
Formations and Movement Techniques
When choosing a movement formation or technique, consider the most recent situation update and the level of C2 needed for the mission. Choose the option that will provide the greatest security and is most likely to result in mission accomplishment. During individual platoon movement, place the smallest element forward. This gives the rest of the platoon freedom to maneuver.
Positioning of the Machine-Gun Teams or Weapons Squad
The maneuvering of the crew-served weapons system is key to successful light infantry tactics. The platoon leader positions his crew-served weapons such as machine guns and Javelins where they can best provide security to the platoon. METT-TC will determine the placement. He may task-organize some of the weapons to the rifle squads or keep them together under the weapons squad leader (if he has a weapons squad) and close to the command post. Keeping the weapons squad close allows the platoon leader to quickly deploy the guns into an overwatch position or to provide a base of fire against a threat.