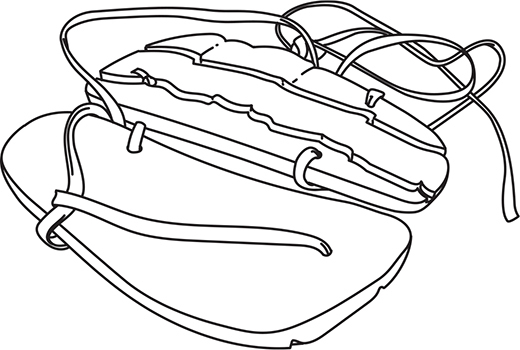
First, trace your foot on the rubber and make a mark between your big toe and second toe where the toe thong will go. Next, cut the traced soles from the rubber and punch a hole on each side just near the back of the arch of your foot. Then punch another one on your mark for the toe thong. Cut a 6' length of cord and feed it through the toe thong hole with a knot on the other end to hold it in place. Feed the working end through the outside hole, around your heel, through the other hole, around the string on the top of your foot, and then retrace the lashing to lace the sandal in place.
THIS INSOLE NEVER FELT SO GOOD
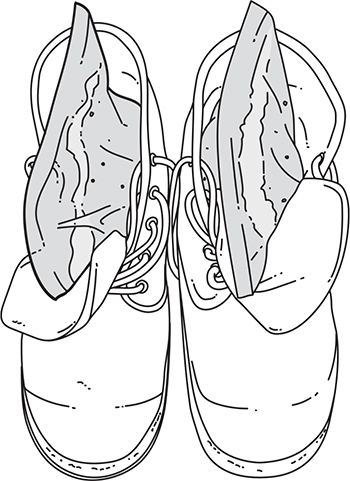
If you follow my work at all, then you already know that I love wool. It’s amazing in cold weather, and there’s nothing like a good pair of wool socks to keep your feet warm and toasty when the temperature plummets. One quick and easy footwear hack that I’ve used over the years to give me that extra edge of warmth and comfort is to custom cut my own boot insoles from wool felt. Felt is a fabric made by matting and compressing wool fibers until they become a solid piece of material. You can buy wool felt at almost any fabric store. Trace your existing shoe insoles on the felt to get the right size, cut the felt out with scissors, and insert them into your hiking boots. Not only will they add an extra layer of comfort, but the wool will also provide much-needed insulation for the bottom of your feet against the cold ground.
USE ICE TO MAKE YOUR SHOES MORE COMFORTABLE
There are many reasons why your boots can feel smaller than usual. Maybe you’ve put on weight. Maybe you’ve decided to wear thicker socks. Maybe your boots got soaked and shrank when they dried. For whatever reason, there is a quick and easy way to stretch them out a little bit. Fill resealable freezer bags about three-quarters full with water. Stuff those water bags into your boots and put them in the freezer. As the bags of water freeze they will expand and force your boot to stretch. Freezing water has the power to burst concrete; this hack is a great way to use that power to do something that is very difficult to do—stretch your boots!
DUCT TAPE SNOWSHOES
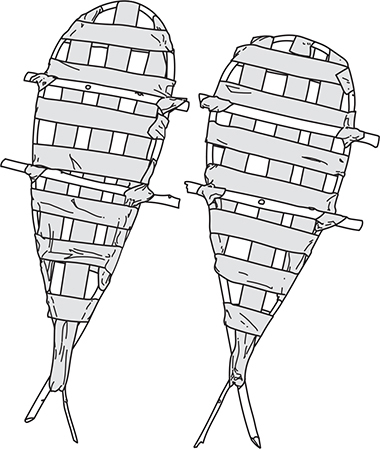
If a pair of tennis rackets aren’t handy, here is another great snowshoe hack that only takes a few minutes longer to hack into existence. Cut and bend a 1⁄2" diameter flexible green sapling into a teardrop shape, approximately 2' × 1'. Use duct tape at the intersection to hold it together. Use more of the tape to create a web-like netting that spans the width and length of the wooden frame’s interior space. This will resemble a crude wood and duct tape version of a tennis racket head. Next, duct-tape 2 braces across the top that span the distance from the ball of your foot to your heel. These should be 1" in diameter and cut from green wood. Finally, use duct tape to secure the front of your boot to the front wooden cross brace. Your heel should lift freely upward but rest securely on the rear brace when stepping down.
SOCK GAITERS
This hack isn’t as much about shoes as it is stopping things from getting inside them while you’re on the move. I rarely spend time in the woods (especially the desert) without a pair of gaiters lashed around my shins. Gaiters are a protective garment designed to keep mud, snow, thorns, sand, forest debris, and insects from getting into your boots while hiking. They also protect your shins against thorns, some kinds of snakebites, branch slaps, and moisture. Some good friends of mine went on a mission trip to Belize. While watching a video of their experience I noticed that their guides were wearing makeshift sock gaiters. They’d tucked their pant legs in their boots. Then they took the cut-off portions of the legs from thick hunting socks and pulled that up and around the ankle of their boot. Several of them even had a front section of a 2-liter bottle cut and tucked inside the gaiter for added protection.
CANOPY HACKS
TRASH BAG SHELTER
You’ve probably heard of using a trash bag as a poncho. However, not only can a trash bag be an incredible poncho, but it can serve as a surprisingly effective one-person shelter as well. As a kid I was taught to cut a head hole in the middle of the bottom of the bag and poke my arms out of 2 more holes cut at the corners. Wow, was this wrong! You only want to make a 2" cut about 1' down the fold from one of the bottom corners. When you make this cut across the fold it ends up being double that length when you open it up. This is your face hole. Pull the bag over your head and stretch the hole over your face and under your chin. Tuck your legs inside and sit against a downwind side of a big tree to get some rest.
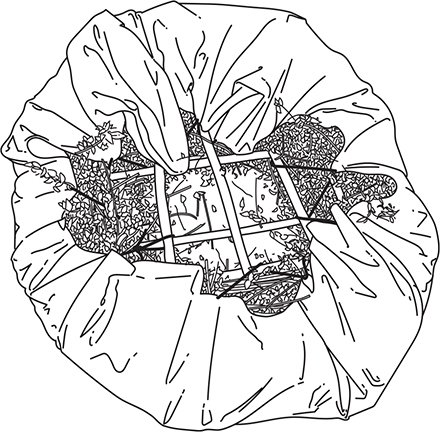
HACK TARP BOAT
This hack isn’t about making shelter but rather using a shelter tarp to make an improvised boat.
Lay your tarp flat on the ground. I used a 9' × 12' tarp.
Pile pine boughs or leafy branches in a circle about 12" high. This will be the diameter of your boat. Leave at least 1'–2' of tarp around the perimeter.
Lay a grid of sturdy sticks, 1"–2" in diameter, on top of the circle.
Pile another 12" of green boughs on top, again in a circular pattern.
Wrap the tarp around the circle and tie it to the grid of sticks.
Cross your fingers.
See the complete photo series of steps at http://willowhavenoutdoor.com/hack-tarp-boat/.
POP CAN SNOW/SAND ANCHOR
Securing tent or canopy stakes in snow or sand can be very difficult, if not impossible. You can make a very simple and easy snow/sand anchor from a flattened soda can. Start by flattening the can sideways, not from top to bottom. Next, punch a hole in the middle of the flattened can. Feed your tent guyline through the hole and place a knot on the other side to hold it secure. Finally, bury the flattened can in the sand or snow. The flat face of the buried can will act as an anchor to hold your line secure. Almost anything flat and sturdy will work, but a flattened pop can is an easy hack.
POP TAB TENSIONER
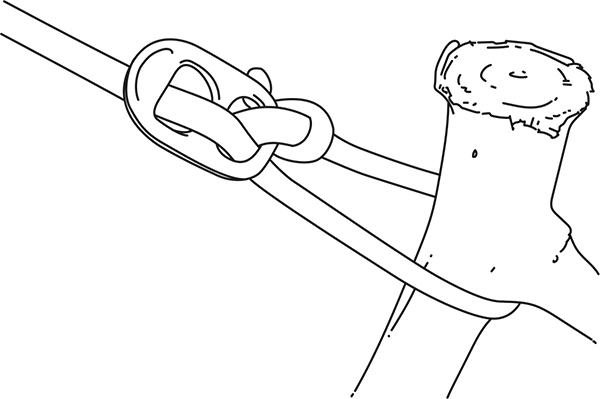
One of the first skills I teach in all of my survival courses is how to tie up an effective canopy shelter. Not only does this portion of the course involve canopy configurations, but I also teach tensioning knots such as the taut-line hitch. If the wrong tensioning knots are used, a canopy shelter can come crashing down when you least expect it. One great hack for tightening guylines is to use a plain old aluminum pop can tab. Once you remove it from the can, break off the tiny little metal ring that holds it to the can. This will expose a jagged edge that’s critical for this hack to work. Now feed your line through the tab as shown, and it can be used to tighten or loosen guylines as needed without having to fuss with knots.
TWO SIMPLE GROMMET SAVERS
Grommets on the corners of tarps are notorious for tearing out in high winds and storms. A simple hack to help prevent this from happening is to thread your guyline through the grommet and then around a small, stout stick. Tying around this stick distributes the stress on the grommet to a larger surface area and applies downward pressure on the grommet rather than a direct pull against it. A metal bottle cap also works very well as reinforcement. Punch a hole through the middle and tie a knot on the other side to hold it. This acts as a button stopper against the grommet and relieves stress on the grommet and tarp. Note: The grommets of a tightly stretched tarp are less likely to fail due to reduced wind flap.