Figure 2-9: Treadle spring snare
Figure 4 Deadfall
The figure 4 is a trigger used to drop a weight onto a prey and crush it (Figure 2-10). The type of weight used may vary, but it should be heavy enough to kill or incapacitate the prey immediately. Construct the figure 4 using three notched sticks. These notches hold the sticks together in a figure 4 pattern when under tension. Practice making this trigger beforehand; it requires close tolerances and precise angles in its construction.
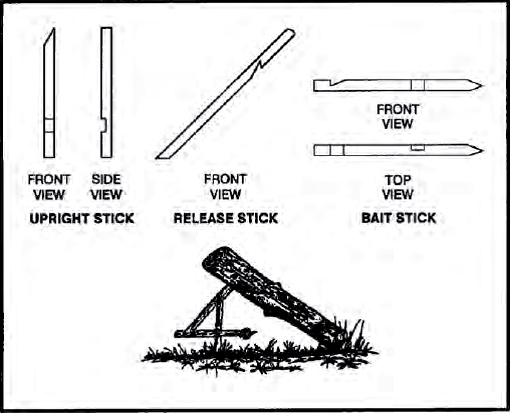
Figure 2-10: Figure 4 deadfall
Paiute Deadfall
The Paiute deadfall is similar to the figure 4 but uses a piece of cordage and a catch stick (Figure 2-11). It has the advantage of being easier to set than the figure 4. Tie one end of a piece of cordage to the lower end of the diagonal stick. Tie the other end of the cordage to another stick about 5 centimeters long. This 5-centimeter stick is the catch stick. Bring the cord halfway around the vertical stick with the catch stick at a 90-degree angle. Place the bait stick with one end against the drop weight, or a peg driven into the ground, and the other against the catch stick. When a prey disturbs the bait stick, it falls free, releasing the catch stick. As the diagonal stick flies up, the weight falls, crushing the prey.
Bow Trap
A bow trap is one of the deadliest traps. It is dangerous to man as well as animals (Figure 2-12). To construct this trap, build a bow and anchor it to the ground with pegs. Adjust the aiming point as you anchor the bow. Lash a toggle stick to the trigger stick. Two upright sticks driven into the ground hold the trigger stick in place at a point where the toggle stick will engage the pulled bow string. Place a catch stick between the toggle stick and a stake driven into the ground. Tie a tripwire or cordage to the catch stick and route it around stakes and across the game trail where you tie it off (as in Figure 2-12). When the prey trips the trip wire, the bow looses an arrow into it. A notch in the bow serves to help aim the arrow.

Figure 2-11: Paiute deadfall
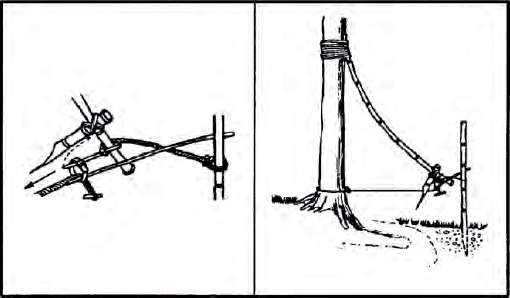
Figure 2-12: Bow trap

WARNING
This is a lethal trap. Approach it with caution and from the rear only!
Pig Spear Shaft
To construct the pig spear shaft, select a stout pole about 2.5 meters long (Figure 2-13). At the smaller end, firmly lash several small stakes. Lash the large end tightly to a tree along the game trail. Tie a length of cordage to another tree across the trail. Tie a sturdy, smooth stick to the other end of the cord. From the first tree, tie a trip wire or cord low to the ground, stretch it across the trail, and tie it to a catch stick. Make a slip ring from vines or other suitable material. Encircle the trip wire and the smooth stick with the slip ring. Emplace one end of another smooth stick within the slip ring and its other end against the second tree. Pull the smaller end of the spear shaft across the trail and position it between the short cord and the smooth stick. As the animal trips the tripwire, the catch stick pulls the slip ring off the smooth sticks, releasing the spear shaft that springs across the trail and impales the prey against the tree.
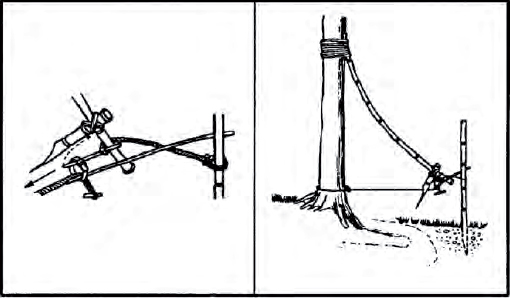
Figure 2-13: Pig spear shaft
WARNING
This is a lethal trap. Approach it with caution!
Bottle Trap
A bottle trap is a simple trap for mice and voles (Figure 2-14). Dig a hole 30 to 45 centimeters deep that is wider at the bottom than at the top. Make the top of the hole as small as possible. Place a piece of bark or wood over the hole with small stones under it to hold it up 2.5 to 5 centimeters off the ground. Mice or voles will hide under the cover to escape danger and fall into the hole. They cannot climb out because of the wall’s backward slope. Use caution when checking this trap; it is an excellent hiding place for snakes.
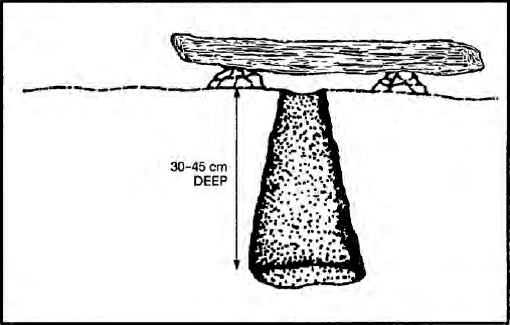
Figure 2-14: Bottle trap
KILLING DEVICES
There are several killing devices that you can construct to help you obtain small game to help you survive. The rabbit stick, the spear, the bow and arrow, and the sling are such devices.
Rabbit Stick
One of the simplest and most effective killing devices is a stout stick as long as your arm, from fingertip to shoulder, called a “rabbit stick.” You can throw it either overhand or sidearm and with considerable force. It is very effective against small game that stops and freezes as a defense.
Spear
You can make a spear to kill small game and to fish. Jab with the spear, do not throw it. See Figure 2-20.
Bow and Arrow
A good bow is the result of many hours of work. You can construct a suitable short-term bow fairly easily. When it loses its spring or breaks, you can replace it. Select a hardwood stick about one meter long that is free of knots or limbs. Carefully scrape the large end down until it has the same pull as the small end. Careful examination will show the natural curve of the stick. Always scrape from the side that faces you, or the bow will break the first time you pull it. Dead, dry wood is preferable to green wood. To increase the pull, lash a second bow to the first, front to front, forming an “X” when viewed from the side. Attach the tips of the bows with cordage and only use a bowstring on one bow.
Select arrows from the straightest dry sticks available. The arrows should be about half as long as the bow. Scrape each shaft smooth all around. You will probably have to straighten the shaft. You can bend an arrow straight by heating the shaft over hot coals. Do not allow the shaft to scorch or burn. Hold the shaft straight until it cools.
You can make arrowheads from bone, glass, metal, or pieces of rock. You can also sharpen and fire harden the end of the shaft. To fire harden wood, hold it over hot coals, being careful not to bum or scorch the wood.
You must notch the ends of the arrows for the bowstring. Cut or file the notch; do not split it. Fletching (adding feathers to the notched end of an arrow) improves the arrow’s flight characteristics, but is not necessary on a field-expedient arrow.
Sling
You can make a sling by tying two pieces of cordage, about sixty centimeters long, at opposite ends of a palm-sized piece of leather or cloth. Place a rock in the cloth and wrap one cord around the middle finger and hold in your palm. Hold the other cord between the forefinger and thumb. To throw the rock, spin the sling several times in a circle and release the cord between the thumb and forefinger. Practice to gain proficiency. The sling is very effective against small game. See Part V, Chapter 2 for more information about slings and arrows of outrageous fortune.
FISHING DEVICES
You can make your own fishhooks, nets and traps and use several methods to obtain fish in a survival situation.
Improvised Fishhooks
You can make field-expedient fishhooks from pins, needles, wire, small nails, or any piece of metal. You can also use wood, bone, coconut shell, thorns, flint, seashell, or tortoise shell. You can also make fish hooks from any combination of these items (Figure 2-15).
To make a wooden hook, cut a piece of hardwood about 2.5 centimeters long and about 6 millimeters in diameter to form the shank. Cut a notch in one end in which to place the point. Place the point (piece of bone, wire, nail) in the notch. Hold the point in the notch and tie securely so that it does not move out of position. This is a fairly large hook. To make smaller hooks, use smaller material.