First of all here is a list of natural features you want to take into account when selecting your stronghold:
And it is also much harder work skirmishing to the attack up a hill. Not surprisingly this is why castles are mostly on hills. Being on a hill or at least raised ground also lessens the chances of being flooded by a downpour. Not fatal but unpleasant enough.
You may also want a route out of the base which is sheltered from fire to escape if this becomes necessary. Weigh this against the possibility of offering cover to approaching enemy forces.
Spreading the risk
We have already seen that the shorter your perimeter the more concentrated your fire can be at all points along it.
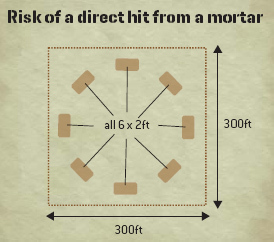
What is not quite so obvious is the advantage of spreading your forces over an area. Someone shelling the position in the example to the right with mortar fire from a safe – for them – distance away has a beaten zone – the area where his bombs are going to fall – of roughly 300ft x 300ft = 90,000 square feet. A bomb would actually have to land in your trench to do you harm and your trench is 6ft by 2ft = 12 square feet.
So the maths say there is only 1 chance in 7,500 of any individual bomb landing in your trench. That is better odds than the guy firing the mortar has. It’s better odds than crossing the highway safely in some towns.
Killing ground
All around your position you want a clear area of as large as possible. 100 yards minimum by choice. 300 yards is better. The two reasons for this are:
If there have to be any ditches or hollows in the killing ground which you cannot see into, and which therefore may give cover to an attacker, fill them with mines and razor wire. Zero-in mortars, artillery and fixed-line machine-gun fire if you are a larger unit.
Laying out the position
Once the site of the position is selected one person should be authorized to mark out all the defensive fire positions. A circle gives the shortest perimeter for the greatest area covered. Normally two men to a foxhole is good as single foxholes can get lonely. Also, if one man is killed its whole arc of fire is not left undefended.
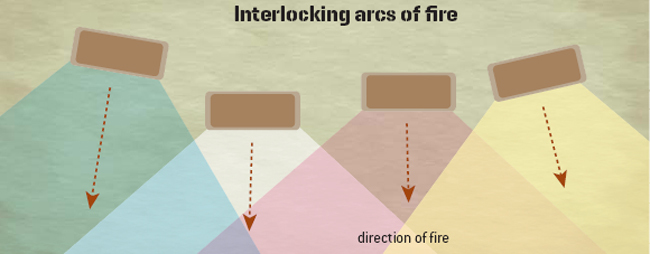
Arcs of fire are allocated to each position and these arcs should not only interlock but should still interlock when one position is taken out of the scheme.
An ‘arc of fire’ is the angle of responsibility given to any man or group to cover and defend. In the diagram below it can be seen that not only is the position unapproachable without coming under fire but it will remain so even if any of the foxholes are silenced.
Machine guns should be sited at points of particular danger – such as where the enemy can get closest to the position without being seen or fired upon. Snipers should be positioned where they can see the furthest or are otherwise of most use.
As I said earlier, if you are going to be staying in a position for some time it can be a good idea to dig communicating trenches between the fire positions so as to allow reinforcements to be moved around without exposure to fire. With a larger unit you might want to consider building a command post and centralizing food, water and ammunition supplies. There might also be room to establish a first-aid post – medics are always good for morale.
Wire
Military barbed-wire is like the stuff farmers use but the spines are longer and closer together. Razor-wire is a central strand like barb-wire but with blades like old fashioned razor-blades in place of the spines. If you are in a hurry to cross a wired-up defence you can tolerate rolling over barbed wire but razor wire is much less fun. Both types come in coils which are opened out into loose spirals when in position.
Wire doesn’t stop soldiers it merely slows them down so you have more time to shoot them. Attackers tend to get caught up in wire and have to disentangle themselves. It is best set loosely in coils and tangles because this way it is harder to clear a path through it and, when entangled, harder to get free. Wire should always be covered by fire. Preferably machine-gun fire. And a few mines are no bad thing either. There is no point slowing down his advance if the enemy can safely take his time.
Landmines
Landmines – particularly anti-personnel mines – are pretty unpleasant things: but no one said it was going to be all fun and games in the army. Use landmines to make the enemy reluctant to approach your position if you are staying for long enough to justify the effort. When an attacker treads on one of your mines it will seriously undermine the morale of his comrades as he will likely lay around screaming for hours. Or until you shoot him as all defensive minefields should be covered by fire.
Booby traps
It is often a good idea to set booby traps such as trip wires attached to flares or Claymore Mines in places like gulleys where the enemy are likely to approach your position. By careful use of this technique you will often catch the reconnaissance party coming to have a look at your position. My own preference is to arm the traps last thing at night and disarm them first thing in the morning detailing the clearing patrol for this duty.
Response to harassing fire
When you are properly dug in your main irritant will be harassing fire from mortars and the odd RPG lobbed inside your position. There are a number of things you can do about this besides making sure you are in a nice safe hole.
The low-tech answer is to watch out with night sights and spot where they are shooting from. A mortar or RPG is not hard to spot at night if they are within visual range – and an RPG has to be to have a hope of hitting you. A mortar will probably be in sight unless they are well set up and you can certainly see the flash easily enough at night.