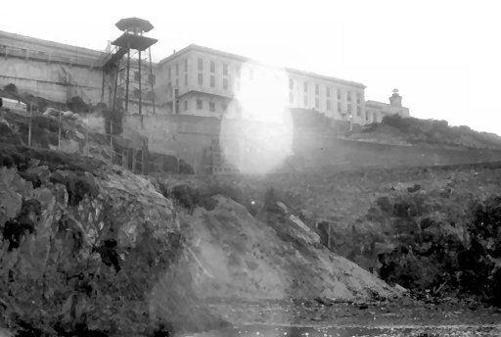
The area where the escapees entered the water, known today as Barker’s Beach.
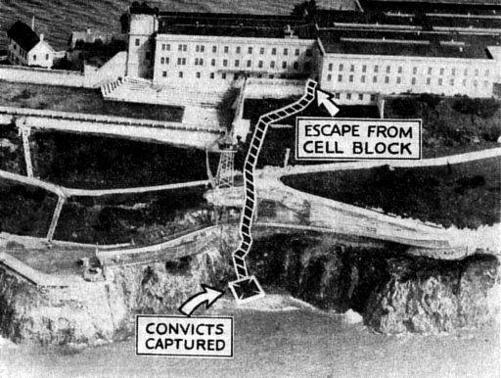
The off-duty correctional staff poured into the Armory to get weapons, and then started to search the island in groups. The launch McDowell was sent out to begin searching the shorelines through the dense fog. It was well known among the staff that the inmates would try to take hostages in their desperation to attain freedom, and officers were sent to search every conceivable hiding spot around the living quarters, including the Warden’s basement. As the officers walked quietly along the roadway, one of them heard voices coming from a remote cove below, but was unable to see anything because of the fog. Finally, the road tower guard shined the powerful searchlight into the cove, and followed two figures running for the water. One officer observing from the roadway yelled at the inmates to halt, and fired several warning shots ahead of them. The two men hit the water, and the officers, now able to target the inmates, opened fire with a shower of machine gun and rifle bullets raining into the cove.
The first men to be captured were Young and McCain, who were stripped of their clothing, and stood chattering and cold from exposure. The two inmates were brought up to the visitor’s area of the administration building and given blankets until they could be escorted to the prison hospital. The cove proved to be too dangerous for the McDowell, so two officers took a small rowing boat into the shallow water, and pulled the wounded inmates Stamphill and Barker into the craft. Stamphill was lethargic and had suffered serious gunshot wounds to his lower extremities. He was hit twice, with one bullet through his left leg just above the knee, the wound bleeding profusely from a severed artery; and the second to his right leg near the ankle. When he was carried to the Alcatraz Hospital, he was in critical condition. Barker was pulled into the boat and was also found to be critically injured. He had suffered gunshot wounds to the head and thigh, and he had an obvious fracture in his left leg that most likely resulted from a stray bullet. Ty Martin was found standing almost completely naked, wearing only a pair of water soaked socks, bleeding from several cuts and bruises and nearly frozen from exposure. Warden Johnston later wrote that when Miller shined the light onto him, Ty started yelling, “I give up, I give up.” Martin was also taken to the hospital for an examination.
McCain and Young were found to be uninjured and both were immediately sent to solitary confinement in A Block. Martin was also treated and released back into solitary confinement. Barker was semi-conscious when he arrived at the hospital, and complained that he was in severe pain. Warden Johnston stated that they tried to get a formal statement from Barker His last words were documented in a formal report by Junior Officer George Hoag, who assisted in the Operation Room. Hoag wrote in his report and recorded Barker’s final words:
While in the hospital, after Stamphill and Barker were laying on the operating tables, at approximately 5:25 A.M. Barker started to roll and twist, you directed me to hold him from falling off the table, I stepped to table and held him, while doing so, Mr. Pepper, being on the opposite side of the inmate, Barker spoke to me, saying, "I'm crazy as hell, I should have never tried it.
In a memorandum to the Warden dated January 14, 1939, Dr. Romney Ritchey described Barker’s condition:
Re: Barker, Arthur, 268-AZ
This will inform you that the above captioned Inmate, who came to the Hospital yesterday morning with injuries mentioned in a previous memorandum, showed a gradual lost of strength during the day and died at 5:40 P.M. last night.
When first brought in he was greatly confused but partly conscious and complained of pain in the left leg which was broken, and of being cold. Later on during the morning he was restless in bed and would rally to look around him but made no statement or gave any indication that he understood the situation more than to realize at time his own precarious physical condition. Everything possible was done to improve his condition and Dr. E. M. Townsend of the U.S. Marine Hospital was called in consultation. During the afternoon he became more restless and confused and was constantly rolling about in bed. His circulation became weaker more rapidly during the afternoon and his breathing more labored and it was realized that he probably would not survive the night. A Spinal Puncture revealed a large amount of blood in the cranial cavity resulting from a skull fracture. His condition showed little change after 3:00 P.M. until 5:30 P.M. when he became rapidly worse and in spite of stimulants died at 5:40 P.M.
Cause of Death: Fracture of Skull
Doc Barker’s father could not afford to have his son brought back to Oklahoma. Warden Johnston arranged for a small formal service and burial in Colma, California, where ironically several other celebrity crime figures have been laid to rest, including the famous old-west lawman Wyatt Earp. Services for Barker were held on January 17 that the Lasswell Funeral Parlor, and he was laid to rest in a pauper’s grave in the Mount Olivet Cemetery late that afternoon. Protestant Chaplain Wayne Hunter wrote a memo to Johnston stating that the only people in attendance were a prison clerk, two men from the funeral parlor, the manager of the cemetery, and four other cemetery employees.
The only unusual occurrence reported was that when Barker’s casket was being prepared to be driven to the cemetery, a drunk staggered into the funeral parlor and yelled out only one word, “Barker.” When asked what he wanted, he turned around and walked out.
Doc’s grave was marked only with his Alcatraz inmate number, #268.
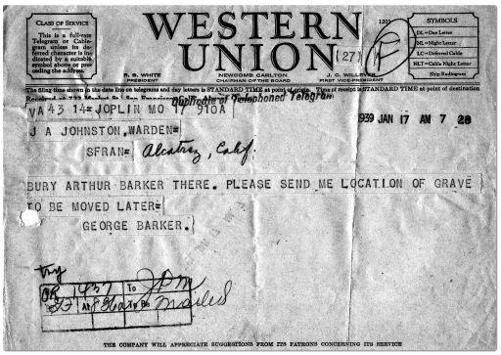
A telegram from Barker’s father asking that his son be buried in San Francisco.
Stamphill’s wounds proved serious but not fatal and he would remain in the hospital until April 8, 1939. He was subsequently transferred to isolation, and was kept there until August 3, 1940, when he was released back into the general prison population. The experience of the escape attempt seemed to have changed Stamphill; from then on he would maintain a fairly clear conduct record and he held several jobs in various departments at Alcatraz. Stamphill was approved for transfer to Leavenworth in 1950, and he remained there until his parole in 1956. Once paroled, Stamphill started a small tax preparation and business accounting firm, which kept him out of trouble for nearly ten years. He married, but soon after started having personal and business problems that ultimately led to severe debt, and he eventually would violate his parole following another burglary. He was returned to Leavenworth and released several years later. He died in September of 1998 in Kansas City following complications from a stroke.
A coroner’s inquest conducted by Coroner... B.W. Leland following the death of Doc Barker resulted in a deluge of negative press about the security practices at Alcatraz. Associate Warden Edward J. Miller appeared as the sole witness in the inquest. Miller admitted that the officers on duty could have been asleep during the escape and that they were “definitely not alert. ” However he did make it clear that the officers were required to call the Armory every half hour, which made it seem very unlikely that they were taking a nap during the time period when the inmates had escaped from D Block. Miller testified that no saws had been found, and no trace of filings or any material which might have been used to conceal the progress of work on the iron bars. The instrument that had been used to force the “tool-proof” outside bars was likewise never found. The jury findings of the inquest stated the following: